Free original lessons
Angel Drawing Easy: Wings, Robe, and Halo Step by Step
Learn to draw a simple angel with wings, robe, and halo using clear proportion guides, construction steps, and checkable practice tasks.
Free lesson
Four exercises
Worked answers
Object Drawing Lessons
This guide teaches a straightforward way to draw an angel figure with wings, a robe, and a halo. You will build the figure from simple shapes, place the wings and halo using measured proportions, and refine the robe with a consistent line convention. All measurements are hypothetical examples you can adjust to your paper size. The approach favors clear construction over perfect symmetry, so small variations are acceptable as long as the overall proportions and placement remain coherent.
Practice materials: Printable downloads are not available for this lesson yet. Use the instructions and four exercises below.
Reference illustration
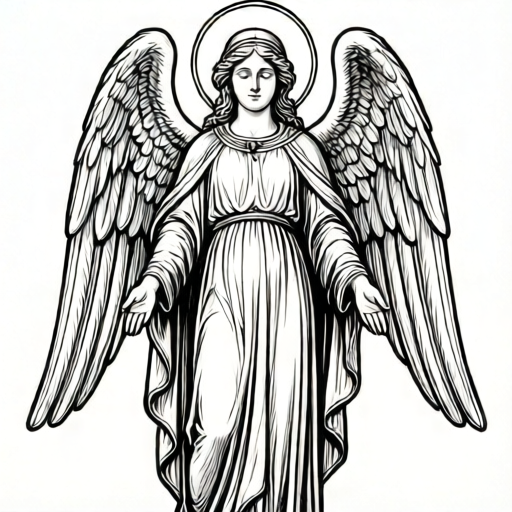
Use the stated measurements and conventions for each exercise.
Setting Up Proportions and Placement
Begin by deciding the total height of the angel on your page. For this guide, assume a figure height of 12 units from the top of the head to the bottom of the robe. Mark a light vertical center line. Place the top of the head at unit 0.5 and the bottom hem at unit 12. This gives you a simple ruler for every later step.
Divide the height into three equal bands of 4 units each: head and shoulders (0 to 4), torso and arms (4 to 8), and robe and feet (8 to 12). The halo will sit above the head, the wings will attach behind the shoulders, and the robe will widen toward the hem. Keep all guide lines light so they can be erased or absorbed into the final drawing.
- Draw a vertical center line and mark 0 at the top and 12 at the bottom.
- Mark band boundaries at 4 and 8 units.
- Draw a light oval for the head centered on the line between 0.5 and 3.5 units.
- Mark shoulder points about 2 units to each side of the center line at the 4-unit mark.
Constructing the Head, Halo, and Shoulders
The head is an oval about 3 units tall and 2 units wide, centered on the vertical line. The halo is a ring drawn above the head. For this example, place the halo center at 1.5 units on the center line, with an outer diameter of 3 units and an inner diameter of 2 units. These numbers are hypothetical; measure your own page and choose values that fit. The head oval runs from 0.5 units (head top) to 3.5 units (head bottom). With the halo outer radius at 1.5 units, the halo's bottom edge sits at 1.5 minus 1.5 equals 0.0 units, so the ring is fully above the head. The gap between the halo's bottom edge at 0.0 units and the head top at 0.5 units is 0.5 units. If you prefer a larger gap, raise the halo center or shrink the ring, keeping the ring clear of the head.
Shoulders sit at the 4-unit mark. Draw a gentle curve from the left shoulder to the right shoulder, passing behind the neck. The neck is a short rectangle about 1 unit wide and 0.5 units tall connecting the head bottom at 3.5 units to the shoulders at 4.0 units. Keep the halo ring separate from the head so the figure reads clearly.
- Draw the head oval from 0.5 to 3.5 units on the center line.
- Draw the halo as two concentric circles centered at 1.5 units on the center line.
- Draw the neck rectangle from 3.5 to 4.0 units.
- Draw the shoulder curve at the 4-unit mark, about 4 units wide total.
Building the Robe and Arms
The robe begins at the shoulders and widens to the hem. At the 4-unit mark, the robe width is about 4 units. At the 8-unit mark, widen it to about 6 units. At the 12-unit mark, widen it to about 8 units. Connect these widths with smooth side lines. The hem is a gentle curve, not a straight line, to suggest fabric.
Arms can be simple sleeves. Draw a sleeve from each shoulder down to about the 7-unit mark, angling slightly outward. Hands are optional; if included, use small oval shapes at the sleeve ends. Keep the robe folds as a few long, light lines rather than many short strokes.
- Mark robe widths of 4, 6, and 8 units at the 4, 8, and 12 unit marks.
- Connect the width marks with smooth side lines.
- Draw a curved hem at the 12-unit mark.
- Add sleeves from the shoulders to about the 7-unit mark.
Adding Wings and Refining the Figure
Wings attach behind the shoulders. For a simple pair, draw each wing as a rounded triangular shape that rises above the shoulder line and tapers toward the hem. A workable example: the wing root is at the 4-unit mark, the wing tip reaches 2 units above the shoulder, and the lower edge ends near the 9-unit mark. Mirror the left and right wings loosely; exact symmetry is not required.
Refine the drawing by darkening the final outline and erasing construction lines. Use a consistent line convention: outline lines are firm, fold lines are lighter, and guide lines are removed. Check that the halo is clear of the head, the wings read as separate from the robe, and the robe widens steadily from shoulders to hem.
- Draw the left wing from the shoulder root upward and outward.
- Draw the right wing with similar but not identical curves.
- Darken the final outline and erase guide lines.
- Add a few light fold lines on the robe.
Worked example
Using a 12-unit figure height, place the head, halo, shoulders, and robe width marks. State the unit positions and widths, then describe one check.
Worked answer
Head oval from 0.5 to 3.5 units on the center line. Halo center at 1.5 units on the center line, outer diameter 3 units, inner diameter 2 units. Shoulders at the 4-unit mark, about 4 units wide. Robe widths: 4 units at the 4-unit mark, 6 units at the 8-unit mark, 8 units at the 12-unit mark. Check: the robe width increases by 2 units at each checkpoint, and the halo's bottom edge sits at 0.0 units, leaving a 0.5-unit gap between the halo's bottom edge and the head top at 0.5 units.
Why: The positions follow the three-band division of the 12-unit height. The halo is separated from the head to keep the silhouette clear. The robe widths increase steadily so the figure reads as a widening robe rather than a block.
Check: Measure the gap between the halo's bottom edge (1.5 minus 1.5 equals 0.0 units) and the head top (0.5 units); the gap is 0.5 units, so the ring clears the head with a visible gap. Measure the three robe widths; they should be 4, 6, and 8 units in this example.
Four practice exercises
Exercise 1
A figure is 12 units tall. The head oval runs from 0.5 to 3.5 units. Where is the head center, and how tall is the head?
Show answer and check
Head center is at 2 units; head height is 3 units.
Why: The midpoint of 0.5 and 3.5 is 2. The difference 3.5 minus 0.5 is 3.
Check: Add the half-height to the bottom: 0.5 plus 1.5 equals 2. Subtract the top from the bottom: 3.5 minus 0.5 equals 3.
Exercise 2
Robe widths are 4 units at the 4-unit mark, 6 units at the 8-unit mark, and 8 units at the 12-unit mark. What is the total increase from shoulders to hem, and what is the increase per band?
Show answer and check
Total increase is 4 units; increase per band is 2 units.
Why: From 4 to 8 units is one band and from 8 to 12 is another. Each band adds 2 units of width, so the total is 4 units.
Check: Subtract the shoulder width from the hem width: 8 minus 4 equals 4 units total increase. Divide by 2 bands: 4 divided by 2 equals 2 units per band.
Exercise 3
A halo has an outer diameter of 3 units and an inner diameter of 2 units. What is the ring thickness, and what is the outer radius?
Show answer and check
Ring thickness is 0.5 units; outer radius is 1.5 units.
Why: Ring thickness is half the difference between outer and inner diameters: (3 minus 2) divided by 2 equals 0.5. Outer radius is half the outer diameter: 3 divided by 2 equals 1.5.
Check: Double the ring thickness and add the inner diameter: 1 plus 2 equals 3, matching the outer diameter.
Exercise 4
A wing root is at the 4-unit mark, the wing tip is 2 units above the shoulder, and the lower edge ends at the 9-unit mark. How tall is the wing from root to tip, and how far below the root does the lower edge end?
Show answer and check
Wing rises 2 units above the root; lower edge ends 5 units below the root.
Why: The tip is 2 units above the 4-unit root, so the rise is 2 units. The lower edge at 9 units is 9 minus 4 equals 5 units below the root.
Check: Add the rise to the root: 4 plus 2 equals 6 for the tip. Subtract the root from the lower edge: 9 minus 4 equals 5.
Common mistakes
- Making the halo touch or overlap the head. Leave a small gap between the head top and the halo ring, and redraw the halo centered above the head.
- Widening the robe too abruptly near the hem. Use the 4, 6, and 8 unit width marks as checkpoints and connect them with smooth lines.
- Drawing wings that look like they grow from the front of the robe. Attach the wing roots behind the shoulder curve and let the robe overlap the lower wing edges slightly.
- Using many short, scratchy lines for the outline. Redraw the final outline with fewer, longer strokes and keep fold lines lighter than the outline.
Self-check rubric
- Figure height is marked and divided into three bands.
- Head oval is centered on the vertical line and sits within the top band.
- Halo is a ring above the head with a visible gap.
- Shoulders are placed at the band boundary and the robe widens steadily.
- Wings attach behind the shoulders and remain distinct from the robe.
- Outline lines are firmer than fold lines, and guide lines are removed or absorbed.
- Valid alternatives are accepted if proportions and placement remain coherent.
Questions and answers
Do I need to use the exact unit values in this guide?
No. The 12-unit height and the widths are hypothetical examples. Measure your paper and choose values that fit, keeping the same relative proportions.
Can the wings be different sizes?
Yes. Slight differences are acceptable. Check that both wings attach behind the shoulders and that neither hides the halo.
How do I know if my robe proportions are reasonable?
Compare the robe width at the shoulders, mid-robe, and hem. A steady increase from about 4 to 6 to 8 units is one checkable pattern.
What line style should I use?
Use firm lines for the outline, lighter lines for folds, and remove guide lines. Consistency matters more than a single correct style.