Free original lessons
Draw an Angry Eye: Narrowed Lid, Brow Tension, and Glare
Learn to draw an angry eye by narrowing the lid, lowering the brow, and placing a glare highlight. Includes a convention, rubric, and four practice tasks.
Free lesson
Four exercises
Worked answers
Object Drawing Lessons
Anger in an eye comes from shape tension, not from shading. This lesson defines a simple drawing convention: a horizontal eye reference line is a reference line, the upper lid is a line from the inner corner to the outer corner, and the lower lid is a line from the outer corner back to the inner corner. The iris is a circle centered between those corners. upper-lid rise means the vertical distance from the eye reference line to the upper lid peak, the highest point of the upper lid line. You will narrow that upper-lid rise, lower the brow toward the inner corner, and place the pupil and a small glare highlight to create a focused glare. Eye shapes vary, so the rubric rewards clear tension and consistent choices rather than one universal drawing.
Practice materials: Printable downloads are not available for this lesson yet. Use the instructions and four exercises below.
Reference illustration
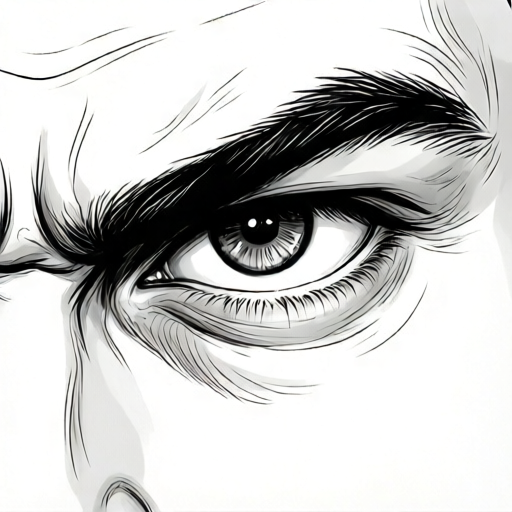
Use the stated measurements and conventions for each exercise.
Set the neutral eye reference line
Draw a horizontal eye reference line about 6 cm long. Mark the inner corner at the left end and the outer corner at the right end. Draw a curved upper lid from inner to outer corner, peaking about 2 cm above the eye reference line at the midpoint. Draw a lower lid from outer back to inner corner, dipping about 1 cm below the eye reference line at the midpoint. The upper-lid rise is measured from the eye reference line to the upper lid peak, so this neutral eye has an upper-lid rise of about 2 cm. Place a circle for the iris centered at the midpoint, with a diameter about 1.6 cm, so its radius is about 0.8 cm. Because the lower lid dips 1 cm below the eye reference line, the iris bottom sits about 0.2 cm above the lower lid at the midpoint. Add a pupil circle about 0.7 cm wide inside the iris. These numbers are hypothetical examples; measure your own paper and adjust.
Keep the corners fixed. In the angry variant, the inner corner stays at the same point, but the upper lid line becomes straighter and lower. The outer corner may rise slightly. The lower lid stays nearly flat. This contrast between a lowered upper lid and a steady lower lid is what reads as a narrowed, tense eye. Because upper-lid rise is measured from the eye reference line to the upper lid peak, the lower lid dip does not change the upper-lid rise.
- Mark a 6 cm eye reference line and label the left end inner corner and the right end outer corner.
- Draw the neutral upper lid peaking 2 cm above the eye reference line at the midpoint.
- Draw the neutral lower lid dipping about 1 cm below the eye reference line.
- Place the iris circle centered at the midpoint and the pupil inside it.
- Label the eye reference line-to-upper-lid-peak distance as the neutral upper-lid rise.
Narrow the lid and lower the brow
Lower the brow line toward the inner corner. Draw a brow stroke that begins about 1.5 cm above the inner corner and slopes up to about 2 cm above the outer corner. This upward slope toward the outer side means the brow is lower at the inner side than at the outer side, creating brow tension. Keep the brow stroke separate from the lid line so the eye shape remains readable.
Keep the brow stroke above the upper lid at every point. The gap between brow and lid should stay positive, and the brow should be lower at the inner side than at the outer side. If the brow crosses the lid or rises toward the inner corner, the expression reads as worry or surprise rather than anger.
- Reuse the same inner and outer corner points.
- Draw the angry upper lid with a highest point about 1.2 cm above the eye reference line.
- Keep the lower lid dip to about 0.8 cm below the eye reference line, so the iris bottom sits at the lower lid.
- Draw a brow stroke starting about 1.5 cm above the inner corner and ending about 2 cm above the outer corner.
- Check that the brow is lower at the inner side than at the outer side.
Place the pupil and glare highlight
Move the iris slightly toward the inner corner to suggest a focused glare. Keep the iris circle the same size as in the neutral drawing, about 1.6 cm wide, and center it about 0.5 cm inward from the midpoint. Place the pupil inside the iris, about 0.7 cm wide, and shift it toward the inner corner by about 0.2 cm. The pupil should not touch the iris edge.
Add one small glare highlight as a white circle about 0.3 cm wide near the upper edge of the pupil on the side facing the outer corner. A second tiny highlight is optional but must stay smaller than the first. The glare should sit inside the iris, not on the lid. This highlight gives the eye a hard, focused look without realistic shading.
- Shift the iris center 0.5 cm toward the inner corner.
- Keep the iris diameter about 1.6 cm and the pupil about 0.7 cm.
- Shift the pupil 0.2 cm toward the inner corner without touching the iris edge.
- Draw a 0.3 cm glare circle near the upper pupil edge on the outer side.
- Confirm the glare is inside the iris and smaller than the pupil.
Compare and refine using the convention
Place the neutral and angry drawings side by side. Measure the upper-lid rise of each from eye reference line to upper lid peak. The angry upper-lid rise should be visibly smaller, for example 1.2 cm versus 2 cm. Check that the inner corner did not move and that the brow is lower at the inner side than at the outer side. If the eye looks surprised rather than angry, lower the upper lid further or lower the brow at the inner side to increase the downward slope toward the inner corner, keeping the brow above the lid and lower at the inner side than at the outer side.
Valid alternatives include a sharper outer corner, a thicker brow stroke, or a slightly different iris size, as long as the narrowed lid, lowered brow, and glare placement remain clear. The rubric rewards consistent tension cues, not a single exact shape.
- Measure both upper-lid rises and record the difference.
- Verify the inner corner position is unchanged.
- Check the brow is lower at the inner side than at the outer side.
- Adjust lid height or brow slope if the expression reads as surprise.
- Record any valid alternative choices you made.
Worked example
A student draws a neutral eye with a 6 cm eye reference line, an upper lid peak 2 cm above the eye reference line, and a lower lid dip 0.5 cm below. They want an angry version with the same corners. Describe the measurements and placement they should use.
Worked answer
Keep the inner and outer corners at the same points. Draw the angry upper lid with a highest point about 1.2 cm above the eye reference line, and keep the lower lid dip at about 0.8 cm below the eye reference line, so the iris bottom sits at the lower lid. This gives an angry upper-lid rise of about 1.2 cm compared with the neutral 2 cm, a 40 percent reduction. Draw the brow from about 1.5 cm above the inner corner up to about 2 cm above the outer corner, so the brow is lower at the inner side and stays above the lid. Shift the iris center 0.5 cm toward the inner corner, keep the iris about 1.6 cm wide, shift the pupil 0.2 cm inward, and add a 0.3 cm glare circle near the upper pupil edge on the outer side.
Four practice exercises
Exercise 1
A neutral eye has an eye reference line of 8 cm and an upper lid peak 3 cm above the eye reference line. The lesson's 40 percent reduction rule is applied to the upper-lid rise, which is measured from the eye reference line to the upper lid peak. Calculate the angry upper-lid rise, then the angry upper lid peak. The lower lid dip is below the eye reference line and does not affect this calculation.
Show answer and check
Neutral upper-lid rise: 3 cm. Angry upper-lid rise: 0.6 times 3 equals 1.8 cm. Angry upper lid peak: 1.8 cm above the eye reference line.
Why: The 40 percent reduction is defined on the upper-lid rise, so multiply the neutral upper-lid rise by 0.6 to get 1.8 cm. Because upper-lid rise is measured from the eye reference line to the upper lid peak, the angry peak is 1.8 cm above the eye reference line. The lower lid dip is below the eye reference line and is not added.
Check: Verify that 0.6 times 3 equals 1.8. Confirm the reduction: 3 minus 1.8 equals 1.2 cm, and 1.2 divided by 3 equals 0.4, or 40 percent.
Exercise 2
Assume this is a flawed student drawing. An angry eye drawing has a brow stroke starting 2 cm above the inner corner and ending 1 cm above the outer corner. The upper lid at the inner side is 1.2 cm above the eye reference line and at the outer side is 1.5 cm above the eye reference line. Calculate the brow-to-lid gap at each side and state whether the brow tension reads correctly.
Show answer and check
Inner gap: 2 minus 1.2 equals 0.8 cm. Outer gap: 1 minus 1.5 equals negative 0.5 cm, meaning the brow is below the lid at the outer side. The brow tension does not read correctly for two reasons. First, the convention requires the brow to be lower at the inner corner than at the outer corner, but here the brow is higher at the inner side (2 cm) than at the outer side (1 cm). Second, the negative outer gap means the brow crosses below the upper lid at the outer side; the brow must remain above the lid.
Why: Brow tension requires the brow to remain above the upper lid and to be lower at the inner corner than at the outer corner. Here the brow is higher at the inner side (2 cm) than at the outer side (1 cm), violating the convention, and the negative outer gap means the brow crosses the lid.
Check: Confirm both gaps are positive and that the brow height above the inner corner is less than the brow height above the outer corner. Adjust the inner brow height downward and/or the outer brow height upward until both conditions hold.
Exercise 3
A student places an iris 2 cm wide centered 1 cm toward the inner corner from the midpoint. The pupil is 1 cm wide and shifted 0.5 cm toward the inner corner. The glare circle is 0.4 cm wide and placed on the upper lid. Identify three errors (one placement, one sizing, one placement or sizing) and give corrected values using the lesson convention.
Show answer and check
Error one: the glare is on the lid instead of inside the iris. Corrected: place the glare inside the iris near the upper pupil edge. Error two: the iris and pupil are oversized relative to the convention (2 cm iris and 1 cm pupil vs 1.6 cm and 0.7 cm). Corrected: use an iris about 1.6 cm wide and a pupil about 0.7 cm wide. Error three: the pupil shift plus pupil radius reaches the iris edge. Iris radius is 1 cm, pupil radius is 0.5 cm, and shift is 0.5 cm, so 0.5 plus 0.5 equals 1.0 cm, exactly at the edge. Corrected: shift the pupil about 0.2 cm toward the inner corner so it stays fully inside the iris.
Why: The convention keeps the pupil fully inside the iris and places the glare inside the iris. A pupil radius of 0.5 cm shifted 0.5 cm from the iris center reaches the iris radius of 1 cm, so the pupil touches the edge. The example ratio also keeps the pupil smaller relative to the iris.
Check: Check that the pupil diameter is less than the iris diameter and that shift plus pupil radius is less than the iris radius. Confirm the glare circle is inside the iris and smaller than the pupil.
Exercise 4
A neutral eye has an upper-lid rise of 4 cm. An angry version has an upper lid peak 2.4 cm above the eye reference line. Calculate the angry upper-lid rise and the percentage reduction from the neutral upper-lid rise. Then state one change that would make the eye read as more angry.
Show answer and check
Angry upper-lid rise: 2.4 cm. Reduction: 4 minus 2.4 equals 1.6 cm, and 1.6 divided by 4 equals 0.4, or 40 percent. To read as more angry, lower the upper lid peak further, for example to 2 cm, which would give an upper-lid rise of 2 cm and a 50 percent reduction.
Why: The upper-lid rise is the eye reference line-to-upper-lid-peak distance, so it equals the upper lid peak above the eye reference line. A 40 percent reduction matches the lesson example; lowering the lid further increases the tension cue.
Check: Recalculate 4 minus 2.4 equals 1.6, and 1.6 divided by 4 equals 0.4. Confirm the new example gives 4 minus 2 equals 2, and 2 divided by 4 equals 0.5, or 50 percent.
Common mistakes
- Raising the upper lid instead of lowering it, which creates surprise rather than anger. Lower the highest point of the upper lid to about 1.2 cm above the eye reference line and keep the lower lid nearly flat.
- Moving the inner corner inward or outward, which changes the eye shape and weakens the comparison. Keep the inner and outer corner points fixed between the neutral and angry versions.
- Placing the glare highlight on the lid or outside the iris. Draw the glare as a small circle inside the iris near the upper pupil edge.
- Making the brow slope upward toward the inner corner, which reads as worry. Make the brow lower at the inner corner than at the outer corner so the brow slopes downward toward the inner side.
Self-check rubric
- The inner and outer corner points are unchanged from the neutral reference.
- The angry upper-lid rise is visibly smaller than the neutral upper-lid rise, with a recorded measurement.
- The upper lid is lowered and the lower lid remains nearly flat.
- The brow is lower at the inner corner than at the outer corner, creating a downward inner slope.
- The iris and pupil are shifted toward the inner corner without touching the iris edge.
- A glare highlight is placed inside the iris near the upper pupil edge.
- Valid alternative choices are consistent and do not obscure the anger cues.
Questions and answers
How narrow should the angry eye be?
Use the neutral upper-lid rise as a reference and reduce it by roughly 40 percent. For example, if the neutral upper-lid rise is 2 cm, aim for about 1.2 cm. Measure your own drawing rather than copying a fixed number.
Where should the pupil sit for a glare?
Shift the iris and pupil slightly toward the inner corner, about 0.5 cm and 0.2 cm respectively in the example. Keep the pupil inside the iris and do not let it touch the edge.
Can I use a different eye shape?
Yes. The convention fixes the corner points and the upper-lid rise measurement, but the curve of the lids and the brow thickness can vary. The rubric checks that the narrowed lid, lowered brow, and glare are clear.
Do I need shading to show anger?
No. This lesson uses line and placement only. Shading is excluded so the shape tension remains the focus.