Free original lessons
Draw an Explosion Burst: Radiating Shock Lines and Debris
Learn to draw a clear explosion effect using a burst shape, radiating shock lines, and scattered debris zones with a simple convention and checkable steps.
Free lesson
Four exercises
Worked answers
Object Drawing Lessons
This lesson teaches a repeatable way to draw an explosion burst effect. You will build a central burst shape, add radiating shock lines that follow a consistent direction convention, and scatter debris in defined zones. The goal is a readable, energetic graphic, not a realistic pyrotechnic event. All measurements are hypothetical examples; measure your own paper and tools. Use any pencil or pen and a straightedge or ruler. The convention: shock lines radiate outward from the burst center, and their length decreases with distance from the center to suggest fading energy. Debris is drawn as small marks whose size and density decrease outward. You may vary line weight, dash pattern, and debris shapes as long as the radiating structure stays clear. A rubric at the end allows valid alternatives.
Practice materials: Printable downloads are not available for this lesson yet. Use the instructions and four exercises below.
Reference illustration
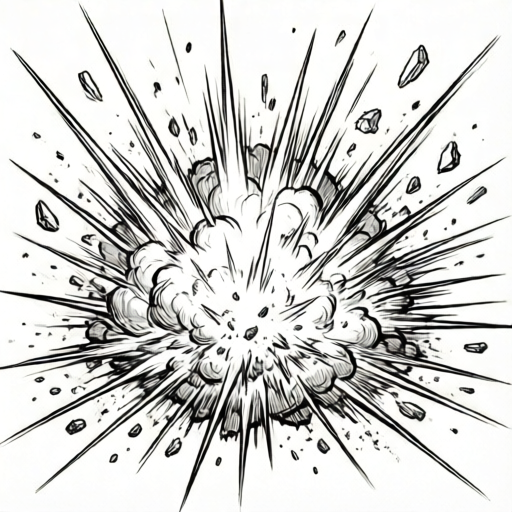
Use the stated measurements and conventions for each exercise.
Build the burst shape
Start with a center point on your page. Draw a closed burst outline made of 6 to 10 outward spikes. Keep the spikes uneven in length so the shape looks energetic rather than geometric. A useful convention is to alternate long and short spikes around the center. The burst outline is the boundary of the bright core; shock lines will start just outside it.
Choose a paper size and mark a center. For example, on a 15 cm by 15 cm area, place the center at 7.5 cm from each edge. Draw the burst outline so its longest spike reaches about 3 cm from the center and its shortest about 1.5 cm. These numbers are hypothetical; adjust to your paper.
- Mark a center point and label it C.
- Draw 6 to 10 spikes outward from C, alternating long and short lengths.
- Close the outline between spike tips to form the burst shape.
- Check that the outline is closed and that no spike crosses another.
Add radiating shock lines
Shock lines show energy moving outward. Use the convention that every shock line points away from C along a straight ray. Draw 8 to 12 rays spaced roughly evenly around the burst. Each ray starts just outside the burst outline and extends outward. To suggest fading, make lines near the burst longer and lines farther out shorter, or use a dashed pattern that becomes sparser outward.
Keep line direction consistent: no shock line should point back toward C. If you use dashes, make each dash segment align with its ray. Vary line weight slightly for energy, but keep the radiating structure readable.
- Lightly mark 8 to 12 ray directions from C using a ruler.
- Start each shock line just outside the burst outline.
- Draw each line outward along its ray; shorten lines as they get farther from C.
- Check that every shock line points away from C and none cross the burst outline.
Scatter debris in zones
Debris adds motion. Define three zones: inner (close to the burst), middle, and outer. In the inner zone, draw larger debris marks and more of them. In the middle zone, use medium marks and moderate density. In the outer zone, use small marks and low density. This zone convention makes the scatter look like it is spreading outward.
Debris marks can be dots, short dashes, or tiny triangles. Keep each mark small enough that it does not merge with shock lines. Place debris between shock lines rather than on top of them so both remain visible.
- Draw two light circles around C to mark inner and middle zone boundaries.
- Place larger debris marks in the inner zone, medium in the middle, small in the outer.
- Keep debris off the shock lines and outside the burst outline.
- Check that debris density decreases from inner to outer zone.
Refine and self-check
Review the drawing against the convention. The burst outline should be closed and centered on C. Shock lines should radiate outward and shorten with distance. Debris should be denser and larger near the burst and sparser and smaller outward. You may adjust spike count, line style, and debris shapes; the rubric accepts alternatives that keep the radiating structure clear.
Use a simple arithmetic check: count shock lines and debris marks in each zone. For example, if you drew 10 shock lines, the inner zone might have 12 debris marks, the middle 8, and the outer 4. These counts are hypothetical; the key is a decreasing pattern.
- Confirm the burst outline is closed and centered.
- Confirm all shock lines point away from C.
- Count debris marks per zone and confirm density decreases outward.
- Erase any guide marks that confuse the structure.
Worked example
On a 15 cm by 15 cm area, draw a burst centered at C with 8 spikes, 10 shock lines, and debris in three zones. Use the convention that shock lines radiate outward and shorten with distance, and debris density decreases outward.
Worked answer
Center C at 7.5 cm from each edge. Draw 8 spikes alternating 3 cm and 1.5 cm from C, then close the outline. Mark 10 rays from C and draw shock lines starting just outside the outline; make inner lines about 2 cm long and outer lines about 1 cm long. Draw two light circles at 4 cm and 6 cm from C. Place 12 large debris marks inside 4 cm, 8 medium marks between 4 cm and 6 cm, and 4 small marks beyond 6 cm. Check that all shock lines point away from C and that debris counts decrease outward.
Four practice exercises
Exercise 1
Draw a burst with 6 spikes and 8 shock lines on a 10 cm by 10 cm area. Use the convention that shock lines point away from the center. Place debris in two zones: inner and outer. State your center location and spike lengths.
Show answer and check
Center at 5 cm from each edge. Spikes alternate 2 cm and 1 cm. Eight shock lines start just outside the outline and point outward; inner lines about 1.5 cm, outer about 0.8 cm. Inner zone within 3 cm has 8 large debris marks; outer zone beyond 3 cm has 4 small marks.
Why: A smaller area needs shorter spikes and lines to stay on the page. Two zones still show decreasing density. The center and lengths are checkable against the paper size.
Check: Measure from the center to each spike tip; confirm alternating lengths. Count shock lines and confirm each points away from the center. Count debris marks per zone and confirm inner count is greater than outer.
Exercise 2
Draw a burst with 10 spikes and 12 shock lines. Use dashed shock lines that become sparser outward. Place debris in three zones. Describe how you vary dash spacing and debris size.
Show answer and check
Center marked. Ten spikes alternate 3 cm and 1.5 cm. Twelve dashed shock lines: inner dashes 5 mm long with 2 mm gaps; outer dashes 3 mm long with 4 mm gaps. Debris: 14 large marks inner, 9 medium middle, 5 small outer.
Why: Dash spacing and debris size both decrease outward, reinforcing the fading-energy convention. The counts are simple to verify.
Check: Check that dash gaps increase outward and debris counts decrease outward. Confirm all dashed lines align with rays from the center.
Exercise 3
Draw a burst where the longest spike is 4 cm and the shortest is 2 cm. Use 9 shock lines. Place debris so that no mark touches a shock line. Explain your placement rule.
Show answer and check
Center marked. Nine spikes alternate 4 cm and 2 cm. Nine shock lines radiate outward. Debris placed midway between adjacent shock lines in three zones: 10 inner, 6 middle, 3 outer. No debris mark overlaps a shock line.
Why: Placing debris between shock lines keeps both structures visible. Alternating spike lengths create an energetic outline. Counts decrease outward.
Check: Inspect each debris mark for contact with a shock line. Count shock lines and debris per zone. Measure longest and shortest spikes from the center.
Exercise 4
Draw a burst with 7 spikes and 10 shock lines. Use a convention where shock lines are solid near the burst and become dashed farther out. Place debris in three zones and state the counts. Then list two valid alternative choices you could have made.
Show answer and check
Center marked. Seven spikes alternate 2.5 cm and 1.2 cm. Ten shock lines: solid for the first 1 cm from the outline, dashed beyond. Debris: 12 inner, 7 middle, 3 outer. Alternatives: use 8 spikes instead of 7; use dots instead of short dashes for debris.
Why: Changing line style with distance supports the fading convention. Stating alternatives shows the rubric accepts variation while keeping the radiating structure.
Check: Confirm solid-to-dashed transition occurs at a consistent distance. Count debris per zone and confirm decreasing pattern. Verify alternatives do not break the outward-radiating rule.
Common mistakes
- Shock lines point in random directions or cross back toward the center. Redraw each shock line along a straight ray from C outward; remove any line that points inward.
- Debris is evenly dense everywhere, so the scatter looks static. Use the three-zone convention: larger and denser near the burst, smaller and sparser outward.
- The burst outline is a perfect circle or regular star, which looks mechanical. Alternate long and short spikes and vary spike count between 6 and 10.
- Debris marks sit on top of shock lines and hide the radiating structure. Place debris between shock lines and keep marks small.
Self-check rubric
- Burst outline is closed and centered on a marked center point.
- Shock lines radiate outward from the center and do not point inward.
- Shock line length or dash density decreases with distance from the center.
- Debris is placed in three zones with larger and denser marks near the burst and smaller, sparser marks outward.
- Debris does not obscure the shock lines or the burst outline.
- Alternative spike counts, line styles, and debris shapes are acceptable if the radiating structure and decreasing density remain clear.
Questions and answers
Do I need a ruler?
A straightedge helps keep shock lines straight, but freehand lines are acceptable if they clearly radiate outward from the center.
How many shock lines should I draw?
8 to 12 is a useful range. Fewer may look sparse; more may look cluttered. Adjust to your paper size.
Can I use color?
Yes. Color can separate zones, but the radiating structure and decreasing debris density must remain clear in black and white.
What if my burst shape is not centered?
Re-mark the center and redraw the outline so the longest spikes are roughly balanced around C.