Reference diagram
LETTER · Download PDF (2 pages)
Free original resources
Learn to construct a basic eye outline using lid contour and iris circle placement. Includes a convention, worked example, practice tasks, and a rubric for valid alternatives.
Original reference diagrams, four practice exercises and separate worked answers. All files are free. No signup required.
LETTER · Download PDF (2 pages)
LETTER · Download PDF (4 pages)
LETTER · Download PDF (4 pages)
Choose A4 or US Letter for your printer. The reference and answer illustrations are not physical rulers; follow the scale instruction printed on the practice worksheet.
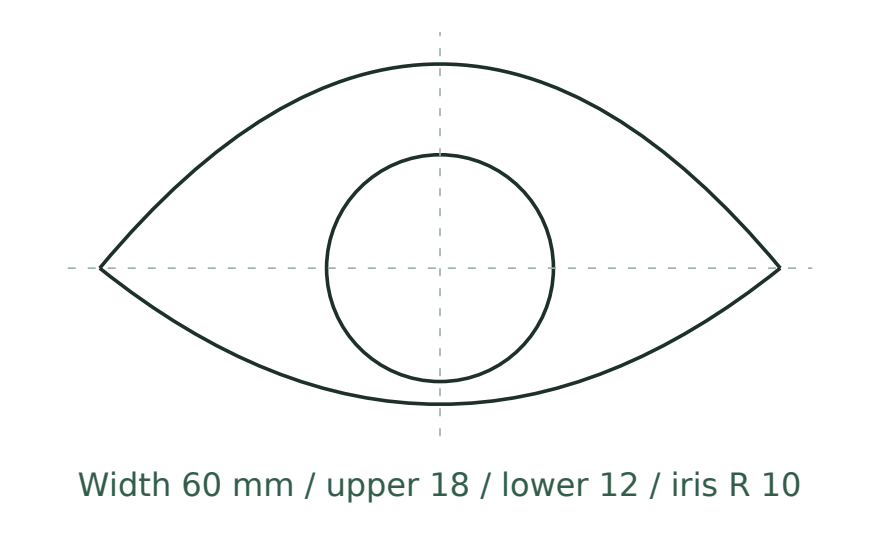
This lesson teaches a repeatable method for drawing a basic eye outline: an upper lid contour, a lower lid contour, and an iris circle placed within the opening. The goal is a clear, proportional outline, not realistic shading or iris detail. You will use a simple convention: the eye opening is bounded by two curved lid lines that meet at the corners, and the iris is a circle whose center sits at the midpoint of the horizontal corner-to-corner axis. Because eye shapes vary, the method allows multiple valid outlines; the rubric rewards consistent construction and clear placement rather than a single universal shape. All measurements below are hypothetical examples for practice; measure your own paper and tools when adapting the method.
Begin by deciding the overall width of the eye opening. For practice, use a horizontal span of 60 mm on plain paper. Mark both corners on this horizontal eye-opening axis. Mark its midpoint and draw a light vertical center guide through it; this guide is called the midline in this lesson. The iris center is the intersection of the axis and this guide. This point need not be halfway between the upper and lower lids, because their heights can differ. Keep the guides light so they can be adjusted.
Define a convention for lid height: measure from the axis upward to the highest point of the upper lid, and downward to the lowest point of the lower lid. For a neutral practice eye, use 18 mm above the axis and 12 mm below it. These numbers are hypothetical examples; the important part is that you record your chosen values and keep them consistent within one drawing.
The upper lid contour is a smooth curve from the left corner to the right corner, passing through the upper peak. It should be fuller near the middle and taper toward the corners. The lower lid contour is a shallower curve from the same corners through the lower trough. Both curves must meet exactly at the corners; if they cross or leave a gap, the outline is not closed. Draw lightly first, then refine.
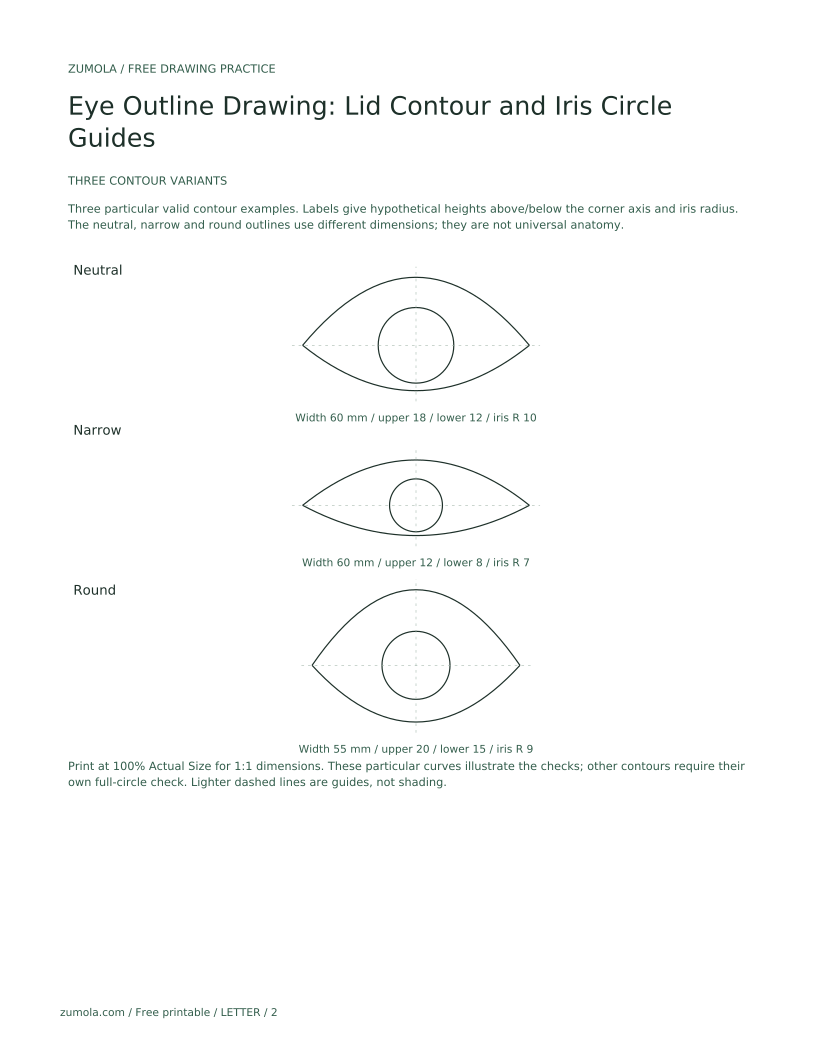
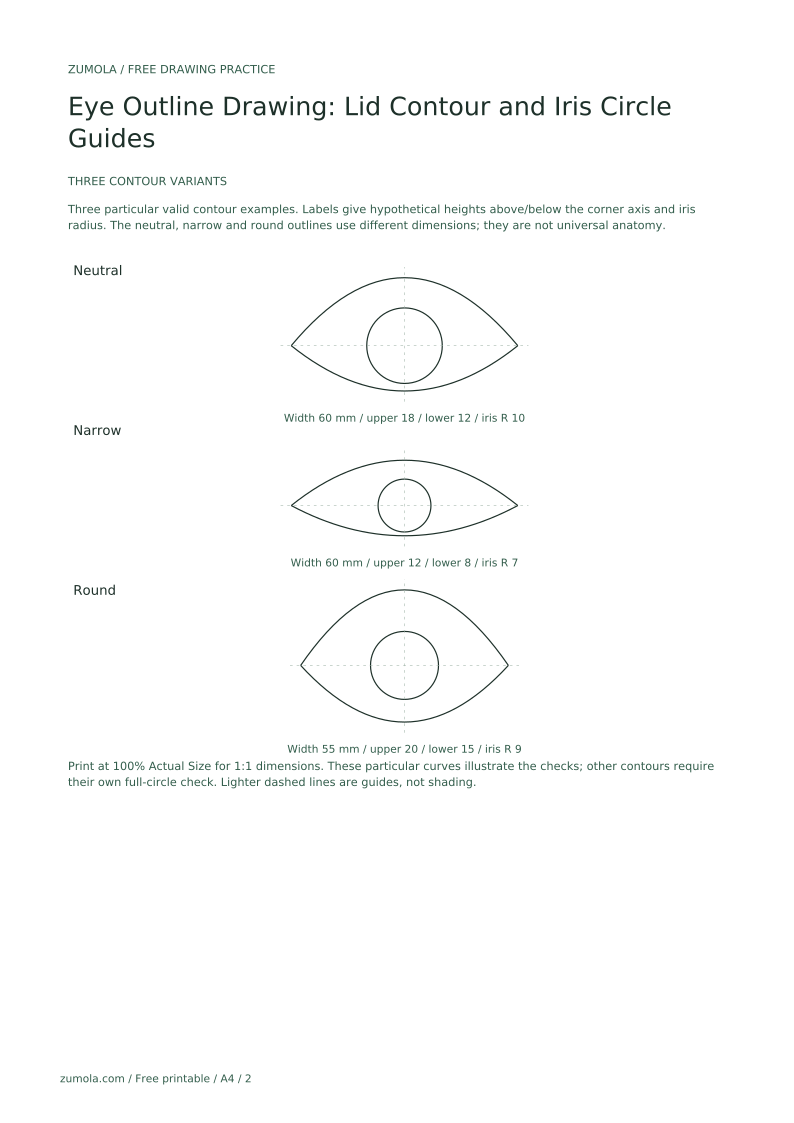
Lid contour varies with eye shape. A rounder eye uses a higher upper peak and a lower lower trough; a narrower eye uses a flatter upper curve and a shallower lower curve. The method stays the same: corners fixed, peaks measured from the axis, curves meeting at the corners. The reference PDF includes three variants: neutral, round, and narrow, each with labeled hypothetical peak heights.
Place the iris center at the midpoint of the corner-to-corner axis. For the neutral practice eye, use a radius of 10 mm. This lesson uses a simplified drawing convention in which the full iris circle stays within the opening; touching a lid is allowed. It is not a rule about realistic anatomy. Check the entire circle against both drawn lid curves. If it crosses a lid, adjust the radius or contour, changing one variable at a time and noting the change.
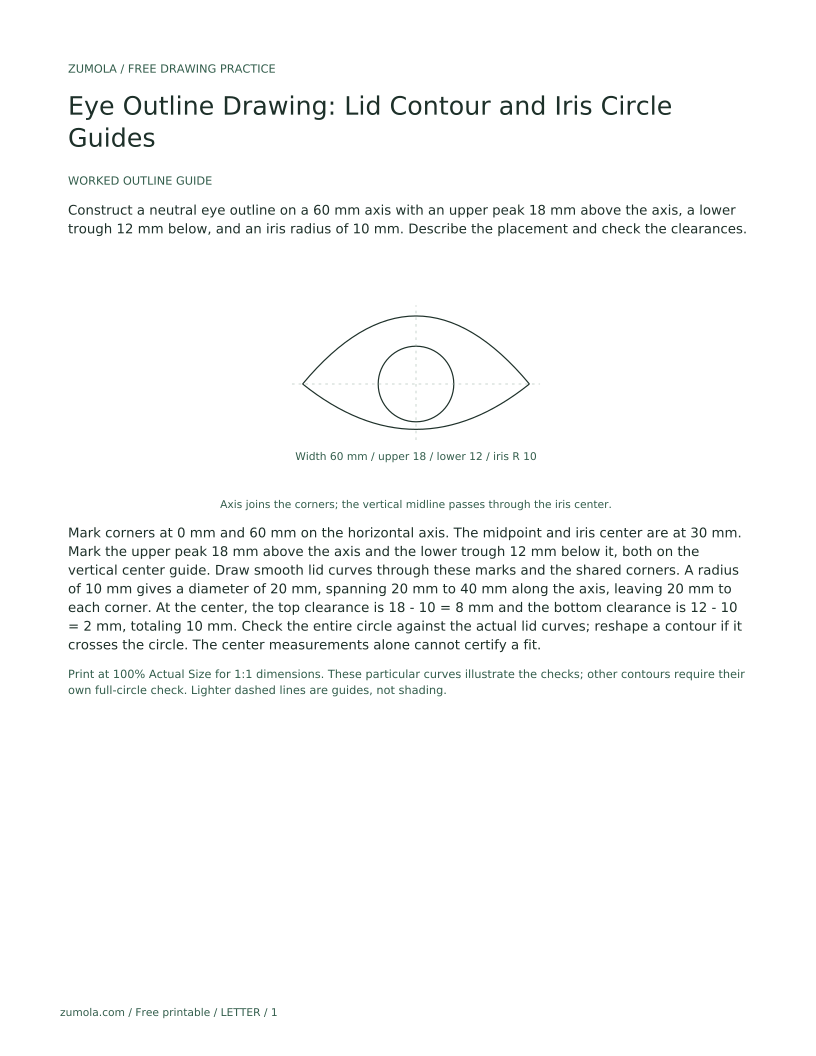
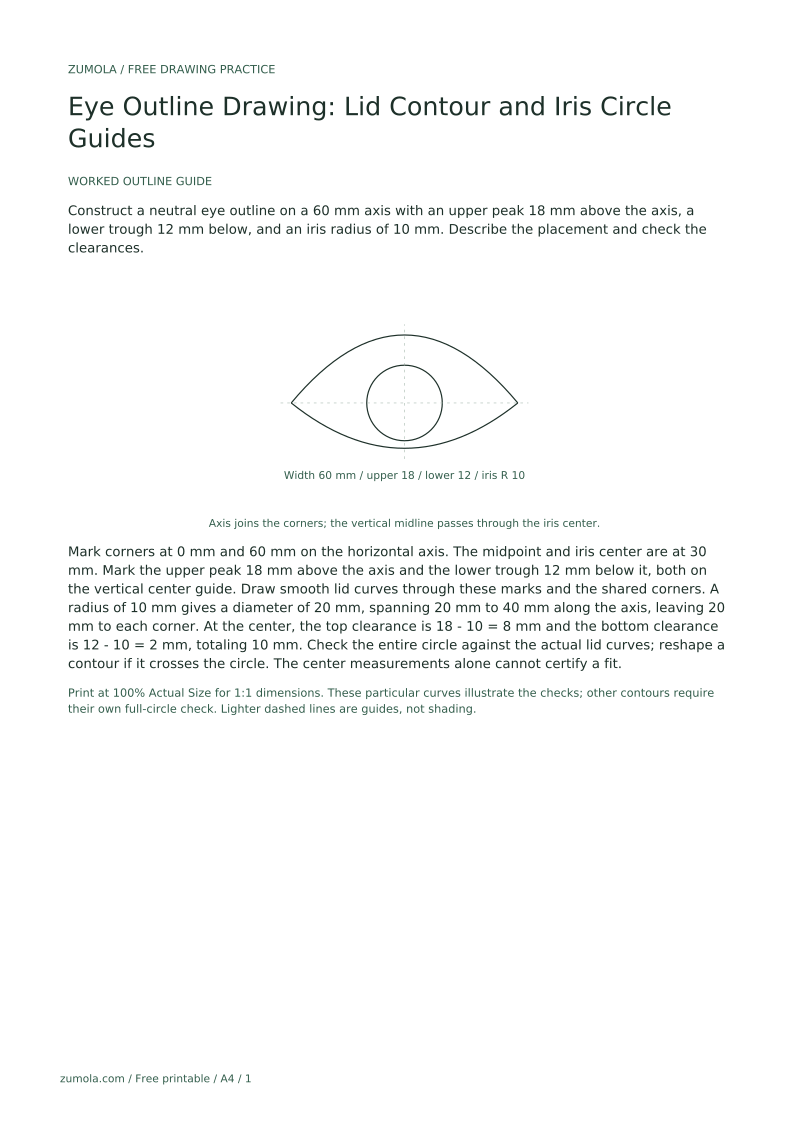
With a 60 mm opening and a 10 mm radius, the iris diameter is 20 mm, leaving 20 mm horizontally to each corner. Upper and lower center heights of 18 mm and 12 mm give center clearances of 8 mm above the circle and 2 mm below it, totaling 10 mm. These are checks at the center only: they do not prove that the circle fits along every part of the curved lids. Trace the full circle and compare it with both contours; refine the curves if needed. The measurements are hypothetical drawing examples.
Refinement means making the outline clear and consistent, not adding shading or iris detail. Darken the final lid contours and iris circle only after the construction lines are correct. Keep the corners sharp and the curves smooth. A useful check is to trace the outline with your finger: the path should go from corner to corner along the upper lid, then back along the lower lid, with the iris circle fully inside.
Because eye shapes vary, valid alternatives exist. A narrower eye with a flatter upper lid and a smaller iris can be correct if the construction is consistent and the placement is clear. The rubric rewards recorded measurements, closed contours, a centered iris, and a clean final outline. It does not require a single universal eye shape.
Construct a neutral eye outline on a 60 mm axis with an upper peak 18 mm above the axis, a lower trough 12 mm below, and an iris radius of 10 mm. Describe the placement and check the clearances.
Mark corners at 0 mm and 60 mm on the horizontal axis. The midpoint and iris center are at 30 mm. Mark the upper peak 18 mm above the axis and the lower trough 12 mm below it, both on the vertical center guide. Draw smooth lid curves through these marks and the shared corners. A radius of 10 mm gives a diameter of 20 mm, spanning 20 mm to 40 mm along the axis, leaving 20 mm to each corner. At the center, the top clearance is 18 - 10 = 8 mm and the bottom clearance is 12 - 10 = 2 mm, totaling 10 mm. Check the entire circle against the actual lid curves; reshape a contour if it crosses the circle. The center measurements alone cannot certify a fit.
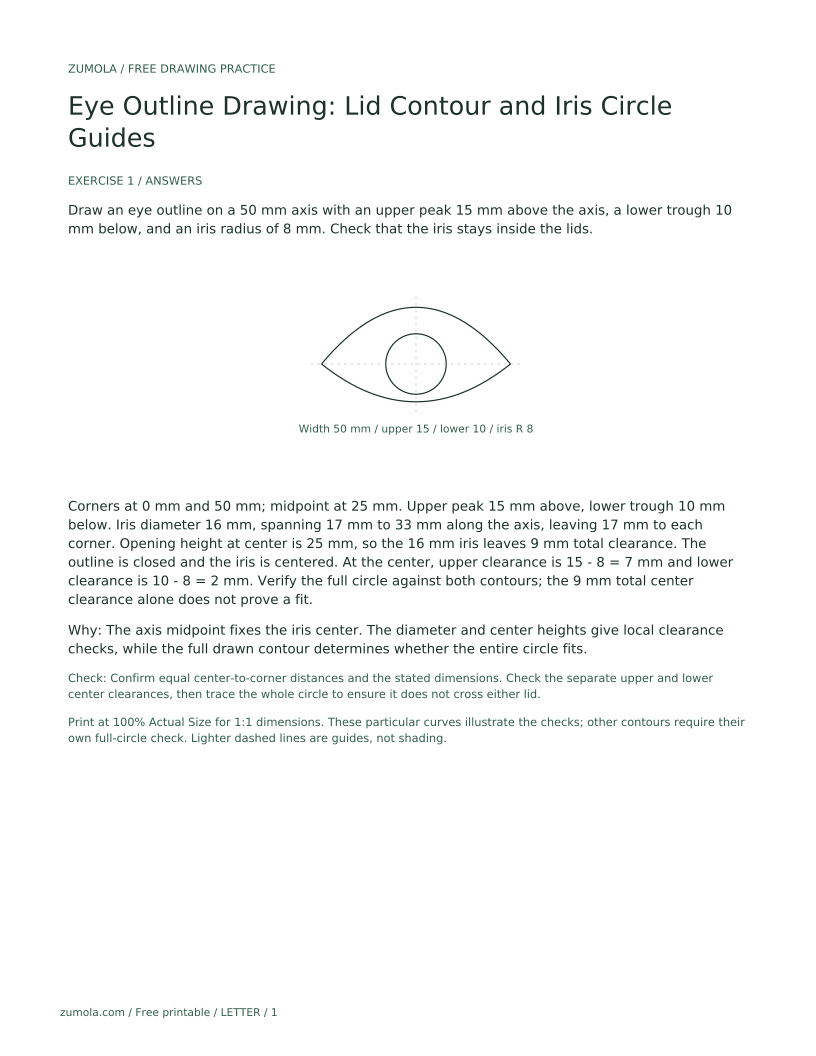
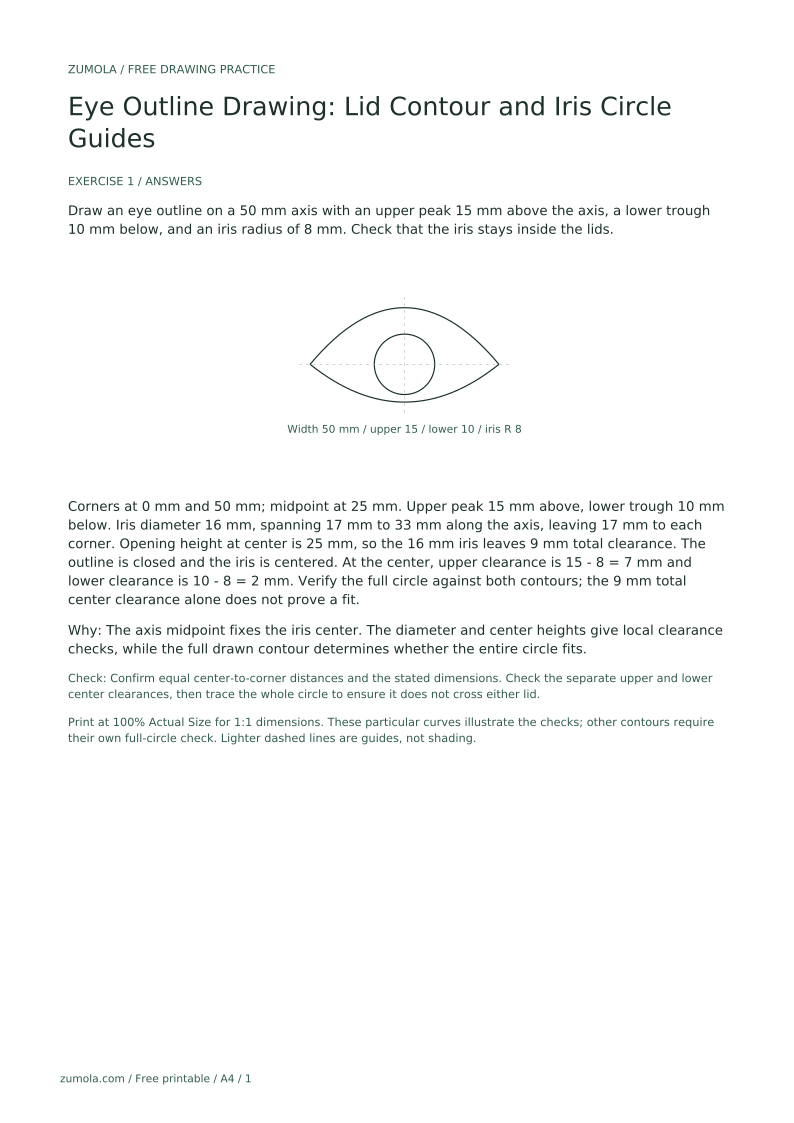
Draw an eye outline on a 50 mm axis with an upper peak 15 mm above the axis, a lower trough 10 mm below, and an iris radius of 8 mm. Check that the iris stays inside the lids.
Corners at 0 mm and 50 mm; midpoint at 25 mm. Upper peak 15 mm above, lower trough 10 mm below. Iris diameter 16 mm, spanning 17 mm to 33 mm along the axis, leaving 17 mm to each corner. Opening height at center is 25 mm, so the 16 mm iris leaves 9 mm total clearance. The outline is closed and the iris is centered. At the center, upper clearance is 15 - 8 = 7 mm and lower clearance is 10 - 8 = 2 mm. Verify the full circle against both contours; the 9 mm total center clearance alone does not prove a fit.
The axis midpoint fixes the iris center. The diameter and center heights give local clearance checks, while the full drawn contour determines whether the entire circle fits.
Check: Confirm equal center-to-corner distances and the stated dimensions. Check the separate upper and lower center clearances, then trace the whole circle to ensure it does not cross either lid.
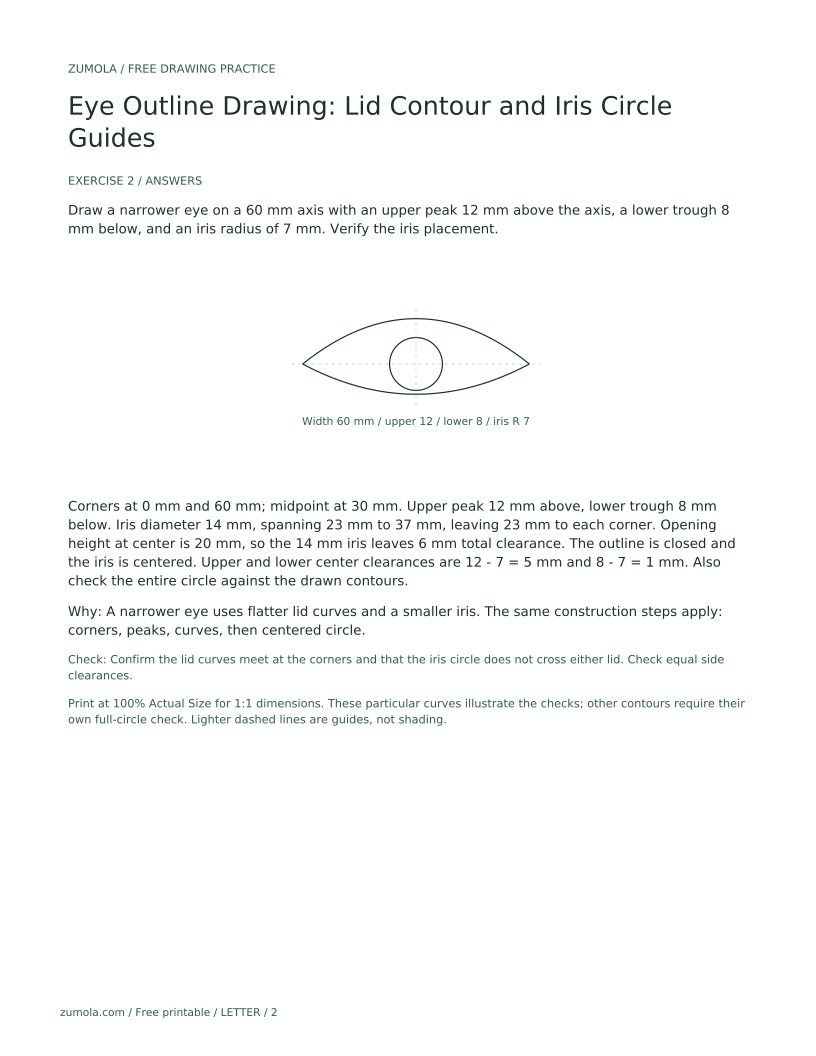
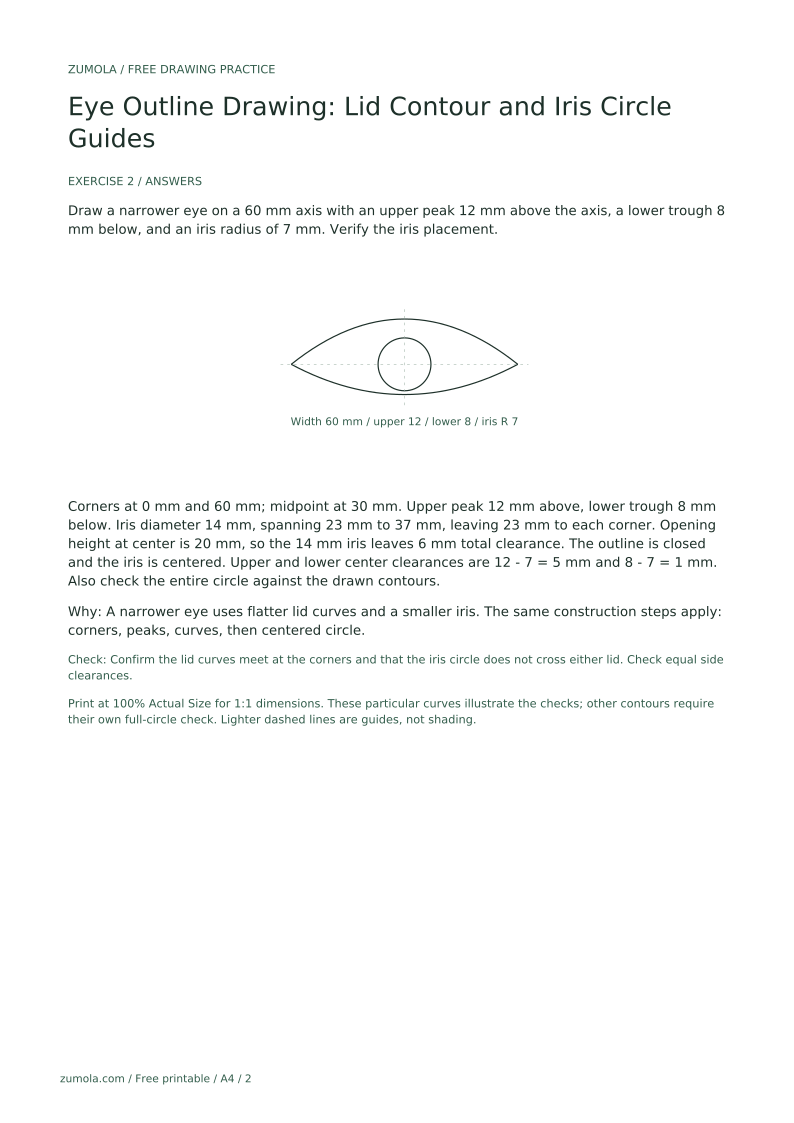
Draw a narrower eye on a 60 mm axis with an upper peak 12 mm above the axis, a lower trough 8 mm below, and an iris radius of 7 mm. Verify the iris placement.
Corners at 0 mm and 60 mm; midpoint at 30 mm. Upper peak 12 mm above, lower trough 8 mm below. Iris diameter 14 mm, spanning 23 mm to 37 mm, leaving 23 mm to each corner. Opening height at center is 20 mm, so the 14 mm iris leaves 6 mm total clearance. The outline is closed and the iris is centered. Upper and lower center clearances are 12 - 7 = 5 mm and 8 - 7 = 1 mm. Also check the entire circle against the drawn contours.
A narrower eye uses flatter lid curves and a smaller iris. The same construction steps apply: corners, peaks, curves, then centered circle.
Check: Confirm the lid curves meet at the corners and that the iris circle does not cross either lid. Check equal side clearances.
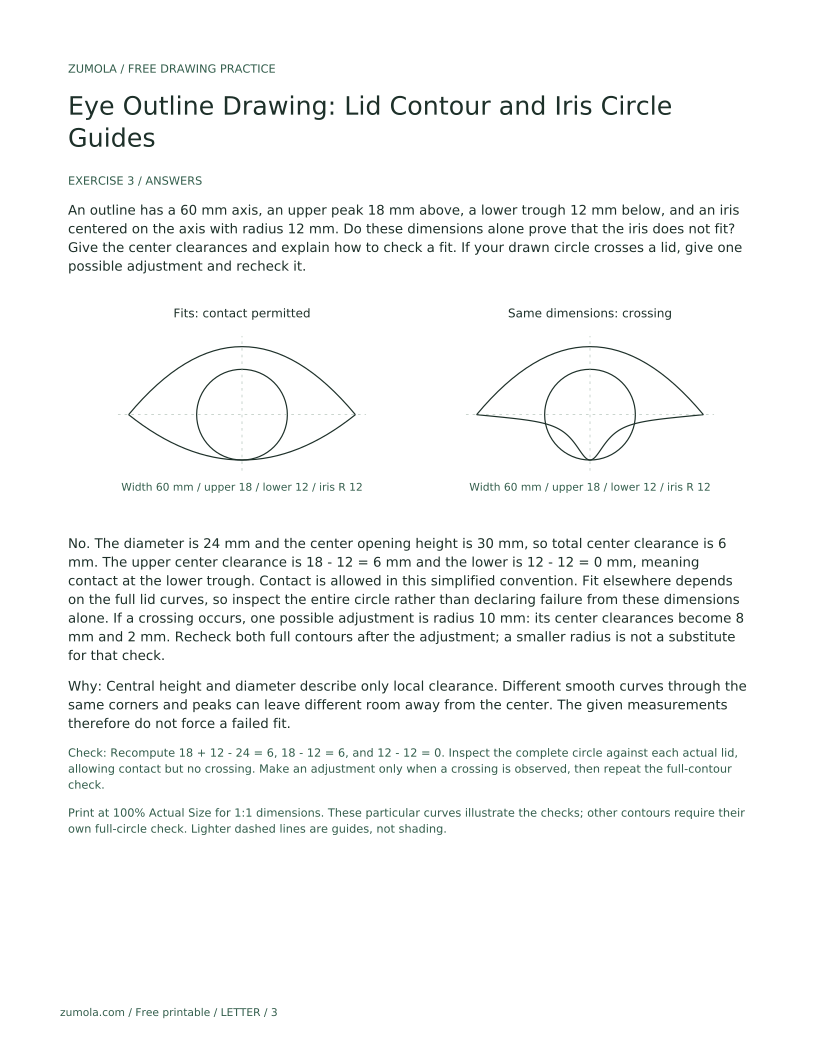
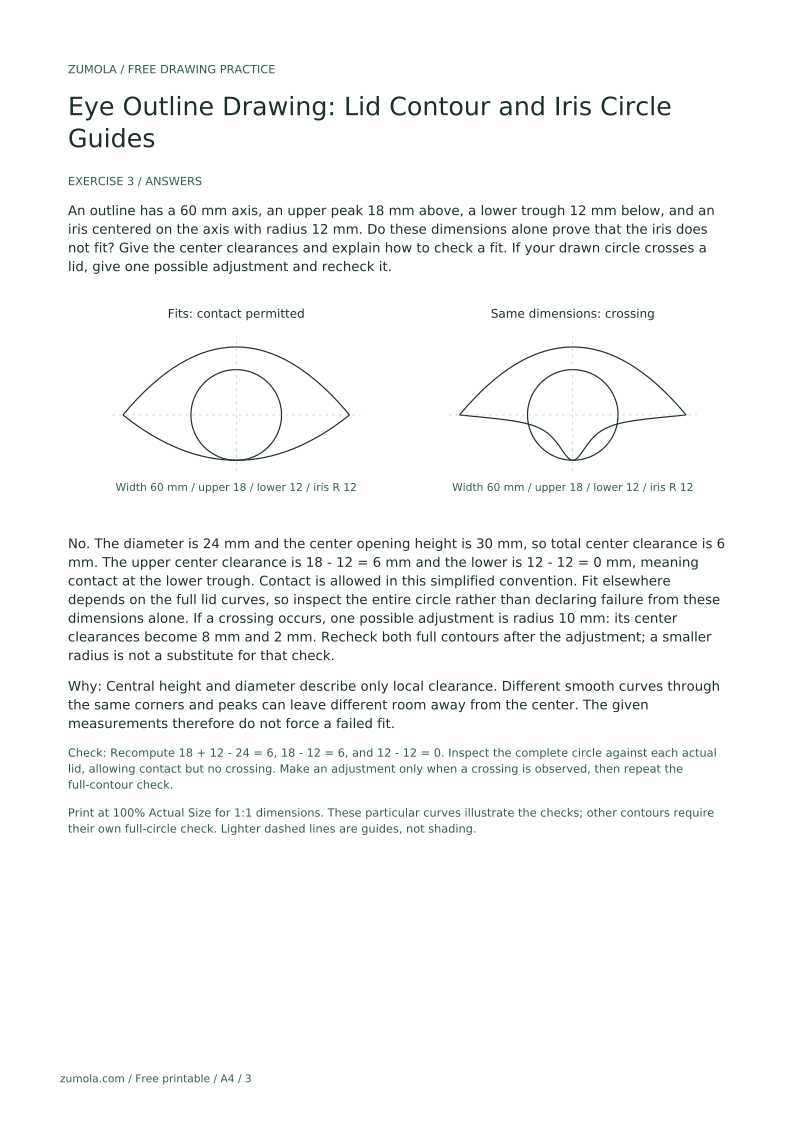
An outline has a 60 mm axis, an upper peak 18 mm above, a lower trough 12 mm below, and an iris centered on the axis with radius 12 mm. Do these dimensions alone prove that the iris does not fit? Give the center clearances and explain how to check a fit. If your drawn circle crosses a lid, give one possible adjustment and recheck it.
No. The diameter is 24 mm and the center opening height is 30 mm, so total center clearance is 6 mm. The upper center clearance is 18 - 12 = 6 mm and the lower is 12 - 12 = 0 mm, meaning contact at the lower trough. Contact is allowed in this simplified convention. Fit elsewhere depends on the full lid curves, so inspect the entire circle rather than declaring failure from these dimensions alone. If a crossing occurs, one possible adjustment is radius 10 mm: its center clearances become 8 mm and 2 mm. Recheck both full contours after the adjustment; a smaller radius is not a substitute for that check.
Central height and diameter describe only local clearance. Different smooth curves through the same corners and peaks can leave different room away from the center. The given measurements therefore do not force a failed fit.
Check: Recompute 18 + 12 - 24 = 6, 18 - 12 = 6, and 12 - 12 = 0. Inspect the complete circle against each actual lid, allowing contact but no crossing. Make an adjustment only when a crossing is observed, then repeat the full-contour check.
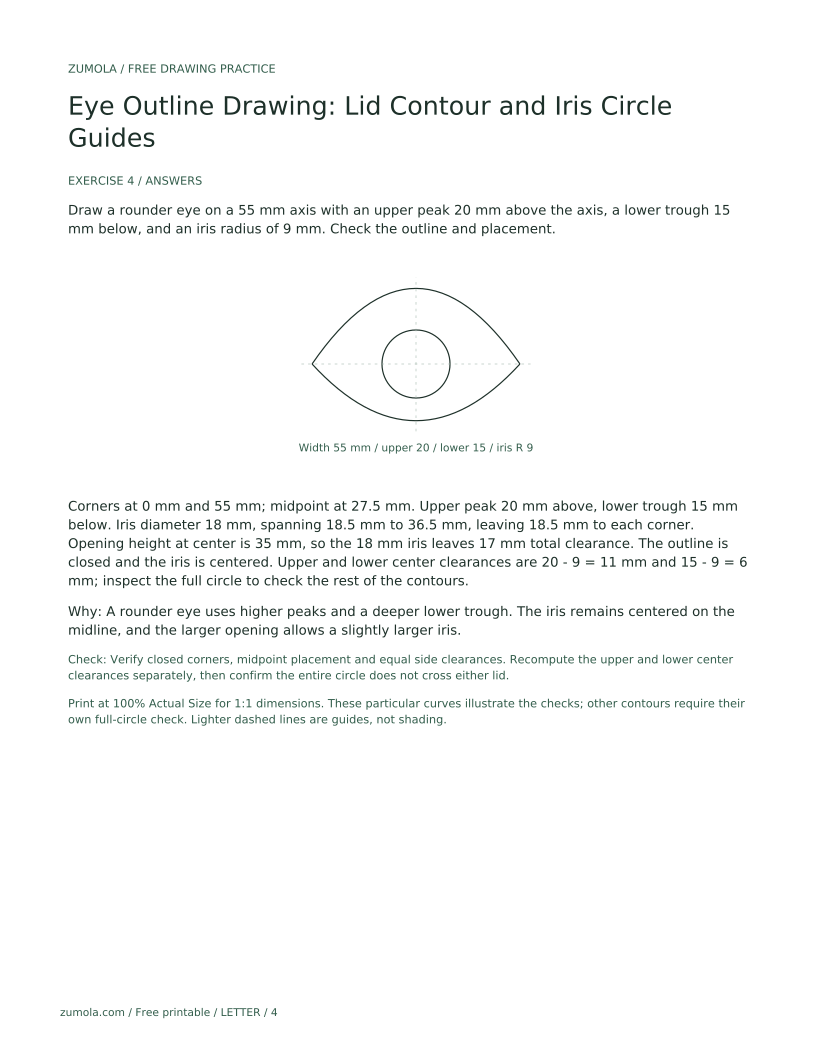
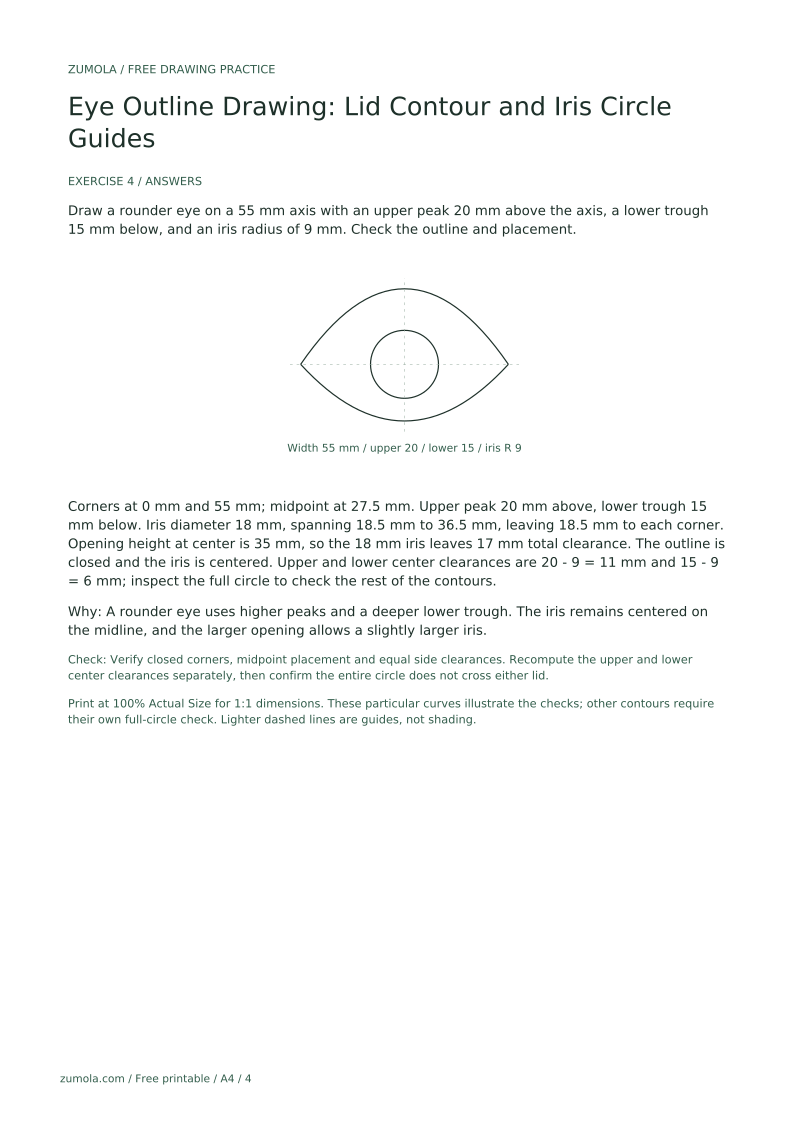
Draw a rounder eye on a 55 mm axis with an upper peak 20 mm above the axis, a lower trough 15 mm below, and an iris radius of 9 mm. Check the outline and placement.
Corners at 0 mm and 55 mm; midpoint at 27.5 mm. Upper peak 20 mm above, lower trough 15 mm below. Iris diameter 18 mm, spanning 18.5 mm to 36.5 mm, leaving 18.5 mm to each corner. Opening height at center is 35 mm, so the 18 mm iris leaves 17 mm total clearance. The outline is closed and the iris is centered. Upper and lower center clearances are 20 - 9 = 11 mm and 15 - 9 = 6 mm; inspect the full circle to check the rest of the contours.
A rounder eye uses higher peaks and a deeper lower trough. The iris remains centered on the midline, and the larger opening allows a slightly larger iris.
Check: Verify closed corners, midpoint placement and equal side clearances. Recompute the upper and lower center clearances separately, then confirm the entire circle does not cross either lid.
Redraw both curves from the same corner points and check that they touch exactly; adjust the curve shape, not the corner positions.
Re-measure the midpoint of the axis and place the circle center there; check equal distances to the left and right corners.
Reduce the radius or increase the lid peak heights, changing one variable at a time and recording the new values.
Measure both peaks from the same axis and record them; use a consistent convention for the chosen eye shape.
No. This lesson covers only the outline: lid contours and an iris circle. Shading, iris detail, and expression are excluded.
Yes. The numbers here are hypothetical examples. Measure your own paper and keep units consistent within one drawing.
Valid alternatives are allowed. The rubric checks construction and placement, not a single universal shape.
Check that the circle center is on the midline and that the circle stays within the lid contours; use simple arithmetic to verify clearances.