Free original lessons
Draw an Old Balance Scale: Beam, Pan, and Base Construction
Learn to draw a classic balance-style weighing scale by building its base, beam, and pan with clear steps, symmetry checks, and practice tasks.
Free lesson
Four exercises
Worked answers
Object Drawing Lessons
This guide teaches a reliable construction method for drawing an old balance-style weighing scale. You will build the object from simple geometric parts: a sturdy base, a central column, a horizontal beam, suspension cords, and a shallow pan. The method emphasizes proportion, symmetry, and checkable geometry rather than shading or decorative detail. All measurements are hypothetical examples; measure your own paper and tools before drawing. The convention for any lettering or labels is simple: use clear uppercase letters with the baseline at the bottom and the midline at the top of each letter, and accept any legible style that follows that height convention. Work lightly at first, then firm up the lines you keep.
Practice materials: Printable downloads are not available for this lesson yet. Use the instructions and four exercises below.
Reference illustration
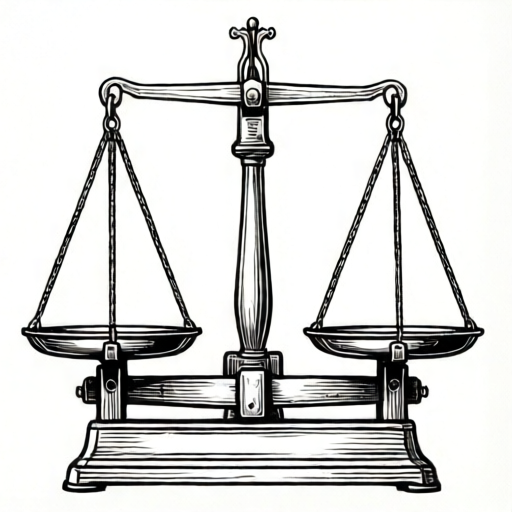
Use the stated measurements and conventions for each exercise.
Set the frame and base
Begin by deciding the overall height and width of your drawing on the page. For example, on a 20 cm by 25 cm area, place the scale so the base occupies the lower third and the beam sits near the upper third. Mark a vertical center line lightly; this line controls the column and the beam's midpoint.
Draw the base as a wide, low shape. A simple trapezoid works well: a bottom edge about 8 cm wide, a top edge about 5 cm wide, and a height of about 2 cm. These numbers are hypothetical; adjust them to fit your page. Keep the base symmetrical about the center line by measuring equal distances left and right.
- Mark the vertical center line.
- Draw the base bottom edge centered on the line.
- Draw the base top edge shorter than the bottom edge and centered.
- Connect the corners to form a trapezoid.
- Check that left and right widths match.
Build the column and beam
From the center of the base top, draw a vertical column upward. A column about 1.5 cm wide and 10 cm tall is a workable hypothetical example. Keep its sides parallel to the center line. At the top of the column, draw a small cap or pivot block; this is where the beam will rest.
The beam is a long horizontal bar. Draw it so its midpoint sits exactly on the center line. For symmetry, measure equal lengths from the midpoint to each end. A beam about 12 cm long and 1 cm thick is a reasonable hypothetical size. Add a small central pivot shape, such as a circle or diamond, to show where the beam balances.
- Draw the column sides parallel to the center line.
- Add a small cap at the column top.
- Mark the beam midpoint on the center line.
- Measure equal distances left and right for the beam ends.
- Draw the beam as a horizontal bar through the midpoint.
- Add a pivot shape at the center.
Add the pan and suspension
Hang a shallow pan from one end of the beam. Draw two or three suspension cords from the beam end down to the pan rim. The pan can be a shallow bowl or a flat dish; a simple ellipse with a short side wall reads clearly. Keep the pan centered under the beam end so the cords look balanced.
For a classic look, add a second pan on the other side, or draw a single pan if your design calls for it. If you draw two pans, use the same pan shape and cord lengths on both sides. Check that the beam remains horizontal and that the pan rims are at equal heights when the scale is at rest.
- Choose one beam end for the pan.
- Draw two or three cords from the beam end downward.
- Draw the pan rim as a shallow ellipse.
- Add a short side wall to the pan.
- If using two pans, repeat with equal cord lengths.
- Check that pan rims are level.
Refine and check symmetry
Lightly erase construction marks that are no longer needed. Firm up the base, column, beam, cords, and pan outlines. Use the center line to check that the column is vertical and the beam midpoint is centered. Measure the beam's left and right halves with a ruler; they should match within your chosen tolerance, such as 2 mm for a hypothetical example.
Check the pan suspension: cord lengths should be equal on each side of the pan, and the pan should hang below the beam end without tilting. If you include lettering or labels, follow the stated convention: uppercase letters with the baseline at the bottom and the midline at the top. Accept any legible style that meets that height rule.
- Erase unnecessary construction lines.
- Firm up final outlines.
- Measure beam halves for symmetry.
- Check cord lengths and pan level.
- Apply the lettering height convention if labeling.
Worked example
Construct a simple old balance scale on a 20 cm by 25 cm page using a base trapezoid 8 cm wide at the bottom, 5 cm at the top, and 2 cm tall; a column 10 cm tall and 1.5 cm wide; and a beam 12 cm long and 1 cm thick. Describe the order and one symmetry check.
Worked answer
Place a vertical center line. Center the base trapezoid on the line with the 8 cm bottom edge and 5 cm top edge. From the base top center, draw the column upward 10 cm with sides parallel to the center line. Mark the beam midpoint on the center line at the column top, measure 6 cm left and 6 cm right, and draw the 12 cm beam. Add a pivot shape at the midpoint. Check symmetry by measuring the left and right beam halves; both should be 6 cm within your chosen tolerance.
Four practice exercises
Exercise 1
On a 15 cm by 20 cm area, draw a base trapezoid 6 cm wide at the bottom, 4 cm at the top, and 1.5 cm tall. Add a vertical column 8 cm tall and 1 cm wide at the base center. State one measurement you would check.
Show answer and check
A centered trapezoid with the stated dimensions and a vertical column at its center. Check that the column sides are parallel to the center line and that the base left and right widths match.
Why: The base and column are built from centered measurements, so symmetry and verticality are the key checks.
Check: Measure the base bottom edge left and right from the center line; they should be 3 cm each within your tolerance. Check the column width is 1 cm.
Exercise 2
Draw a horizontal beam 10 cm long and 0.8 cm thick with its midpoint on a vertical center line. Add a pivot circle at the midpoint. Describe how you check beam symmetry.
Show answer and check
The beam is centered with 5 cm on each side of the midpoint. The pivot circle sits at the midpoint. Check by measuring from the midpoint to each beam end; both should be 5 cm within your tolerance.
Why: A centered beam has equal halves, and the pivot marks the balance point.
Check: Use a ruler to measure each half from the midpoint; record both lengths and compare.
Exercise 3
From one end of a beam, draw three suspension cords of equal length down to a shallow pan rim. The cords are 4 cm long in this hypothetical example. Describe how to check the pan is level.
Show answer and check
Draw three cords from the beam end to the pan rim, each 4 cm. The pan rim should be horizontal. Check by measuring each cord and comparing the pan rim height at left and right.
Why: Equal cord lengths keep the pan level; unequal lengths cause tilting.
Check: Measure each cord length and the vertical distance from the beam end to the pan rim on both sides.
Exercise 4
Draw a complete old balance scale with one base, one column, one beam, and one pan. Use a center line and state your symmetry tolerance. Then label the base with the word BASE using uppercase letters whose baseline is at the bottom and midline at the top.
Show answer and check
A complete scale with centered base, vertical column, centered beam, and level pan. The label BASE uses uppercase letters meeting the height convention. The stated tolerance might be 2 mm for a hypothetical example.
Why: The construction follows the same centered order, and the label follows the given lettering convention.
Check: Measure beam halves and base widths for symmetry; check the label letters sit between baseline and midline.
Common mistakes
- Drawing the beam without centering its midpoint on the column. Mark the midpoint first, then measure equal distances to each beam end.
- Making the base too narrow so the scale looks unstable. Widen the base bottom edge and keep it centered on the vertical line.
- Using unequal cord lengths so the pan tilts. Measure each cord from the beam end to the pan rim and match lengths.
- Letting the column lean away from vertical. Check the column sides against the center line and redraw parallel.
Self-check rubric
- Base is centered and symmetrical about the vertical center line.
- Column is vertical and sits at the base center.
- Beam midpoint is on the center line and beam halves are equal within the stated tolerance.
- Pan suspension cords are equal in length and the pan hangs level.
- Construction lines are light and final outlines are clear.
- Any lettering follows the baseline-to-midline height convention and is legible.
Questions and answers
Do I need to draw two pans?
No. A single pan is acceptable if your design calls for it. If you draw two, keep the pan shapes and cord lengths equal.
How precise must the symmetry be?
Use a simple checkable tolerance. For a hypothetical example, beam halves within 2 mm of each other are acceptable. Measure your actual drawing and state your chosen tolerance.
Can I use lowercase letters for labels?
The convention given uses uppercase letters with baseline at the bottom and midline at the top. If you use lowercase, keep the x-height between baseline and midline and accept any legible style.
Should I shade the drawing?
Shading is outside this construction task. Focus on clear outlines and correct proportions.