Free original lessons
Orangutan Drawing Simple: Face Proportions and Arm Pose
Learn a simple orangutan drawing method: build the face with clear proportion guides, then construct a relaxed arm pose using basic shapes and checkable steps.
Free lesson
Four exercises
Worked answers
Object Drawing Lessons
This guide focuses on two things that make a simple orangutan drawing readable: the face structure and the arm pose. You will use a defined convention for facial proportions, build the arm from simple segments, and check your work with arithmetic and visual tests. The approach is deliberately plain so you can draw with a pencil and paper. All measurements are hypothetical examples; measure your own paper and adjust. The goal is a clear, recognizable orangutan face and a natural arm pose, not fur texture or full-body anatomy.
Practice materials: Printable downloads are not available for this lesson yet. Use the instructions and four exercises below.
Reference illustration
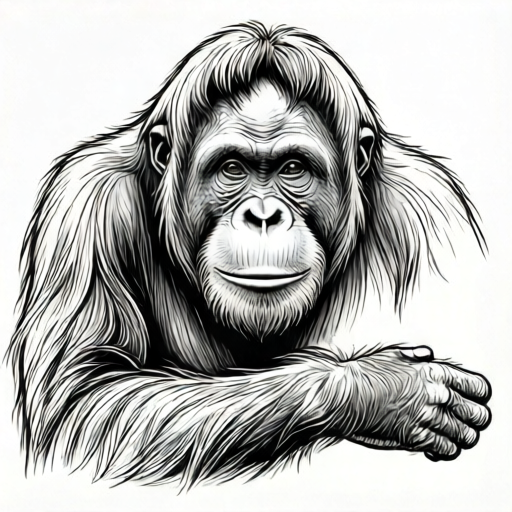
Use the stated measurements and conventions for each exercise.
Face proportion convention
Use a face oval as the base. Define the oval height as H and width as W. A simple convention is W = 0.8H. Mark a vertical midline and a horizontal midline. The eyes sit on the horizontal midline. Place the eye centers at 0.25W and 0.75W from the left edge of the oval. The nose bridge starts at the horizontal midline and ends at 0.65H from the top. The mouth line sits at 0.75H from the top. The ears attach at the horizontal midline, with their tops near 0.35H and bottoms near 0.65H.
This convention is a guide, not a rule. Orangutan faces vary, and your drawing can use a wider or narrower oval. The key is consistency: once you choose H and W, keep the eye, nose, and mouth positions proportional to those values. Label your chosen numbers as hypothetical examples on your practice sheet so you can compare attempts.
- Draw the face oval and label its height H and width W.
- Mark the vertical and horizontal midlines.
- Place eye centers at 0.25W and 0.75W on the horizontal midline.
- Mark the nose bridge from the horizontal midline to 0.65H.
- Mark the mouth line at 0.75H and attach ears at the horizontal midline.
Arm pose construction
Build the arm from three segments: upper arm, forearm, and hand. Use a shoulder point, an elbow point, and a wrist point. For a relaxed pose, let the upper arm drop slightly outward and the forearm angle forward. A simple check is to keep the elbow angle between 90 and 120 degrees. You can measure this with a protractor or estimate by comparing the forearm to a right angle.
The hand can be a rounded rectangle with four finger lines and a thumb line. Keep the hand length about 0.6 times the forearm length. This is a hypothetical proportion; adjust to your drawing. The arm should connect to the face oval at the shoulder, which sits below the ear line. Avoid drawing the arm too stiff: a slight bend at the elbow reads as natural.
- Mark the shoulder point below the ear line.
- Draw the upper arm segment to the elbow point.
- Draw the forearm segment to the wrist point, keeping the elbow angle near 90 to 120 degrees.
- Add the hand as a rounded rectangle, with hand length about 0.6 times the forearm length.
- Check that the arm connects smoothly to the face oval and that the pose looks relaxed.
Practice panel for two expressions
Use a practice panel with two face ovals side by side. On the left, draw a neutral expression: eyes on the horizontal midline, mouth at 0.75H, and a slight curve. On the right, draw a curious expression: raise the inner eyebrow lines slightly and open the mouth a little. Keep the same H and W for both ovals so you can compare proportions.
The convention allows valid alternatives. You may change the eye spacing or mouth curve as long as the proportions remain consistent with your chosen H and W. The rubric rewards clear structure and checkable placement, not a single universal face.
- Draw two face ovals with the same H and W.
- Mark midlines and place eyes at 0.25W and 0.75W.
- Draw the neutral mouth at 0.75H with a slight curve.
- For the curious face, raise the inner eyebrow lines and open the mouth slightly.
- Compare both faces and adjust any placement that drifts from your chosen proportions.
Worked example
Draw a simple orangutan face with H = 10 cm and W = 8 cm. Place the eyes on the horizontal midline at 0.25W and 0.75W. Mark the mouth at 0.75H. Then add a relaxed arm with an elbow angle of about 100 degrees and a hand length of 3 cm if the forearm is 5 cm.
Worked answer
The face oval is 10 cm tall and 8 cm wide. The horizontal midline is 5 cm from the top. Eye centers are at 2 cm and 6 cm from the left edge. The mouth line is 7.5 cm from the top. The arm connects at the shoulder below the ear line, bends at the elbow to about 100 degrees, and the hand is 3 cm long, which is 0.6 times the 5 cm forearm. The drawing shows a clear face structure and a relaxed arm pose.
Four practice exercises
Exercise 1
A face oval has H = 12 cm and W = 9.6 cm. Where should the eye centers be placed horizontally if they sit at 0.25W and 0.75W?
Show answer and check
At 2.4 cm and 7.2 cm from the left edge.
Why: 0.25 times 9.6 equals 2.4, and 0.75 times 9.6 equals 7.2. These are the horizontal positions on the midline.
Check: Measure from the left edge of the oval and confirm the two distances add to 9.6 cm.
Exercise 2
An arm has a forearm of 6 cm. Using the hypothetical hand length of 0.6 times the forearm, what is the hand length?
Show answer and check
3.6 cm.
Why: Multiply 6 by 0.6 to get 3.6. This keeps the hand proportional to the forearm.
Check: Divide the hand length by the forearm length and confirm the result is about 0.6.
Exercise 3
A face oval is 10 cm tall. The mouth line is at 0.75H from the top. How far is the mouth line from the top, and how far from the bottom?
Show answer and check
7.5 cm from the top and 2.5 cm from the bottom.
Why: 0.75 times 10 equals 7.5. Subtract 7.5 from 10 to get 2.5.
Check: Add the two distances and confirm they equal 10 cm.
Exercise 4
You draw an elbow angle of 110 degrees. Is this within the suggested range of 90 to 120 degrees? Explain.
Show answer and check
Yes, 110 degrees is between 90 and 120 degrees.
Why: The range is inclusive from 90 to 120. Since 110 is greater than 90 and less than 120, it fits.
Check: Compare the measured angle to the endpoints 90 and 120 and confirm it lies between them.
Common mistakes
- Placing the eyes above or below the horizontal midline. Re-measure from the top of the oval to the midline and place the eye centers exactly on it.
- Making the arm too straight, so the pose looks stiff. Add a slight bend at the elbow and check that the angle is between 90 and 120 degrees.
- Using different H and W for the two practice faces. Label H and W on both ovals and keep them equal for a fair comparison.
- Drawing the hand much longer than the forearm. Measure the forearm and make the hand about 0.6 times that length, then adjust visually.
Self-check rubric
- Face oval has a labeled height H and width W.
- Eyes are placed on the horizontal midline at consistent fractions of W.
- Nose bridge and mouth line follow the chosen proportions.
- Arm has three segments and a visible elbow bend between 90 and 120 degrees.
- Hand length is about 0.6 times the forearm length, or a recorded alternative.
- Two practice faces use the same H and W for comparison.
- Valid alternatives are allowed if proportions are consistent and recorded.
Questions and answers
Do I need to use exact numbers?
No. The numbers are hypothetical examples. Choose your own H and W and keep the proportions consistent.
Can I change the eye spacing?
Yes. The convention is a guide. You can widen or narrow the eyes as long as you record your choice and keep it consistent.
How do I know the arm pose looks natural?
Check the elbow angle and the hand length relative to the forearm. A slight bend and a hand about 0.6 times the forearm length usually reads as relaxed.
What should I practice first?
Start with the face oval and midlines, then add the arm. The practice panel with two expressions helps you compare proportions.