Free original lessons
Owl Face Drawing: Facial Disk, Beak, and Eye Symmetry
Learn to construct an owl face using ring guides, a beak triangle, and a symmetry axis. Practice placement and proportion with checkable steps.
Free lesson
Four exercises
Worked answers
Object Drawing Lessons
This lesson focuses on the structural layout of an owl face: the facial disk rings, the beak triangle, and the symmetry axis that aligns the eyes. You will use simple geometric guides to place features before adding any detail. The convention for line placement is explicit: horizontal guides are measured from the baseline (the bottom of the facial disk) to the midline (the vertical center of the disk). Letter styles and ring spacing vary by owl type, so valid alternatives exist. All measurements are hypothetical examples; measure your own paper and tools. No downloads or files are currently available; the resource plan describes what is planned.
Practice materials: Printable downloads are not available for this lesson yet. Use the instructions and four exercises below.
Reference illustration
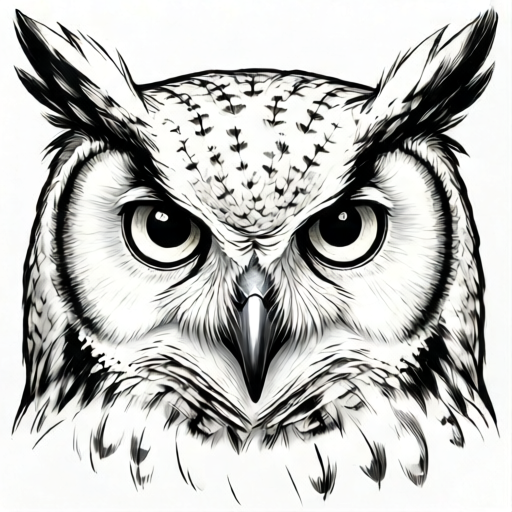
Use the stated measurements and conventions for each exercise.
Set the symmetry axis and facial disk boundary
Begin with a vertical symmetry axis. Mark a baseline at the bottom of the intended facial disk and a midline at its vertical center. The distance from baseline to midline is your reference height H. For this lesson, use a hypothetical H of 8 cm on a 20 cm by 25 cm sheet. Draw a circle or oval centered on the axis with its bottom at the baseline and its top at twice H above the baseline. This is the outer facial disk boundary.
Check symmetry by folding the paper along the axis or by measuring equal horizontal distances from the axis at three heights: near the baseline, at the midline, and near the top. Small differences are acceptable if the overall layout reads as balanced.
- Draw a vertical axis and mark baseline and midline points.
- Measure H from baseline to midline; mark 2H above baseline for the disk top.
- Draw the outer disk boundary as a circle or oval touching baseline and top mark.
- Verify left-right distances from the axis at three heights.
Place the facial disk rings
Inside the outer boundary, draw one or two concentric ring guides. Ring spacing is a style choice; a common hypothetical example is an inner ring at 60 percent of the outer radius and a middle ring at 80 percent. These rings are guides for the facial disk, not final feather edges. Keep ring centers on the symmetry axis.
Valid alternatives include a single ring, asymmetric ring spacing that still reads as a disk, or a slightly flattened oval. The rubric rewards consistent spacing and clear labeling over a single universal shape.
- Mark the disk center on the axis at height H above baseline.
- Measure the outer radius from center to boundary.
- Mark inner ring radius at a chosen percentage of the outer radius.
- Draw rings as smooth curves centered on the axis.
Construct the beak triangle and eye placement
The beak sits on the symmetry axis, centered between the eyes. Construct it as a downward-pointing triangle: a top edge between the eyes and an apex below. A hypothetical example places the top edge at the midline and the apex at 1.5 cm below the midline, with a top width of 2 cm. Adjust these numbers to your disk size, but keep the apex on the axis.
Place eyes symmetrically: measure equal horizontal distances from the axis at the same height. Eye height is typically near the midline or slightly above. Draw eye circles as guides, then check that the distance from each eye center to the axis is equal within your measurement precision.
- Mark the beak top edge endpoints equally left and right of the axis.
- Draw the apex on the axis below the top edge.
- Connect endpoints to apex to form the beak triangle.
- Mark eye centers at equal distances from the axis and at the same height.
- Draw eye guide circles and re-measure symmetry.
Refine and self-check the layout
Before adding detail, review the layout against the rubric: axis straightness, ring consistency, beak centering, and eye symmetry. Use a simple arithmetic check: record left and right distances from the axis for eyes and beak endpoints; the differences should be small relative to your measurement unit. If a difference is large, adjust the feature rather than redrawing the whole disk.
Remember that letter styles and ring spacing vary. A valid alternative may use a wider beak or closer-set eyes if the symmetry and disk structure remain clear. The goal is a readable owl facial construction, not a species portrait.
- Measure and record left-right distances for eyes and beak endpoints.
- Compare differences; adjust any feature with a large mismatch.
- Confirm rings are centered and labeled as guides.
- Proceed to detail only after the layout passes checks.
Worked example
On a sheet with a vertical axis, baseline at 0 cm, midline at 8 cm, and disk top at 16 cm, place an outer disk, one inner ring at 60 percent radius, a beak triangle with top edge at midline and apex 1.5 cm below midline, and two eyes at 3 cm left and right of the axis at 9 cm height. Describe the layout and check symmetry.
Worked answer
The outer disk is a circle centered at 8 cm above baseline with radius 8 cm. The inner ring radius is 4.8 cm (60 percent of 8 cm), centered on the axis. The beak top edge spans from 1 cm left to 1 cm right of the axis at 8 cm height, with apex on the axis at 6.5 cm height. Eye centers are at 3 cm left and 3 cm right of the axis at 9 cm height. Symmetry check: left and right eye distances are both 3 cm; beak endpoints are both 1 cm from the axis. Differences are 0 cm, so the layout is symmetric within the stated precision.
Four practice exercises
Exercise 1
Given a baseline at 0 cm, midline at 6 cm, and disk top at 12 cm, describe where to place the disk center and what outer radius to use.
Show answer and check
Disk center is on the axis at 6 cm above baseline; outer radius is 6 cm.
Why: The disk spans from baseline to top, so its center is halfway between 0 and 12 cm, and the radius is half the height.
Check: Verify center height plus radius equals 12 cm and center height minus radius equals 0 cm.
Exercise 2
An inner ring is set at 75 percent of an outer radius of 8 cm. What is the inner ring radius, and where is its center?
Show answer and check
Inner ring radius is 6 cm; center is on the symmetry axis at the same height as the disk center.
Why: 75 percent of 8 cm is 6 cm; concentric rings share the same center.
Check: Multiply 0.75 by 8 to confirm 6 cm, and confirm the center mark is on the axis.
Exercise 3
A beak triangle has top edge endpoints 1.5 cm left and 1.5 cm right of the axis at 7 cm height, and an apex on the axis at 5 cm height. Is the beak centered? Explain.
Show answer and check
Yes, the beak is centered because both top edge endpoints are 1.5 cm from the axis and the apex lies on the axis.
Why: Centering requires equal left and right distances for the top edge and the apex on the axis.
Check: Compare left and right distances (both 1.5 cm) and confirm the apex height is on the axis.
Exercise 4
Eye centers are placed at 2.8 cm left and 3.2 cm right of the axis at the same height. Describe the symmetry issue and a simple fix.
Show answer and check
The eye distances differ by 0.4 cm; adjust one eye so both are at the same distance, for example 3.0 cm each.
Why: Symmetry requires equal distances from the axis at the same height; a small adjustment corrects the mismatch.
Check: Subtract the distances to find the difference (0.4 cm) and re-measure after adjustment to confirm equality.
Common mistakes
- Drawing the beak off the symmetry axis. Re-mark the axis and place the beak apex directly on it; measure equal distances to the top edge endpoints.
- Using unequal eye distances from the axis. Measure from each eye center to the axis at the same height and adjust until the distances match within your precision.
- Treating ring guides as final feather edges. Label rings as construction guides and keep them light; final edges can vary by style.
- Assuming one universal ring spacing. Choose a spacing percentage and state it; valid alternatives are allowed if the disk reads clearly.
Self-check rubric
- Symmetry axis is straight and clearly marked.
- Outer facial disk boundary touches baseline and top mark and is centered on the axis.
- Ring guides are centered on the axis and labeled as construction guides.
- Beak triangle apex lies on the axis and top edge is centered between the eyes.
- Eye centers are at equal distances from the axis at the same height.
- Measurements and units are recorded and consistent.
- Valid stylistic alternatives are accepted if symmetry and disk structure remain clear.
Questions and answers
Do I need a specific paper size?
No. The hypothetical 20 cm by 25 cm sheet and 8 cm reference height are examples. Measure your own paper and choose a reference height that fits.
How many facial disk rings should I draw?
One or two ring guides are typical. Spacing is a style choice; keep rings centered on the axis and label them as guides.
Can the beak be wider or narrower?
Yes. The triangle proportions are adjustable. Keep the apex on the axis and the top edge centered between the eyes.
What if my eyes are not perfectly equal?
Small differences are acceptable. Measure left and right distances from the axis; if the difference is large, adjust one eye rather than redrawing the disk.