Free original lessons
Upside-Down Elephant Drawing: Orientation and Proportion Practice
Learn to copy an inverted elephant by tracking orientation and proportion cues, then draw your own upside-down elephant with a simple check.
Free lesson
Four exercises
Worked answers
Object Drawing Lessons
Drawing an upside-down elephant is an orientation exercise, not an anatomy lesson. The goal is to copy a reference that has been rotated 180 degrees, keeping the same shapes and relative sizes while resisting the urge to mentally flip the animal upright. Use the tracing box midline and center line as your reference axes for measuring proportions. Work on plain paper with a pencil, eraser, and a ruler. All measurements below are hypothetical examples; measure your own paper and reference to set real values. The reference is described in text so you can build it yourself: an elephant seen from the side, standing on four legs, trunk curling forward, one ear visible, tail at the back. To invert it, rotate the whole drawing 180 degrees so the feet point up and the trunk curls downward. Keep the same left-right order of features as they appear after rotation.
Practice materials: Printable downloads are not available for this lesson yet. Use the instructions and four exercises below.
Reference illustration
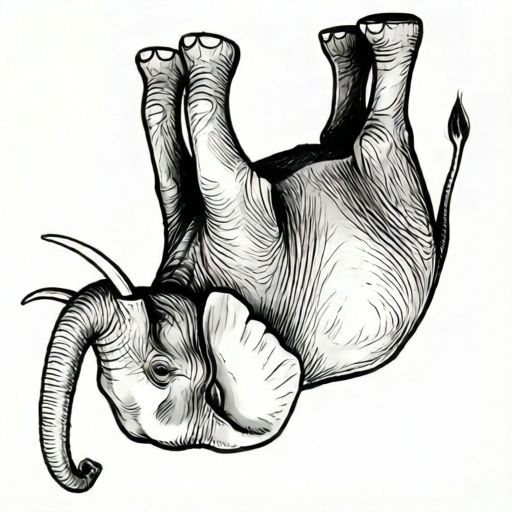
Use the stated measurements and conventions for each exercise.
Set up the inverted reference and tracing box
As a hypothetical example, draw or print a side-view elephant about 12 cm wide and 8 cm tall on a sheet of paper (replace with your own measured size). Mark a baseline under the feet and a midline through the body. Rotate the sheet 180 degrees so the elephant is upside down. This rotated sheet is your reference. On a second sheet, draw a rectangle 14 cm by 10 cm as the tracing box (again, a hypothetical example; size it to your paper). Divide it with a light horizontal midline and a vertical center line. Because the reference is upside down, label the top edge of the box 'feet edge' and the bottom edge 'head edge'.
Place the rotated reference beside the tracing box. Before drawing, point to the trunk tip, the ear, the tail, and the four feet on the reference. Say aloud where each sits relative to the box edges. This orientation check prevents you from drawing an upright elephant by habit.
- Rotate your reference 180 degrees and tape it down so it cannot shift.
- Draw a 14 cm by 10 cm tracing box with a midline and center line.
- Label the feet edge and head edge according to the rotated view.
- Point to trunk, ear, tail, and feet, and state each position aloud.
Copy proportion cues into the tracing box
Use the box to copy the inverted elephant shape by shape. Measure key distances on the reference with a ruler and record them in centimeters. Each example in this lesson uses its own independent hypothetical values, so always measure your own reference. As a hypothetical example, if the body length is 8 cm and the leg length is 3 cm on a reference, keep the ratio 8:3 in your copy. Mark the body as a rounded rectangle, then add the head, trunk, ear, legs, and tail in the rotated positions. Check that the trunk curls toward the head edge and the feet point toward the feet edge.
Proportion cues include the body-to-leg ratio, the ear size relative to the head, and the trunk length relative to the body. Use light pencil lines so you can adjust. If a shape looks too large, compare it to the box divisions rather than guessing.
- Measure body length, leg length, ear width, and trunk length on the reference.
- Mark the body outline in the box using the measured ratios.
- Add head, trunk, ear, legs, and tail in rotated positions.
- Compare each shape to the box midline and center line.
Draw independently and run the orientation check
On a blank frame 16 cm by 12 cm, draw your own upside-down elephant without tracing. Keep the same proportion cues you measured. When finished, run a four-point orientation check: feet point to the top edge, trunk curls toward the bottom edge, the ear sits on the correct side after rotation, and the tail is opposite the head. Then run a proportion check: measure your body length and leg length, divide body length by leg length, and compare that ratio to the reference body-to-leg ratio. Aim to be within about 10% of the reference ratio rather than matching each length exactly.
Valid alternatives are allowed. Your elephant may have a different ear shape or trunk curve as long as the orientation and proportion cues hold. Record your measurements beside the drawing so the check is visible.
- Draw the elephant in the blank frame using light pencil lines.
- Check feet, trunk, ear, and tail positions against the rotated reference.
- Measure body length and leg length and compare the ratio to the reference.
- Adjust any shape that fails the check, then erase construction lines.
Worked example
A reference elephant has a body length of 10 cm and a leg length of 4 cm. After rotating it 180 degrees, you copy it into a 14 cm by 10 cm box. What body-to-leg ratio should you keep, and where should the feet point?
Worked answer
Keep the ratio 10:4, which simplifies to 5:2. The feet should point toward the top edge of the box, which is the feet edge after rotation.
Four practice exercises
Exercise 1
A rotated reference shows an elephant with body length 8 cm and leg length 2 cm. You draw a copy with body length 12 cm. What leg length keeps the same ratio?
Show answer and check
3 cm.
Why: The reference ratio is 8:2, which simplifies to 4:1. For a body length of 12 cm, divide by 4 to get 3 cm.
Check: Multiply your leg length by 4 and confirm it equals the body length: 3 times 4 equals 12.
Exercise 2
In a rotated drawing, the trunk tip is 2 cm from the head edge and the feet are 1 cm from the feet edge. Which edge is the head edge if the box is 10 cm tall?
Show answer and check
The bottom edge.
Why: After 180-degree rotation, the head and trunk move to the opposite side from the feet. The feet are near the top edge, so the head edge is the bottom edge.
Check: The feet are 1 cm from the top edge, so the top edge is the feet edge. After 180-degree rotation the head edge is opposite the feet edge, so the bottom edge is the head edge. Confirm the trunk tip is 2 cm from the bottom edge.
Exercise 3
You measure an ear width of 3 cm and a head width of 7 cm on the reference. Your copy has a head width of 14 cm. What ear width keeps the same proportion?
Show answer and check
6 cm.
Why: The reference ear-to-head ratio is 3:7. Your head width is twice the reference head width, so double the ear width: 3 times 2 equals 6 cm.
Check: Divide your ear width by your head width: 6 divided by 14 simplifies to 3:7, matching the reference.
Exercise 4
A tracing box is 14 cm wide and 10 cm tall. You place the body center at the box center. The reference body is 8 cm long and 5 cm tall. If you keep the same size, how far is the body edge from the left box edge?
Show answer and check
3 cm.
Why: The box center is 7 cm from the left edge. Half the body length is 4 cm. Subtract: 7 minus 4 equals 3 cm.
Check: Add the distance and half the body length: 3 plus 4 equals 7, the box center.
Common mistakes
- Drawing the elephant upright out of habit. Keep the rotated reference taped down and point to the feet edge before each new shape.
- Changing the body-to-leg ratio during copying. Measure both lengths on the reference and write the ratio beside your drawing before you start.
- Placing the ear on the wrong side after rotation. Mark the ear side on the reference with a small arrow, then transfer that arrow to your box.
- Making the trunk too short or too long. Measure trunk length relative to body length and compare your copy to that ratio.
Self-check rubric
- Orientation: feet point to the feet edge and trunk curls toward the head edge.
- Proportion: the measured body-to-leg ratio is within about 10% of the reference body-to-leg ratio.
- Feature placement: ear and tail are on the correct sides after rotation.
- Measurement record: key lengths are written beside the drawing in centimeters.
- Valid alternatives: ear shape or trunk curve may differ if orientation and proportion checks pass.
Questions and answers
Do I need to know elephant anatomy?
No. This task practices orientation and proportion only. Copy the shapes and relative sizes you see in the rotated reference.
What do the tracing box midline and center line do?
They are your reference axes. Measure distances from the midline and center line to compare shapes and keep proportions consistent after rotation.
Can my upside-down elephant look different from the reference?
Yes, as long as the orientation check and proportion cues pass. Ear shape and trunk curve may vary.
How do I know my measurements are correct?
Measure your own paper and reference with a ruler. The numerical values in this lesson are hypothetical examples, so replace them with your actual measurements.