Free original lessons
Draw Angel Falls: Cliff, Waterfall, and Plunge Pool Construction
Learn to draw Angel Falls with a structured cliff, a clear waterfall drop, and a shaded plunge pool using simple shapes and checkable proportions.
Free lesson
Four exercises
Worked answers
Object Drawing Lessons
Angel Falls is a specific scene: a tall, free-falling waterfall dropping from a cliff into a plunge pool. This lesson breaks the scene into three construction problems: the cliff form, the waterfall drop, and the plunge pool. You will use a defined drawing convention, simple arithmetic, and a rubric that allows valid stylistic alternatives. All measurements are hypothetical examples; measure your own paper and tools before drawing.
Practice materials: Printable downloads are not available for this lesson yet. Use the instructions and four exercises below.
Reference illustration
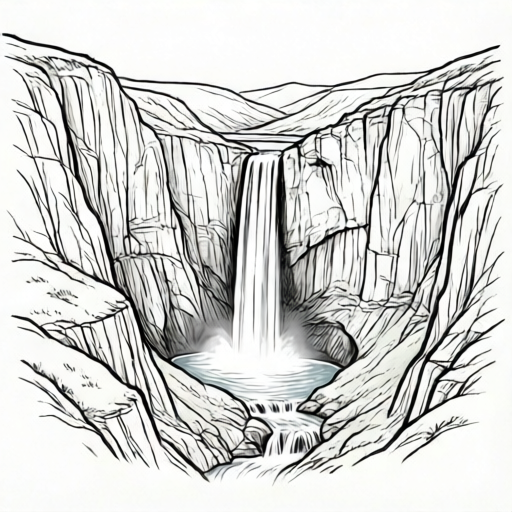
Use the stated measurements and conventions for each exercise.
Cliff Form and Scene Frame
Begin by defining a scene frame on your paper. A rectangle about 18 cm wide and 24 cm tall is a hypothetical example; adjust to your paper. Mark a horizon line at about 60 percent down from the top. The cliff occupies the upper two-thirds, and the plunge pool sits near the bottom.
The cliff is not a single vertical line. Build it as a stepped mass: a broad upper ledge, a narrower middle face, and a lower base that meets the pool. Use three or four overlapping planes so the cliff reads as solid rock. Keep the waterfall channel as a clear vertical gap between cliff planes.
- Draw the scene frame and mark the horizon line at a chosen height.
- Sketch the cliff as three stacked planes: upper ledge, middle face, lower base.
- Mark a vertical channel about one-fifth of the frame width for the waterfall.
- Check that the cliff base meets the pool area without crossing the frame edge.
Waterfall Drop Lines
The waterfall is a free drop, not a cascade over rocks. Draw two nearly parallel drop lines from the cliff lip to the pool surface. The lines may taper slightly inward at the bottom to suggest falling water. Add a few shorter interior lines to show flow, but keep the main drop edges clear.
Use a simple convention: solid lines for the waterfall edges, dashed lines for spray, and short horizontal ticks for the pool surface. This convention is defined here so your drawing can be checked consistently. Letter styles and line weights may vary; the convention is about meaning, not a single universal look.
- Mark the cliff lip where the water leaves the rock.
- Draw two drop lines from the lip to the pool surface.
- Add interior flow lines and dashed spray marks.
- Check that the drop lines do not cross the cliff planes.
Plunge Pool Construction and Shading
The plunge pool is an oval or rounded shape at the cliff base. Its width should be wider than the waterfall channel. Draw the pool outline first, then add shading bands: darker near the waterfall impact, lighter toward the outer edges. Use short curved strokes that follow the pool shape.
A hypothetical example: if the waterfall channel is 4 cm wide, make the pool about 10 cm wide and 6 cm tall. These numbers are examples only; measure your own frame and keep units consistent. Shade the impact zone with denser strokes and leave the outer pool lighter to show depth.
- Draw the pool outline wider than the waterfall channel.
- Mark the impact zone directly below the drop lines.
- Add shading bands from dark at impact to light at the edges.
- Check that the pool sits below the cliff base and within the frame.
Composition and Final Checks
Review the whole scene: the cliff should dominate the upper frame, the waterfall should read as a clear vertical drop, and the pool should anchor the bottom. Adjust the cliff planes if the waterfall channel looks too wide or too narrow. Keep the drop lines parallel enough to read as a single fall.
Use the rubric to check construction, clarity, and convention. Valid alternatives include different cliff textures, varied spray marks, and different shading densities, as long as the three main parts remain identifiable.
- Compare the waterfall channel width to the pool width.
- Confirm the drop lines reach the pool surface.
- Check that shading follows the pool shape.
- Label any hypothetical measurements you used.
Worked example
A scene frame is 18 cm wide and 24 cm tall. The waterfall channel is 4 cm wide. The pool is drawn 10 cm wide and 6 cm tall. The cliff base is 2 cm above the pool top. Check the construction.
Worked answer
The pool is wider than the channel (10 cm > 4 cm), the cliff base sits above the pool, and the channel is about one-fifth of the frame width (4 cm of 18 cm). The construction is consistent with the lesson.
Four practice exercises
Exercise 1
A frame is 20 cm wide. The waterfall channel is 5 cm wide. What is the channel width as a fraction of the frame width?
Show answer and check
5/20 = 1/4 of the frame width.
Why: Divide the channel width by the frame width and simplify.
Check: Multiply 20 cm by 1/4 to get 5 cm.
Exercise 2
A pool is 12 cm wide and a waterfall channel is 4 cm wide. How many times wider is the pool than the channel?
Show answer and check
3 times wider.
Why: Divide pool width by channel width: 12 ÷ 4 = 3.
Check: Multiply 4 cm by 3 to get 12 cm.
Exercise 3
A cliff base is 3 cm above the pool top. The pool is 7 cm tall. If the pool top is at 15 cm from the bottom of the frame, where is the cliff base measured from the bottom?
Show answer and check
18 cm from the bottom.
Why: Add the gap to the pool top position: 15 + 3 = 18 cm.
Check: Subtract 3 cm from 18 cm to return to 15 cm.
Exercise 4
A waterfall drop is 16 cm long. You draw it in two equal segments. How long is each segment?
Show answer and check
8 cm each.
Why: Divide the total drop by 2: 16 ÷ 2 = 8 cm.
Check: Add the two segments: 8 + 8 = 16 cm.
Common mistakes
- Drawing the waterfall as a wide cascade instead of a free drop. Keep two nearly parallel drop lines and a narrow channel; add spray only as dashed marks.
- Making the plunge pool narrower than the waterfall channel. Widen the pool outline so it is clearly broader than the channel.
- Letting the cliff base cross the pool outline. Draw the pool first, then place the cliff base just above it.
- Using inconsistent units for hypothetical measurements. Choose centimetres or another unit and label every example value.
Self-check rubric
- Cliff is built from at least three stacked planes.
- Waterfall has two clear drop lines from cliff lip to pool surface.
- Plunge pool is wider than the waterfall channel.
- Shading follows the pool shape and marks the impact zone.
- Convention is used consistently: solid edges, dashed spray, short pool ticks.
- Hypothetical measurements are labelled and units are consistent.
Questions and answers
Do I need to copy a real photograph of Angel Falls?
No. The lesson teaches construction of the cliff, waterfall drop, and plunge pool. You may use the described scene frame and your own observations.
Can I use different line styles?
Yes. The convention defines solid edges, dashed spray, and short pool ticks. You may vary weight and texture as long as these meanings stay clear.
Are the measurements fixed?
No. All numbers are hypothetical examples. Measure your own paper and keep units consistent.
How do I know the drawing is correct?
Use the rubric and check method: the cliff has stacked planes, the waterfall has two drop lines reaching the pool, and the pool is wider than the channel.