Free original lessons
Astrobot Drawing: Head and Limb Placement Construction
Learn to draw an astrobot character by placing the head and limbs with clear joint steps, proportion guides, and a practice frame for placement.
Free lesson
Four exercises
Worked answers
Object Drawing Lessons
This lesson teaches a repeatable construction method for an astrobot character: a friendly robot explorer with a rounded head, a boxy torso, and jointed limbs. You will use a simple convention: x-height means the distance from the baseline to the midline of a letter or shape, and you will apply that idea to place the head and limb joints consistently. The goal is not a single correct drawing but a clear, checkable construction. You will work from a construction plate concept: a printable sheet with a head-placement zone, limb-joint steps, and body proportion guides, plus a blank robot frame for practice. All resources are planned and free; none are built yet. The method uses simple arithmetic and consistent units, and any numerical values are hypothetical examples you can adjust after measuring your own paper and tools.
Practice materials: Printable downloads are not available for this lesson yet. Use the instructions and four exercises below.
Reference illustration
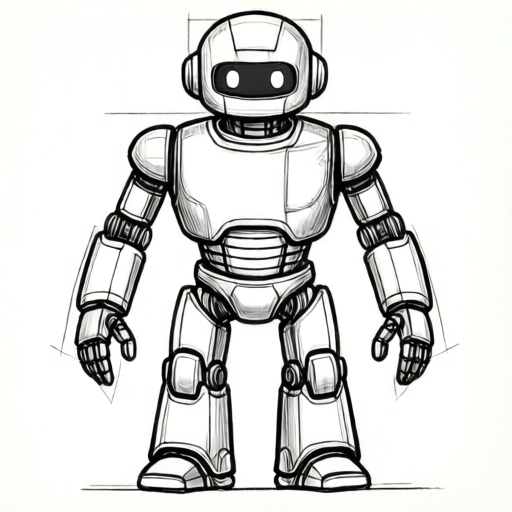
Use the stated measurements and conventions for each exercise.
Set up the construction plate and define your units
Choose a drawing surface and measure it with a ruler. Record the width and height in the same unit, such as centimeters. For this lesson, suppose your paper is 20 cm wide and 28 cm tall; these are hypothetical example values, not a standard. Mark a light border 2 cm from each edge so your robot stays inside the frame. The remaining area is your construction field.
Define one unit as the x-height of your smallest planned letter or shape detail. For example, if your smallest detail is 1 cm tall from baseline to midline, then one unit equals 1 cm. Use this unit for all placement arithmetic so head, torso, and limb joints share a consistent scale. Write the unit at the top of the page.
Draw a vertical center line and a horizontal midline across the construction field. The midline is your reference for symmetry and for the x-height convention: distances measured from the baseline to the midline are one x-height. Keep all guide lines light so they can be erased or left as construction marks.
- Measure the paper width and height; record both in one unit.
- Mark a 2 cm border on all sides using a ruler.
- Define one unit as the baseline-to-midline distance of your smallest detail.
- Draw a vertical center line and a horizontal midline.
- Label the unit and the center line on the page.
Place the head with a placement zone and proportion guide
The head placement zone is a rectangle centered on the vertical center line. Its width is three units and its height is three units. Place the top of the zone two units below the top border. This gives the astrobot a clear head area without crowding the frame. The zone is a guide, not a final outline.
Inside the zone, draw a circle or rounded square for the head. The head should fit inside the zone with a small margin, about half a unit on each side. Mark the head center where the vertical center line and the horizontal midline of the zone cross. This center is the reference for the face and any antenna.
Use the x-height convention to check the head: the distance from the bottom of the head to its midline should be about one and a half units. If your head is much taller or shorter, adjust the zone or the head shape, not the unit. Keep the head centered so the limbs can be placed symmetrically.
- Draw a three-unit by three-unit head zone centered on the vertical line.
- Place the top of the zone two units below the top border.
- Draw the head shape inside the zone with a half-unit margin.
- Mark the head center at the zone midline.
- Check the head height against the x-height convention and adjust the shape.
Build the torso and place limb joints in order
Below the head zone, leave a neck gap of one unit. The torso is a rectangle four units wide and five units tall, centered on the vertical line. Its top is one unit below the head zone. This proportion keeps the astrobot stable and leaves room for arms and legs. Draw the torso lightly and mark its corners.
Place shoulder joints on the torso top corners, one unit inward from each side. Place hip joints on the torso bottom corners, one unit inward from each side. These joint marks are the anchors for the limbs. Use the same unit for all joint spacing so the limbs match.
Draw arms as two segments from each shoulder joint: an upper arm of three units and a forearm of three units, with a small joint circle at the elbow. Draw legs as two segments from each hip joint: a thigh of four units and a shin of four units, with a joint circle at the knee. Keep the limb segments straight or gently curved, and check that left and right lengths match within half a unit.
- Leave a one-unit neck gap below the head zone.
- Draw a four-unit by five-unit torso centered on the vertical line.
- Mark shoulder joints one unit inward from the torso top corners.
- Mark hip joints one unit inward from the torso bottom corners.
- Draw upper arms and forearms with elbow joint circles.
- Draw thighs and shins with knee joint circles.
- Compare left and right limb lengths and adjust within half a unit.
Refine the astrobot and check placement
Add simple astrobot details: a visor or two eyes inside the head, a small antenna above the head center, and a chest panel on the torso. Keep details inside the construction guides so the placement remains clear. Use the x-height convention for small details: a visor height of one unit from baseline to midline is a good starting point.
Check the whole construction with arithmetic. Measure the head zone width, torso width, and limb segment lengths. Confirm that the head is centered, the torso is centered, and the shoulder and hip joints are symmetric. If a measurement is off by more than half a unit, adjust the guide rather than redrawing everything.
Erase or lighten the construction lines only after the placement checks pass. The final drawing should show a clear head, torso, and jointed limbs that match the planned proportions. Keep the unit label and center line visible if you plan to compare multiple attempts.
- Add visor, antenna, and chest panel inside the guides.
- Measure head zone, torso, and limb segments.
- Check centering and joint symmetry.
- Adjust any measurement off by more than half a unit.
- Lighten construction lines after checks pass.
Worked example
Using a 20 cm by 28 cm paper with a 2 cm border and a 1 cm unit, place a head zone three units wide and three units tall, centered, with its top two units below the top border. Then place a torso four units wide and five units tall with a one-unit neck gap. Where is the torso top relative to the top border?
Worked answer
The head zone top is 2 cm below the top border. The head zone is 3 cm tall, so its bottom is 5 cm below the top border. The neck gap is 1 cm, so the torso top is 6 cm below the top border. The torso is centered and 4 cm wide, leaving equal side margins within the 16 cm construction width after the 2 cm borders.
Four practice exercises
Exercise 1
On a 24 cm by 30 cm paper with a 2 cm border and a 1.5 cm unit, find the construction width and height after the border.
Show answer and check
Construction width is 24 minus 4 equals 20 cm. Construction height is 30 minus 4 equals 26 cm.
Why: The border removes 2 cm from each side, so subtract 4 cm from both dimensions. Keep units in centimeters.
Check: Measure the bordered area with a ruler and confirm 20 cm by 26 cm.
Exercise 2
A head zone is three units wide and three units tall. Its top is two units below the top border. With a one-unit neck gap, how far below the top border is the torso top?
Show answer and check
The torso top is 6 units below the top border.
Why: Head zone top is 2 units down. Head zone height is 3 units, so its bottom is 5 units down. Add the 1-unit neck gap to get 6 units down.
Check: Add 2 plus 3 plus 1 and compare with the measured distance on the page.
Exercise 3
A torso is four units wide. Shoulder joints are one unit inward from each top corner. How far apart are the two shoulder joints?
Show answer and check
The shoulder joints are 2 units apart.
Why: Each joint is 1 unit inward from a corner, so the distance between them is 4 minus 1 minus 1 equals 2 units.
Check: Measure between the two joint marks and confirm 2 units.
Exercise 4
An arm has an upper arm of three units and a forearm of three units. A leg has a thigh of four units and a shin of four units. If the left arm measures 6.5 units total and the right arm measures 6 units total, is the difference within half a unit?
Show answer and check
Yes, the difference is 0.5 units, which is within the half-unit allowance.
Why: Subtract 6 from 6.5 to get 0.5. The check allows differences up to half a unit, so this passes.
Check: Measure both arms with the same ruler and subtract the smaller total from the larger.
Common mistakes
- Drawing the head without a placement zone, so it drifts off center. Draw the three-unit head zone first and keep the head inside it with a half-unit margin.
- Using different units for head, torso, and limbs, which makes proportions inconsistent. Define one unit from the baseline-to-midline distance and use it for every measurement.
- Placing shoulder or hip joints at the very corners of the torso, making limbs too wide. Move each joint one unit inward from the torso corner and mark it before drawing the limb.
- Making left and right limb segments different lengths without noticing. Measure both sides and adjust any difference greater than half a unit.
Self-check rubric
- Head is placed inside a centered three-unit zone with a visible margin.
- One unit is defined from baseline to midline and used consistently.
- Torso is centered and sized four units by five units with a one-unit neck gap.
- Shoulder and hip joints are marked one unit inward from torso corners.
- Limb segments match planned lengths within half a unit on both sides.
- Construction lines are light and placement checks are recorded.
- Valid alternatives in head shape or limb style are accepted if placement checks pass.
Questions and answers
What does x-height mean in this lesson?
X-height is the distance from the baseline to the midline of a letter or shape. Here it defines one unit for placement arithmetic, so head and limb details share a consistent scale.
Do I have to use the hypothetical example measurements?
No. The 20 cm by 28 cm paper and 1 cm unit are examples. Measure your own paper and choose a unit that fits your drawing surface, then keep all units consistent.
Can the astrobot have different head shapes or limb styles?
Yes. The construction method allows valid alternatives. A rounded square head or curved limbs are acceptable if the placement zones, joint anchors, and proportion checks are followed.
How do I know the drawing is finished?
The placement checks pass: head centered in its zone, torso centered, joints symmetric, and limb lengths matching within half a unit. Details can vary after those checks.