Free original lessons
Draw a Dandelion with Drifting Seeds and a Tilted Stem
Learn to draw a dandelion seed head with radiating pappus lines, a curved drift path for three seeds, and a clearly measured stem angle.
Free lesson
Four exercises
Worked answers
Object Drawing Lessons
This lesson teaches a simple, repeatable way to draw a dandelion in blowing conditions. You will build a circular seed-head guide, add radiating pappus lines, place three drifting seeds along a curved path, and set the stem at a measured angle. The method uses a defined drawing convention: the seed head is a circle, each pappus is a set of straight lines radiating from a small seed point, and the stem angle is measured from vertical. Letter styles and hand pressure vary, so the rubric rewards clear structure and consistent spacing rather than a single perfect line. All measurements are hypothetical examples you can adjust to your paper and tools.
Practice materials: Printable downloads are not available for this lesson yet. Use the instructions and four exercises below.
Reference illustration
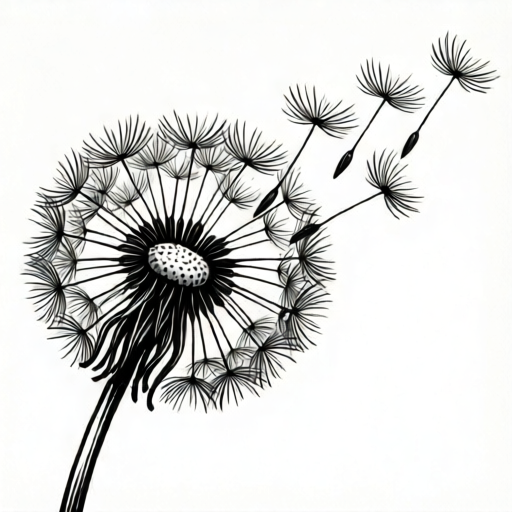
Use the stated measurements and conventions for each exercise.
Build the seed-head guide and radiating pappus
Start with a light circle for the seed head. A hypothetical diameter of 6 cm works on A4 paper. Mark the center with a small dot. This circle is a guide, not a final outline; it keeps the pappus lines evenly distributed.
Each seed is drawn as a short stalk from the center area outward, ending in a small seed point. From that seed point, draw five to seven straight pappus lines fanning outward. Keep the fan angle roughly consistent around the head so the silhouette reads as a sphere of seeds.
Use a simple convention: pappus lines are straight, evenly spaced within each fan, and about one-third the length of the head radius. Vary line length slightly to suggest depth, but keep the overall circular silhouette.
- Draw a light circle 6 cm across and mark its center.
- Draw eight to twelve short stalks from near the center to the circle edge.
- At each stalk end, add a small seed point.
- From each seed point, draw five to seven straight pappus lines fanning outward.
- Check that the outer tips form a rough circle and that no fan is much denser than its neighbors.
Set the stem angle and add the drift path
The stem angle is measured from vertical. A hypothetical tilt of 20 degrees to the right gives a clear blowing look without making the head fall over. Use a protractor or a folded paper corner to check the angle; label your chosen value as a hypothetical example if you change it.
Draw the stem as a slightly curved line from the bottom of the seed head downward. The curve should be gentle and consistent, not kinked. The stem meets the head at the lower edge of the circle.
For the drift path, draw a light curved line from the right side of the seed head outward. Place three seed positions along this path at increasing distances. Each drifting seed has the same fan structure as the head seeds but is rotated to suggest motion.
- Measure 20 degrees from vertical and mark the stem direction.
- Draw a gentle curved stem from the lower edge of the head to the bottom of the page.
- Draw a light curved drift path from the right edge of the head outward.
- Mark three seed positions on the path at short, medium, and long distances.
- Draw each drifting seed with a seed point and five to seven pappus lines, rotating the fan to follow the path direction.
Refine spacing and check the composition
Spacing is the main readability factor. Around the head, gaps between seed fans should be similar. Along the drift path, the distance between seeds should increase steadily so the motion reads as acceleration.
Check the stem angle by comparing it to a vertical reference line. If the stem looks too steep, reduce the tilt by a few degrees and redraw lightly. Keep the head circle visible as a guide until the final pass.
Use consistent units: measure the head diameter, stem length, and seed distances in centimeters. A hypothetical stem length of 10 cm and drift distances of 2 cm, 4 cm, and 7 cm from the head edge give a clear progression.
- Compare gaps between adjacent seed fans and adjust any obvious outliers.
- Verify the stem angle against a vertical line.
- Check that drift distances increase from seed one to seed three.
- Erase the guide circle only after the pappus tips form a stable silhouette.
- Add a light ground line if needed, but keep the focus on the head and drifting seeds.
Worked example
Draw a dandelion head 6 cm across with a stem tilted 20 degrees to the right and three drifting seeds at 2 cm, 4 cm, and 7 cm from the head edge along a curved path.
Worked answer
A light 6 cm circle with a center dot, eight stalks ending in seed points, and five straight pappus lines per fan forming a circular silhouette. The stem curves gently from the lower edge at a 20-degree tilt from vertical. A light curved path extends right with three seed positions at 2 cm, 4 cm, and 7 cm from the head edge, each drawn with a rotated five-line fan. Guide circle erased after the silhouette is stable.
Four practice exercises
Exercise 1
Draw a seed head 5 cm across with ten stalks and six pappus lines per fan. State the head diameter and the number of lines per fan.
Show answer and check
A 5 cm circle with ten stalks ending in seed points, each with six straight pappus lines fanning outward. The outer tips form a rough circle.
Why: Ten stalks distribute the fans evenly around the circle, and six lines per fan give a clear but not dense silhouette. Stating the values makes the drawing checkable.
Check: Measure the head diameter with a ruler and count the stalks and lines per fan. Confirm the outer tips stay within about 1 cm of the guide circle.
Exercise 2
Draw a stem tilted 15 degrees to the left from vertical. Add a vertical reference line and label the angle as a hypothetical example.
Show answer and check
A gentle curved stem meeting the lower edge of the head and tilting 15 degrees left of a light vertical line. The angle is labeled as a hypothetical example.
Why: Measuring from a vertical reference makes the tilt checkable. Labeling the value as hypothetical keeps the drawing honest about chosen numbers.
Check: Compare the stem to the vertical line with a protractor or folded corner. The measured angle should be within a few degrees of 15.
Exercise 3
Place three drifting seeds along a curved path at 3 cm, 6 cm, and 9 cm from the head edge. Draw each with a five-line fan rotated to follow the path.
Show answer and check
A light curved path with three seed positions at 3 cm, 6 cm, and 9 cm from the head edge. Each seed has a seed point and five straight pappus lines rotated to match the local path direction.
Why: Increasing distances show acceleration, and rotating the fans connects the seeds to the path. Five lines per fan keeps the structure consistent with the head.
Check: Measure the three distances from the head edge and confirm they increase. Check that each fan has five lines and that the fan direction changes along the path.
Exercise 4
Draw a complete dandelion with a 7 cm head, a 25-degree stem tilt to the right, and two drifting seeds at 4 cm and 8 cm. List the three numerical values you used.
Show answer and check
A 7 cm head with eight to twelve stalks and five to seven pappus lines per fan, a stem tilted 25 degrees right from vertical, and two drifting seeds at 4 cm and 8 cm from the head edge along a curved path. Values listed: 7 cm head, 25-degree tilt, 4 cm and 8 cm drift distances.
Why: A larger head needs slightly more stalks to keep spacing even. The 25-degree tilt is steeper but still checkable against vertical. Two seeds at increasing distances keep the drift readable.
Check: Measure the head diameter, check the stem angle against a vertical line, and measure the two drift distances. Confirm the listed values match the drawing.
Common mistakes
- Drawing pappus lines as curved or tangled strokes. Use straight lines within each fan and keep the fan angle consistent. Curves make the seed head look like hair rather than pappus.
- Placing drifting seeds at equal distances along the path. Increase the spacing between seeds as they move away from the head. Equal spacing reads as a static row, not drifting motion.
- Setting the stem angle by eye without a reference. Draw a light vertical line and measure the tilt from it. Label any chosen angle as a hypothetical example and check it with a protractor or folded corner.
- Making the seed head too dense so individual fans merge. Limit the head to eight to twelve stalks and keep five to seven pappus lines per fan. Fewer, clearer fans read better than a solid mass.
Self-check rubric
- Seed head is circular and the pappus tips form a stable silhouette.
- Each seed fan uses five to seven straight lines with consistent spacing.
- Stem angle is measured from vertical and stated as a hypothetical value if changed.
- Three drifting seeds are placed at increasing distances along a curved path.
- Drifting seeds reuse the same fan structure and are rotated to follow the path.
- Units are consistent and any numerical values are labeled as hypothetical examples.
Questions and answers
How many pappus lines should each seed have?
Five to seven straight lines per fan is a practical range. Fewer looks sparse; more can merge into a blur. Keep the count consistent within a drawing.
Can I change the stem angle?
Yes. The 20-degree tilt is a hypothetical example. Any clear angle measured from vertical works if you state it and check it consistently.
Do drifting seeds need the same fan structure as the head?
Yes. Reusing the same seed point and fan structure keeps the drawing coherent. Rotate the fan to follow the drift path direction.
What if my hand pressure makes lines uneven?
The rubric rewards clear structure and consistent spacing, not uniform line weight. Light guide lines and a final pass with firmer strokes help control variation.