Free original lessons
Cat Anatomy Drawing Practice: Skeleton, Muscles, and Joints
Learn feline skeletal landmarks, major muscle groups, and joint positions for figure drawing using a clear convention, worked example, and four self-contained exercises.
Free lesson
Four exercises
Worked answers
Object Drawing Lessons
Drawing a cat convincingly depends less on fur texture than on understanding what lies beneath it. This lesson teaches a practical convention for locating skeletal landmarks, mapping major muscle groups, and marking joint positions so your cat figures read as living, flexible animals. You will use a simple proportional system, learn to distinguish bony points from soft masses, and practice placing landmarks on a described silhouette. All measurements are hypothetical examples; measure your own reference and paper. The convention treats x-height as the distance from baseline to midline of a letter, and letter styles vary, so treat written labels as approximate guides rather than fixed coordinates.
Practice materials: Printable downloads are not available for this lesson yet. Use the instructions and four exercises below.
Reference illustration
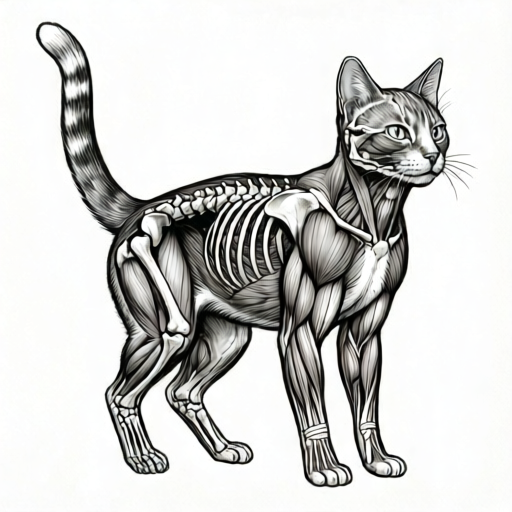
Use the stated measurements and conventions for each exercise.
Skeletal Landmarks You Can Feel and See
A cat skeleton provides the hard points that anchor every drawing. The skull's brow ridge and zygomatic arch create the cheek line. The scapula sits high on the shoulder, its spine often visible as a subtle ridge. The humerus runs from shoulder to elbow, and the radius and ulna run from elbow to wrist. The pelvis connects to the spine at the sacrum, and the femur runs from hip to knee. The tibia and fibula run from knee to ankle. The spine's thoracic and lumbar vertebrae form the back line, and the ribcage creates the barrel of the chest.
Use a consistent convention: mark bony landmarks with small circles and label them with short abbreviations. Treat the x-height of your label as baseline to midline, and accept that different handwriting styles will place the midline slightly differently. This is a guide, not a universal answer. When measuring, use the same units throughout, such as centimeters on your reference and on your paper.
- Locate the shoulder blade's upper edge and mark it with a small circle.
- Find the elbow by bending the front leg slightly; mark the bony point.
- Trace the spine from skull base to tail base, marking three to five points along the back.
- Mark the hip joint where the femur meets the pelvis.
- Mark the knee and ankle on the hind leg.
Major Muscle Groups and Mass Shapes
Muscles create the soft masses that sit over the skeleton. The trapezius runs from neck to shoulder and gives the shoulder a rounded slope. The latissimus dorsi covers the side of the ribcage and creates a smooth curve from back to front leg. The pectorals fill the chest between the front legs. The gluteals cover the hip and create the rounded rump. The quadriceps run along the front of the thigh, and the hamstrings run along the back. The gastrocnemius forms the calf mass above the ankle.
Draw muscle masses as simple ovals or teardrops that overlap the joints. Keep the bony landmarks visible as small circles so you can check that masses sit in plausible positions. A common error is making the chest too narrow; the ribcage should read as a broad barrel between the front legs.
- Sketch an oval for the ribcage between shoulder and hip.
- Add a teardrop for the gluteal mass over the hip joint.
- Place an oval for the quadriceps on the front of the thigh.
- Add a smaller oval for the gastrocnemius above the ankle.
- Check that each mass overlaps a joint rather than floating free.
Joint Positions and Movement
Joints are the hinges and pivots that determine pose. The shoulder joint allows wide rotation; the elbow is a hinge that bends the forearm relative to the upper arm (humerus). The wrist is flexible and supports the paw. The hip is a ball-and-socket joint with broad movement; the knee is a hinge; the ankle is a hinge that points the paw. Mark joints with small squares to distinguish them from bony landmarks marked with circles.
When drawing a walking pose, place the joints first, then connect them with limb lines, then add muscle masses. This order prevents the limbs from looking rubbery. Use simple arithmetic to check proportions: if the shoulder-to-elbow distance is 3 units, the elbow-to-wrist distance is often similar, around 3 units, though this varies with pose and individual animal.
- Mark shoulder, elbow, and wrist on the front leg with small squares.
- Mark hip, knee, and ankle on the hind leg with small squares.
- Connect joints with straight lines to establish limb direction.
- Add slight curves to suggest muscle and fur without losing the joint structure.
- Check that opposite legs alternate in a walking pose.
Putting It Together on a Silhouette
A blank cat silhouette is a useful practice surface. Begin by placing the spine line and ribcage oval. Then mark the shoulder and hip joints. Add the limb joints, then the muscle masses, then refine the outline. Keep your landmark circles and joint squares visible until the final pass so you can verify placement.
Use a rubric that rewards plausible placement and consistent convention rather than a single correct drawing. Valid alternatives include slightly different muscle shapes, different label handwriting, and small variations in joint position that still read as feline.
- Draw a spine line from skull base to tail base.
- Place a ribcage oval centered on the spine.
- Mark shoulder and hip joints with squares.
- Add elbow, wrist, knee, and ankle squares.
- Overlay muscle masses as ovals and teardrops.
- Refine the silhouette outline last.
Worked example
A described side-view cat silhouette has a spine line 12 cm long. The shoulder joint is 3 cm from the skull base along the spine, and the hip joint is 9 cm from the skull base. Place the ribcage oval centered between shoulder and hip, mark the shoulder and hip joints, and add one muscle mass over each hip. Use centimeters throughout.
Worked answer
Mark the skull base at 0 cm and the tail base at 12 cm. Place the shoulder joint at 3 cm and the hip joint at 9 cm. The ribcage oval spans from about 3 cm to 9 cm, centered at 6 cm. Add a gluteal teardrop over the hip joint at 9 cm and a quadriceps oval on the front of the thigh below the hip. Check that the ribcage width is roughly one-third of its length, about 2 cm, as a hypothetical example.
Four practice exercises
Exercise 1
A described cat silhouette has a spine line 10 cm long. The shoulder joint is 2 cm from the skull base, and the hip joint is 8 cm from the skull base. Mark both joints with squares, draw a ribcage oval centered between them, and state the oval's center position in centimeters from the skull base.
Show answer and check
Shoulder at 2 cm, hip at 8 cm, ribcage oval centered at 5 cm from the skull base.
Why: The midpoint between 2 cm and 8 cm is (2 + 8) / 2 = 5 cm. The oval spans roughly from 2 cm to 8 cm, so its center is 5 cm.
Check: Measure from the skull base to your oval center; it should read about 5 cm. Confirm the shoulder and hip squares are at 2 cm and 8 cm.
Exercise 2
On a described side-view cat, the shoulder-to-elbow distance is 4 cm and the elbow-to-wrist distance is 4 cm. The hip-to-knee distance is 5 cm and the knee-to-ankle distance is 5 cm. Mark all four joints with squares and state the total front-leg joint-to-joint length and the total hind-leg joint-to-joint length.
Show answer and check
Front leg total is 8 cm; hind leg total is 10 cm.
Why: Front leg: 4 cm + 4 cm = 8 cm. Hind leg: 5 cm + 5 cm = 10 cm. These are hypothetical example values, not standards.
Check: Add the two front segments and the two hind segments separately. Confirm each sum matches your marked joint spacing.
Exercise 3
A described cat has a ribcage oval 6 cm long and 2 cm wide. Add a gluteal teardrop over the hip joint and a quadriceps oval on the front of the thigh. State the ribcage length-to-width ratio and explain whether the oval reads as a barrel or a narrow tube.
Show answer and check
The ratio is 6:2, or 3:1. The oval reads as a barrel because its width is one-third of its length, which is a plausible chest proportion in this hypothetical example.
Why: Divide length by width: 6 / 2 = 3. A 3:1 ratio gives a broad oval rather than a thin tube. The muscle masses should overlap the hip joint and thigh respectively.
Check: Measure the oval's length and width in centimeters and divide. Confirm each muscle mass overlaps a joint or bony landmark.
Exercise 4
A described walking cat has four marked joints on each side: shoulder, elbow, wrist, and hip, knee, ankle. The front legs alternate so that when the left shoulder is forward, the right shoulder is back. Mark the joints with squares, connect them with limb lines, and state one check that confirms the alternating pattern.
Show answer and check
The check is that the left and right shoulder squares sit at different positions along the spine line, and the corresponding elbow and wrist squares follow the same forward or back direction.
Why: Alternating legs in a walk means opposite front legs are in different phases. If the left shoulder is forward, the right shoulder should be back, and each limb's joints should follow its shoulder's direction.
Check: Draw a vertical line through each shoulder square and compare their positions. Confirm the left and right shoulders are offset and that each limb's joints align with its shoulder's phase.
Common mistakes
- Drawing muscle masses that float away from the skeleton. Anchor each mass so it overlaps at least one bony landmark or joint marker.
- Making the ribcage too narrow between the front legs. Widen the ribcage oval so it reads as a barrel, then check that the front legs attach near its sides.
- Treating the elbow and knee as the same kind of joint. Mark both the elbow and knee as hinge joints; distinguish them by location and by which segments they connect (elbow: humerus to forearm; knee: femur to lower leg), not by a backward/forward bending rule.
- Using inconsistent units when checking proportions. Choose one unit, such as centimeters on your reference, and use it for every measurement in that drawing.
Self-check rubric
- Spine line runs from skull base to tail base and is marked with at least three points.
- Ribcage oval sits between shoulder and hip and reads as a barrel, not a narrow tube.
- Shoulder and hip joints are marked with squares and placed plausibly along the spine.
- Elbow, wrist, knee, and ankle are marked with squares and connected by limb lines.
- At least three muscle masses overlap a joint or bony landmark.
- Labels use a consistent convention; x-height from baseline to midline is treated as approximate.
- Units are consistent throughout the drawing and any arithmetic checks.
- Valid alternatives in muscle shape, label handwriting, and small joint shifts are accepted.
Questions and answers
Do I need a real cat to practice?
No. You can use a described silhouette and your own measurements. A real cat helps, but the convention works from any clear reference.
How precise should landmark placement be?
Aim for plausible placement within about one x-height of your label. Handwriting varies, so small differences are acceptable.
Why mark joints with squares and bones with circles?
The shape difference makes it easy to check your drawing at a glance and keeps the convention consistent across exercises.
Can I use different muscle shapes?
Yes. The rubric rewards plausible mass placement and consistent convention, not a single universal shape.