Free original lessons
Crossed Hands Drawing: Wrist Rotation, Finger Overlap, and Palm Orientation
Learn to draw crossed hands by blocking two hand masses, setting wrist crossing angles, and ordering finger overlaps with a clear palm-orientation check.
Free lesson
Four exercises
Worked answers
Object Drawing Lessons
Crossed hands look difficult because two similar shapes overlap in a small space. This lesson breaks the pose into three decisions: where each hand mass sits, how the wrists cross, and which fingers sit in front. You will use a simple convention for hand landmarks, measure your own reference or hand to set proportions, and check overlap order before adding detail. The goal is a readable pose, not a single correct style. Different hand sizes and finger lengths are valid; the rubric rewards consistent structure and clear overlap logic.
Practice materials: Printable downloads are not available for this lesson yet. Use the instructions and four exercises below.
Reference illustration
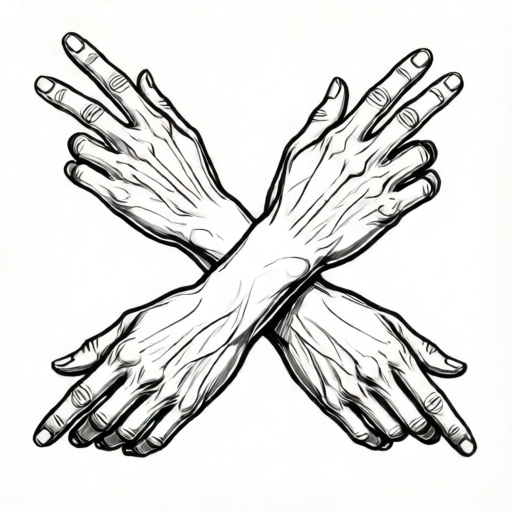
Use the stated measurements and conventions for each exercise.
Block the two hand masses before any fingers
Start with two rounded rectangles or ovals that represent the palm and back of each hand. Place them so they overlap slightly at the wrist area. Keep the masses simple: no fingers yet. Decide which hand is nearer to the viewer; that hand will usually sit in front at the wrist crossing.
Use a landmark convention: mark the wrist center, the knuckle line, and the thumb base on each mass. These three points let you compare the two hands without drawing every finger. If you are working from a photo, measure the distance from wrist center to knuckle line and from knuckle line to thumb base in the same units, then scale both hands to the same unit before comparing.
- Draw two palm masses with a slight overlap at the wrists.
- Mark wrist center, knuckle line, and thumb base on each mass.
- Label the nearer hand and the farther hand.
- Check that both masses use the same unit for their landmark distances.
Set the wrist crossing angle
The wrist crossing is the angle between the two forearm directions at the point where the wrists overlap. Draw a short line for each forearm direction, then measure the angle between them with a simple protractor or by comparing to a right angle. A hypothetical example is 35 degrees; measure your own reference rather than copying that number.
Rotate each hand mass around its wrist center until the forearm lines meet the chosen angle. The nearer hand's wrist edge should sit in front. Keep the knuckle lines roughly parallel to the palm mass edges so the hands do not look twisted. If the angle feels too wide, reduce it by moving one forearm line closer; if too narrow, increase it. Record the angle you used so you can repeat it.
- Draw one forearm direction line per hand.
- Measure the angle between the two lines.
- Rotate each palm mass around its wrist center to match the lines.
- Confirm the nearer wrist edge is in front.
- Write down the chosen angle for consistency.
Order finger overlap and check palm orientation
Fingers cross in a specific order. Decide which finger is on top at each crossing point, then draw that finger last so its outline stays continuous. A common pattern is that the nearer hand's fingers sit over the farther hand's fingers, but this can change at individual crossings. Mark each crossing with a small tick to show which line passes in front.
Palm orientation controls thumb placement, but the side depends on both the hand identity and the orientation. For a right hand with the palm facing the viewer, the thumb base sits on the viewer's left; with the back facing the viewer, it sits on the viewer's right. For a left hand, reverse these sides. Draw the thumb base before the fingers so the palm direction is clear. Use the landmark marks from the first section to keep thumb bases consistent with the chosen orientation.
- Mark every finger crossing point with a tick showing the front line.
- Draw the front finger first at each crossing, then the back finger.
- Draw thumb bases before finger details.
- Check palm orientation against the thumb base side.
- Compare finger lengths using the same unit as the palm landmarks.
Proportion note and self-check
Finger length varies between people and styles. Measure from knuckle line to fingertip on your own reference or hand, and compare that to the palm length from wrist center to knuckle line. Use the same unit for both. A hypothetical example ratio is 0.9, meaning fingers are slightly shorter than the palm; your measured ratio may differ and is still valid.
Before finishing, run a self-check: are both palm masses present, is the wrist angle recorded, does every crossing have a front tick, and is each thumb base on the correct side for its palm orientation? If any answer is no, adjust that layer before adding detail. Keep the drawing in simple line so the overlap order stays readable.
- Measure palm length and finger length in the same unit.
- Record the ratio you measured.
- Check palm masses, wrist angle, crossing ticks, and thumb sides.
- Fix the earliest layer that fails the check.
Worked example
A learner blocks two palm masses. The nearer hand's palm length is 6 units from wrist center to knuckle line, and its finger length is 5 units. The farther hand's palm length is 5 units and its finger length is 4 units. The wrist angle is set to a hypothetical 30 degrees. Describe the overlap order and check the proportion.
Worked answer
Nearer hand ratio is 5 divided by 6, about 0.83. Farther hand ratio is 4 divided by 5, 0.8. Both ratios are close, so the hands look consistent. The nearer hand sits in front at the wrist crossing. At each finger crossing, mark a tick and draw the nearer hand's finger outline last where it passes in front. Check that each thumb base matches its palm orientation before adding detail.
Four practice exercises
Exercise 1
Block two palm masses for crossed hands. The nearer hand has palm length 7 units and finger length 6 units. The farther hand has palm length 6 units and finger length 5 units. Calculate both finger-to-palm ratios and state which hand is in front at the wrist.
Show answer and check
Nearer ratio is 6 divided by 7, about 0.86. Farther ratio is 5 divided by 6, about 0.83. The nearer hand is in front at the wrist.
Why: Divide finger length by palm length for each hand using the same unit. The nearer hand is the one labeled in front during blocking.
Check: Recompute both divisions and confirm the nearer hand label matches the front wrist edge.
Exercise 2
A drawing has a wrist angle of 40 degrees between forearm lines. You want a narrower crossing. Describe how to adjust the forearm lines and what to record.
Show answer and check
Move one forearm line closer to the other to reduce the angle below 40 degrees, rotate the palm masses to match, and record the new angle.
Why: The wrist angle is the angle between forearm directions. Reducing the separation narrows the crossing. Recording the angle keeps later steps consistent.
Check: Measure the new angle with the same method and confirm both palm masses still meet their forearm lines.
Exercise 3
At a finger crossing, the nearer hand's index finger passes over the farther hand's middle finger. Describe the drawing order and the tick mark.
Show answer and check
Place a tick at the crossing showing the nearer index finger in front. Draw the farther middle finger first, then draw the nearer index finger outline last so it stays continuous.
Why: The front finger's outline must remain unbroken. Drawing it last prevents the back finger from cutting through it.
Check: Trace each outline through the crossing and confirm only the front finger's line is continuous.
Exercise 4
A right hand shows the back of the hand to the viewer. The thumb base is on the viewer's right. State the palm orientation and one check to confirm thumb placement.
Show answer and check
The palm faces away from the viewer. For a right hand with the back facing the viewer, the thumb base is on the viewer's right, which matches. Check that the thumb base was drawn before finger details.
Why: For a right hand, palm-facing puts the thumb base on the viewer's left and back-facing puts it on the viewer's right. The stated side matches back-facing orientation. Drawing the thumb base early makes the orientation readable.
Check: Confirm the hand is labeled right, compare the thumb base side with the orientation rule (back-facing right hand: viewer's right), and confirm the thumb base line was placed before finger lines.
Common mistakes
- Drawing fingers before the palm masses are placed. Block both palm masses and landmark points first, then add fingers only after the wrist angle is set.
- Letting both wrists overlap without deciding which hand is nearer. Label the nearer hand and keep its wrist edge in front at the crossing.
- Drawing a finger continuously through a crossing without a front tick. Mark each crossing point and draw the front finger's outline last so the overlap order is visible.
- Placing the thumb base on the wrong side for the chosen palm orientation. Decide palm or back orientation first, then place the thumb base before drawing finger details.
Self-check rubric
- Two palm masses are present and overlap at the wrists.
- Wrist center, knuckle line, and thumb base are marked on both hands.
- The wrist crossing angle is recorded and matches the forearm lines.
- Every finger crossing has a front tick and a consistent overlap order.
- Thumb bases match the chosen palm orientation.
- Palm and finger lengths use the same unit and the measured ratio is recorded.
- Valid alternative hand styles are accepted if the landmark structure and overlap logic remain clear.
Questions and answers
Do I need a photo reference to draw crossed hands?
No. You can use your own hand or a simple described pose. Measure palm and finger lengths in the same unit and record the wrist angle you choose.
What if my finger length ratio differs from the example?
That is valid. The example ratio is hypothetical; use your measured ratio and keep it consistent across both hands.
How do I know which finger is in front at a crossing?
Decide the nearer hand first, then mark each crossing with a tick. The tick shows which outline stays continuous. There is no single universal order; the rubric checks that your order is clear and consistent.
Can I use a different hand style?
Yes. The convention uses wrist center, knuckle line, and thumb base as landmarks. Letter styles and finger shapes vary, so the rubric rewards consistent structure rather than one exact shape.