Free original lessons
Drawing Dancer Anatomy: Limb Proportion and Joint Alignment Practice
Learn to draw dancer figures with believable limb proportions and aligned joints in dynamic poses, using simple ratios, checkpoints, and self-checking exercises.
Free lesson
Four exercises
Worked answers
Object Drawing Lessons
Drawing a dancer means capturing both motion and structural logic. This lesson focuses on two measurable skills: limb proportion (how long each segment is relative to the body) and joint alignment (how shoulders, hips, knees, and ankles stack in a pose). You will use a simple convention: x-height is the distance from baseline to midline of a letter, and all body measurements are expressed in head units or x-heights so you can scale the figure consistently. Letter styles vary, so treat x-height as a flexible unit, not a fixed millimeter value. Before drawing, measure your actual paper and pencil; any numerical examples here are hypothetical and should be replaced with your own measured values. The goal is not a single correct silhouette but a defensible structure that you can check with arithmetic and visual landmarks.
Practice materials: Printable downloads are not available for this lesson yet. Use the instructions and four exercises below.
Reference illustration
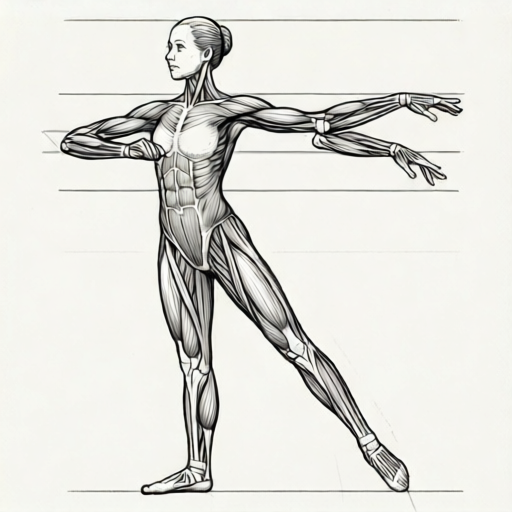
Use the stated measurements and conventions for each exercise.
Establishing a Measurable Unit
Choose a unit you can repeat accurately. A common choice is the head height, measured from the top of the skull to the chin. For a standing dancer, a useful starting ratio is that total height is about 7.5 head units, with legs (hip joint to floor) about 3.5 to 4 head units. These are hypothetical examples; adjust to your reference pose. Write your unit on the page margin so every segment uses the same scale.
For limb segments, use simple fractions of the head unit. For example, upper arm may be about 1.3 head units, forearm about 1.1, thigh about 1.8, and lower leg about 1.6. Record your chosen values before drawing so you can check them later. If you use x-height instead, define it clearly: baseline to midline of a lowercase x in your own handwriting. Because letter styles vary, two students may get different x-heights from the same word; that is acceptable as long as each drawing stays internally consistent.
- Measure your paper and draw a vertical scale bar equal to one head unit.
- Write the segment ratios you will use beside the bar.
- Mark the total figure height in head units on the page edge.
- Label each planned joint location with a small dot before adding contours.
Joint Alignment in Dance Poses
Joint alignment means that the load-bearing line through a pose is plausible. In a standing dancer, the ankle, knee, and hip should fall near a vertical line unless the pose intentionally shifts weight. In an arabesque, the supporting leg's hip, knee, and ankle stack, while the working leg extends behind with the hip joint as the pivot. Draw the joint dots first, then connect them with light lines to test alignment before drawing limbs.
Use a plumb line check: hold a straight edge vertically from the supporting ankle upward. The knee and hip should be within a small, consistent offset you define, such as half a head unit for a relaxed stance. For arms, check that the shoulder, elbow, and wrist form a gentle curve rather than a zigzag. Mark any intentional deviation, such as a tilted pelvis, so it reads as a choice rather than an error.
- Place dots for ankles, knees, hips, shoulders, elbows, and wrists.
- Draw light alignment lines between stacked joints.
- Check the supporting leg against a vertical plumb line.
- Adjust joint dots before adding any body contours.
Drawing Limbs with Proportion Checks
Once joints are placed, build each limb as two segments meeting at the joint. Use your recorded ratios to set segment lengths. For example, if your head unit is 3 cm, a thigh of 1.8 head units is 5.4 cm. Measure from hip dot to knee dot, then knee dot to ankle dot. Keep the same unit for both sides of the body unless the pose uses foreshortening; if a limb points toward the viewer, shorten it consistently and note the reduction.
Check symmetry only where the pose is symmetric. In a mirrored pose, left and right segment lengths should match within your chosen tolerance, such as 0.2 head units. In an asymmetric pose, compare each limb to its own planned ratio. Add contour last: outline the thigh with a slight taper toward the knee, and the calf with a curve that peaks above the ankle. These shapes support the joint structure rather than replacing it.
- Measure each segment from joint dot to joint dot.
- Compare measured length to your planned ratio.
- Shorten foreshortened limbs by a stated fraction and record it.
- Add contours only after all segment checks pass.
Self-Checking and Valid Alternatives
There is no single universal dancer silhouette. Different body types, letter styles, and pose interpretations produce valid alternatives. What must hold is internal consistency: the same unit is used throughout, joint dots support the pose, and segment lengths match the ratios you declared. A drawing with a slightly longer forearm but a clearly labeled ratio and aligned joints can be correct for that student's plan.
Use a simple rubric: unit declared, joints placed before contours, segment lengths within tolerance, alignment lines checked, and deviations labeled. If a check fails, adjust the joint dot or the ratio note rather than erasing the whole figure. Keep your scale bar and ratio list attached to the drawing so the check is reproducible.
- Re-measure two random segments against the scale bar.
- Confirm every intentional deviation is labeled.
- Verify the supporting leg against the plumb line.
- Record one improvement for the next attempt.
Worked example
A dancer stands with weight on the left leg. The head unit is 3 cm. Planned ratios: total height 7.5 units, left thigh 1.8 units, left lower leg 1.6 units, right thigh 1.8 units, right lower leg 1.6 units. The left ankle, knee, and hip are stacked vertically. Calculate the planned left leg length from hip to floor and state one alignment check.
Worked answer
Left leg length = 1.8 + 1.6 = 3.4 head units = 3.4 × 3 cm = 10.2 cm. Alignment check: a vertical plumb line from the left ankle should pass within a stated offset, such as 0.5 head unit (1.5 cm), of the left knee and left hip dots.
Why: Add the two segment ratios, multiply by the head unit, and compare the stacked joints to a vertical line. The offset is a chosen tolerance, not a universal standard.
Check: Re-measure the scale bar, confirm 3.4 units equals 10.2 cm, and verify the plumb line offset is labeled on the drawing.
Four practice exercises
Exercise 1
A dancer's head unit is 4 cm. Planned ratios: upper arm 1.3 units, forearm 1.1 units. Calculate the total arm length from shoulder to wrist in centimeters. Then state one joint-alignment check for a raised arm.
Show answer and check
Total arm length = 1.3 + 1.1 = 2.4 head units = 2.4 × 4 cm = 9.6 cm. Alignment check: the shoulder, elbow, and wrist dots should form a gentle curve, and the elbow should not sit farther than a stated offset, such as 0.5 head unit (2 cm), from the line between shoulder and wrist.
Why: Add the segment ratios, multiply by the head unit, and compare the three joint dots to a chosen tolerance.
Check: Re-measure the scale bar, confirm 2.4 units equals 9.6 cm, and verify the elbow offset is labeled.
Exercise 2
In an arabesque, the supporting leg has thigh 1.8 units and lower leg 1.6 units. The head unit is 2.5 cm. The working leg is foreshortened to 70 percent of its planned length. Calculate the supporting leg length in centimeters and the foreshortened working leg length if its planned total is 3.4 units.
Show answer and check
Supporting leg = 1.8 + 1.6 = 3.4 units = 3.4 × 2.5 cm = 8.5 cm. Working leg planned = 3.4 units = 8.5 cm; foreshortened = 0.70 × 8.5 cm = 5.95 cm. Alignment check: the supporting ankle, knee, and hip should stack within the stated offset, while the working hip is the pivot.
Why: Compute the full length, then apply the stated foreshortening fraction. Label the reduction so the check is reproducible.
Check: Confirm 3.4 × 2.5 = 8.5, then 0.70 × 8.5 = 5.95, and verify the pivot and offset are marked.
Exercise 3
A seated dancer has a head unit of 3.5 cm. Planned thigh is 1.8 units and lower leg is 1.6 units. The knee is bent so the lower leg points toward the viewer and is shortened by 25 percent. Calculate the drawn thigh length and drawn lower-leg length in centimeters.
Show answer and check
Thigh = 1.8 × 3.5 cm = 6.3 cm. Lower leg planned = 1.6 × 3.5 cm = 5.6 cm; shortened = 0.75 × 5.6 cm = 4.2 cm. Alignment check: the hip and knee dots should match the thigh measurement, and the shortened lower leg should be labeled as foreshortened.
Why: Multiply each ratio by the head unit, then apply the stated reduction only to the foreshortened segment.
Check: Re-measure 6.3 cm and 4.2 cm against the scale bar and confirm the 25 percent note is visible.
Exercise 4
A dancer's total height is planned as 7.5 head units with a head unit of 3 cm. The legs are planned as 3.8 head units total. Calculate total height and leg length in centimeters. State one proportion check comparing the leg length to total height.
Show answer and check
Total height = 7.5 × 3 cm = 22.5 cm. Leg length = 3.8 × 3 cm = 11.4 cm. Proportion check: legs are 3.8 ÷ 7.5 ≈ 0.51 of total height, so the leg measurement should be about half the total height within the stated tolerance.
Why: Convert both ratios to centimeters and compare their quotient to confirm the planned proportion.
Check: Verify 22.5 cm and 11.4 cm on the scale bar, then confirm 11.4 ÷ 22.5 ≈ 0.51 matches the planned ratio.
Common mistakes
- Drawing contours before placing joint dots, so limbs drift out of proportion. Place and label all joint dots first, then measure segments before adding any outline.
- Using different units for different limbs, making the figure internally inconsistent. Write one scale bar and one ratio list on the page, and measure every segment against them.
- Forcing a vertical stack in a pose that intentionally shifts weight. Label the intentional offset and check that the supporting ankle, knee, and hip follow a consistent line.
- Treating x-height as a fixed universal value across different handwriting styles. Define x-height from your own baseline-to-midline measurement and keep it consistent within the drawing.
Self-check rubric
- A single unit is declared and a scale bar is visible.
- Joint dots are placed before contours.
- Each limb segment is measured against the declared ratio.
- Supporting-leg alignment is checked with a plumb line or stated offset.
- Intentional deviations and foreshortening are labeled.
- Valid alternatives are accepted if internal consistency is shown.
Questions and answers
Do I need a live model to practice dancer anatomy?
No. You can use a described pose or your own reference sketch. The key is to declare a unit and check joint alignment and segment ratios with simple arithmetic.
How exact should limb proportions be?
Exactness matters less than consistency. Choose ratios, write them down, and check each segment within a tolerance you define, such as 0.2 head units.
What if my letter style gives a different x-height than a classmate's?
That is expected. X-height is baseline to midline of your own letter. Use your measured value consistently; valid alternatives are allowed as long as the drawing is internally coherent.
Can I use centimeters instead of head units?
Yes. Measure your actual paper and pencil, then convert ratios to centimeters. Any numerical values in this lesson are hypothetical examples, not fixed standards.