Free original lessons
Draw Desert Animals: Camel Hump, Lizard Scales, Fennec Ears
Learn to draw three desert animal features with clear construction cues: camel hump mass, lizard scale rows, and fennec ear shape. Includes practice tasks and checks.
Free lesson
Four exercises
Worked answers
Object Drawing Lessons
This lesson focuses on three distinctive desert-animal constructions: the camel's hump as a weighted mass, the lizard's scale pattern as repeating rows, and the fennec's ear as a large tapered shape. You will use simple geometric guides, a defined line convention, and checkable proportions. All drawing is done on paper with pencil; no special tools are required. The goal is not realistic rendering but clear, recognizable feature construction. Each section gives a sequence of steps, common mistakes, and a way to check your work. A worked example shows the full process for one combined study, and four practice exercises let you apply the cues independently. Use the rubric to judge line clarity, proportion, and pattern consistency. Numerical values are hypothetical examples; measure your own paper and pencil if you need exact sizes.
Practice materials: Printable downloads are not available for this lesson yet. Use the instructions and four exercises below.
Reference illustration
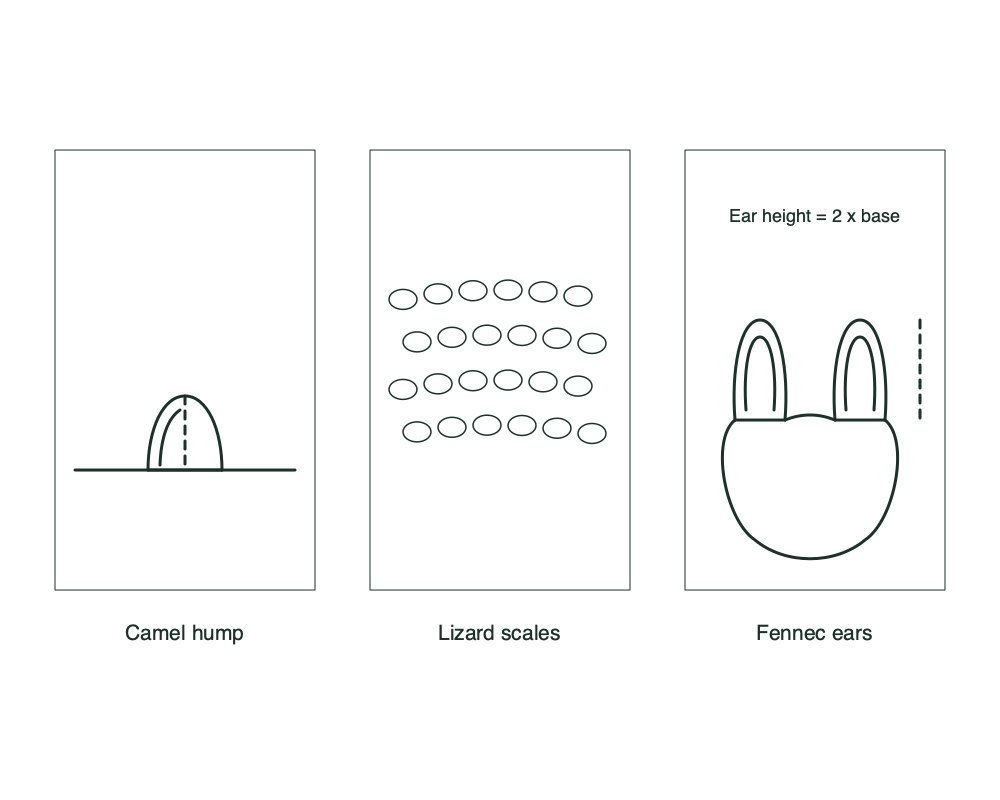
Use the stated measurements and conventions for each exercise.
Camel hump: building a weighted mass
The camel hump is a single rounded mass sitting above the body line. Treat it as a dome with a broad base and a slightly flattened top. The hump should look heavy, not pointed. Use a light construction line to mark the body's top edge, then place the hump's base across about one third of that edge. The hump height is roughly equal to its base width in this simplified convention. Keep the front and back slopes asymmetric if you like, but both must meet the body smoothly.
Draw the hump outline with a continuous curve. Avoid sharp corners at the base. Add a second, inner curve to suggest volume, but do not shade heavily. The hump is a shape cue, not a texture study.
- Draw a horizontal body line about 8 cm long (hypothetical example).
- Mark a base segment on the body line about 3 cm wide, centered.
- Draw a dome from the left base point to the right base point, peaking about 3 cm above the body line.
- Soften the base joins with short transitional curves.
- Add one inner curve parallel to the front slope to suggest mass.
Lizard scales: repeating rows with a clear convention
Use a simple convention: each scale is a small rounded rectangle or oval, and rows alternate offset by half a scale. Draw rows along the body's long axis. Scale size should be consistent within a row; adjacent rows may differ slightly but must read as the same pattern. A row of 6 to 8 scales across a 6 cm body section is a hypothetical example. Keep gaps even. The pattern should follow the body curve, not sit in a rigid grid.
Start with two guide lines marking the top and bottom of the scaled area. Draw the first row, then offset the next row by half a scale. Continue until the area is filled. Do not outline every scale heavily; a light outline is enough.
- Draw two parallel guide lines 2 cm apart along the body curve (hypothetical example).
- Draw the first row of 6 oval scales, evenly spaced, touching the top guide line.
- Offset the second row by half a scale width and draw 6 scales.
- Repeat for 3 to 4 rows, keeping spacing even.
- Erase guide lines and lightly reinforce scale outlines.
Fennec ears: large tapered shapes with a clear base
The fennec ear is a large, tapered shape with a wide base and a rounded tip. Draw the base as a short curve on the head line, then extend two sides outward and upward. The ear length is about twice the base width in this convention. The two ears should mirror each other but may differ slightly in angle. Add an inner curve to show the ear's hollow, but keep it simple.
Place the ears symmetrically on the head guide. The base should sit close to the top of the head, not on the sides. The tips can angle outward slightly. Avoid making the ears triangular with sharp corners; round the tip and soften the base joins.
- Draw a small head circle about 3 cm across (hypothetical example).
- Mark two base curves on the top of the head, each about 1 cm wide, separated by 1 cm.
- From each base, draw two sides outward and upward to a rounded tip about 2 cm above the base.
- Add an inner curve from the base to near the tip on each ear.
- Soften all joins and check that both ears read as the same shape family.
Combining the three features on one study sheet
Use three separate frames on one sheet: one for the camel hump, one for the lizard scale rows, and one for the fennec ears. Keep each frame labeled with the feature name. This prevents the features from merging into a single scene, which is outside this lesson's boundary. Work left to right: hump, scales, ears. Use the same pencil pressure and line convention throughout.
Check each frame against its own cues before moving on. The hump should read as a dome, the scales as offset rows, and the ears as tapered shapes. If a frame fails a check, redraw only that frame.
- Divide the paper into three equal frames, each about 8 cm by 8 cm (hypothetical example).
- Label each frame: Camel hump, Lizard scales, Fennec ears.
- Complete the hump frame using the hump steps.
- Complete the scales frame using the scale steps.
- Complete the ears frame using the ear steps.
- Review all three frames against the rubric.
Worked example
Draw a combined study sheet with three frames: a camel hump, a lizard scale patch, and a pair of fennec ears. Use the construction cues and label each frame.
Worked answer
Frame 1: a dome about 3 cm wide at the base and 3 cm high, with softened base joins and one inner curve. Frame 2: two guide lines 2 cm apart, four rows of six oval scales, each row offset by half a scale. Frame 3: two ears with 1 cm bases on a 3 cm head circle, each ear about 2 cm long with rounded tips and one inner curve. Labels are legible and placed below each frame.
Why: The hump uses a broad base and equal height to read as a mass. The scales use offset rows to create a repeating pattern. The ears use a base on top of the head and a length-to-width ratio of about two to one. Labels separate the features and keep the study within the lesson boundary.
Check: Measure the hump base and height; they should be within 0.5 cm of each other. Count scales per row; each row should have the same number. Measure ear length and base width; length should be about twice the base. Confirm all labels are readable.
Four practice exercises
Exercise 1
Draw a camel hump in a frame about 8 cm by 8 cm. Use a body line 8 cm long and a hump base 3 cm wide. Make the hump height 3 cm. Add one inner curve.
Show answer and check
A dome with a 3 cm base centered on the body line, peaking 3 cm above it, with softened base joins and one inner curve parallel to the front slope.
Why: The base width and height are equal, which gives a heavy, rounded mass. The inner curve suggests volume without shading.
Check: Measure the base width and height; both should be about 3 cm. Check that the base joins are curved, not sharp.
Exercise 2
Draw a lizard scale patch in a frame about 8 cm by 8 cm. Use two guide lines 2 cm apart. Draw four rows of six oval scales, each row offset by half a scale.
Show answer and check
Four rows of six ovals between the guide lines, with each row shifted half a scale width from the row above. Spacing is even and scale size is consistent within each row.
Why: Offset rows create a repeating pattern that follows the body curve. Even spacing makes the pattern readable.
Check: Count the scales in each row; each should have six. Check that the second row is shifted by about half a scale width. Confirm guide lines are erased or light.
Exercise 3
Draw a pair of fennec ears on a head circle about 3 cm across. Each ear base is 1 cm wide, placed on top of the head with 1 cm between bases. Each ear is 2 cm long with a rounded tip and one inner curve.
Show answer and check
Two tapered ears with 1 cm bases on the top of the head, 1 cm apart, each 2 cm long, rounded at the tip, with one inner curve from base to near tip.
Why: The length-to-base ratio of two to one gives the large tapered look. Placing bases on top of the head keeps the ears from looking like side triangles.
Check: Measure each ear length and base width; length should be about twice the base. Check that both bases sit on the head circle and tips are rounded.
Exercise 4
Create a three-frame study sheet. In frame one, draw a camel hump with a 3 cm base and 3 cm height. In frame two, draw two guide lines 1.5 cm apart and fill the area with three offset rows of five oval scales, each row shifted half a scale width from the row above. In frame three, draw fennec ears with 1 cm bases and 2 cm length. Label each frame.
Show answer and check
Three labeled frames: a dome hump with equal base and height; three offset rows of five scales between guide lines 1.5 cm apart; two tapered ears with 1 cm bases and 2 cm length. Labels are legible below each frame.
Why: Separate frames keep each feature distinct and allow independent checks. The proportions follow the cues from each section.
Check: Measure hump base and height; both about 3 cm. Count five scales per row and confirm offset. Measure ear length and base; length about twice base. Read each label aloud to confirm legibility.
Common mistakes
- Drawing the camel hump as a sharp triangle or a thin spike. Use a dome with a broad base and a flattened top; check that the base width is roughly equal to the height.
- Making lizard scales uneven in size or spacing within a row. Draw guide lines first and place scales at even intervals; offset each new row by half a scale.
- Drawing fennec ears as small triangles attached to the sides of the head. Place the ear bases on top of the head, make the length about twice the base width, and round the tips.
- Heavy outlines that make the features look like separate cutouts. Use light construction lines and reinforce only the final contour; keep inner curves lighter than the outer edge.
Self-check rubric
- Hump reads as a rounded mass with a broad base and softened joins.
- Scale rows are evenly spaced, consistent in size within each row, and offset by half a scale.
- Fennec ears have bases on top of the head, rounded tips, and length about twice the base width.
- Line convention is consistent: light construction lines, reinforced final contours, no heavy cutout outlines.
- Labels are legible; letter style may vary but must be readable.
- Valid alternatives are accepted if the feature cues remain clear.
Questions and answers
Do I need to draw the whole animal?
No. This lesson focuses on three distinctive features: the camel hump, lizard scale rows, and fennec ear shape. Draw each feature in its own frame.
How legible do my frame labels need to be?
Legible enough to read at a glance: use clear letter shapes and consistent spacing. Letter styles may vary, so choose a simple style you can repeat rather than copying a single standard.
Can I use different scale shapes?
Yes. The convention allows rounded rectangles or ovals. The key is consistent size within a row and offset rows. Valid alternatives are accepted if the pattern reads clearly.
How do I know my proportions are correct?
Use the check methods in each section: hump base width versus height, scale spacing, and ear length versus base width. Measure with a ruler if needed.