Free original lessons
Feather Texture Drawing: Barb Rows, Downy Zones, and Shaft Detail
Learn to draw feather texture using barb rows at three densities, soft downy base zones, and a clear shaft line. Includes a worked example, four practice tasks, and a rubric.
Free lesson
Four exercises
Worked answers
Object Drawing Lessons
Feather texture comes from three visible structures: the stiff central shaft, the barb rows that branch from it, and the soft downy zone near the base. This lesson teaches you to draw those structures as surface texture, not as a full bird or wing. You will use a simple convention: x-height means the distance from the baseline to the midline of a letter, and letter styles vary, so your handwriting or drawing scale is your own choice. All numerical values below are hypothetical examples for practice, not manufacturing standards. Measure your own paper and tools if you need exact sizes.
Practice materials: Printable downloads are not available for this lesson yet. Use the instructions and four exercises below.
Reference illustration
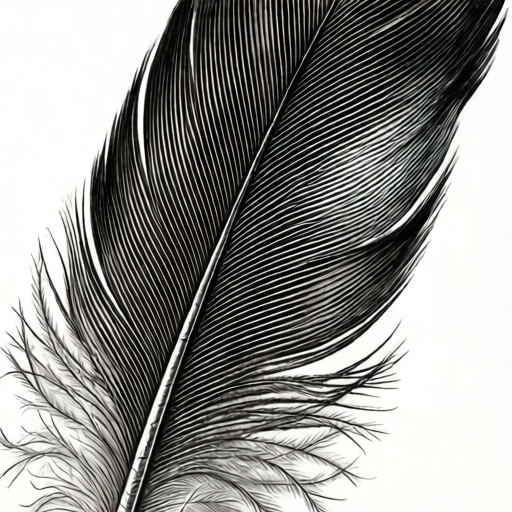
Use the stated measurements and conventions for each exercise.
Map the feather into texture zones
Begin with a single feather outline. Divide it into three zones: the upper tip where barb rows are tight and fine, the middle where rows are clearly separated, and the lower base where a soft downy zone replaces crisp rows. Draw a light shaft line from base to tip, slightly curved. The shaft is not a thick bar; it is a narrow line that anchors every barb row.
Use a pencil and paper. A hypothetical practice feather might be 12 cm long and 3 cm wide at the middle. These numbers are examples only. Mark the midline of the feather with a faint dotted line so you can keep barb rows symmetrical. Keep the outline light so texture remains the focus.
- Draw a light feather outline with a rounded tip and a narrow base.
- Mark a faint midline from base to tip; this is the shaft guide.
- Divide the outline into three horizontal bands: tip, middle, base.
- Label the base band as the downy zone and the upper two bands as barb-row zones.
Draw barb rows at three densities
Barb rows are short lines that branch from the shaft toward the edge. Density means how close the rows sit. Draw three sample strips: sparse rows about 6 mm apart, medium rows about 3 mm apart, and dense rows about 1.5 mm apart. These are hypothetical spacing examples; choose spacing that fits your paper. Sparse rows show structure clearly, medium rows read as texture, and dense rows create a smooth surface.
Angle each barb row slightly toward the tip. Rows on the left side of the shaft lean left; rows on the right lean right. Keep row length shorter near the tip and longer in the middle. Do not draw every row perfectly; slight variation looks natural. Use a sharp pencil and light pressure so you can adjust density later.
- Draw a 10 cm horizontal practice strip and divide it into three equal parts.
- In part one, draw sparse barb rows at a chosen wide spacing.
- In part two, draw medium rows at half the sparse spacing (about 3 mm if sparse is 6 mm).
- In part three, draw dense rows at half the medium spacing (about 1.5 mm if medium is 3 mm).
- Check that each row starts at the shaft guide and ends before the outline edge.
Build the downy zone and shaft detail
The downy zone sits near the base. Replace straight barb rows with soft, wavy lines that curl outward. Draw them shorter and less organized than the upper rows. Overlap a few lines to suggest fluff. Keep the shaft line visible through the downy zone but make it thinner there, as if the shaft fades into soft texture.
Shaft detail means showing the shaft as a narrow line with a slight highlight on one side. Draw a second faint line parallel to the shaft on the light side, leaving a thin gap. Do not shade the whole shaft dark. Near the tip, taper the shaft to a point. Near the base, let the shaft end in a small rounded tip. These choices are drawing conventions, not universal rules; valid alternatives include a darker shaft or a broken shaft line if the texture still reads clearly.
- In the base band, draw five to eight wavy downy lines fanning outward.
- Overlap two or three downy lines to create softness.
- Redraw the shaft as a narrow line with a faint parallel highlight line.
- Taper the shaft at the tip and round it at the base.
- Compare the three zones: crisp rows above, medium rows in the middle, soft downy lines below.
Worked example
Draw a 10 cm practice feather with a shaft guide, three density zones, and a downy base. Use hypothetical spacing: sparse 6 mm, medium 3 mm, dense 1.5 mm. Describe the result.
Worked answer
The feather outline is 10 cm long and 3 cm wide at the middle. The shaft guide runs from base to tip with a faint parallel highlight line. The tip zone uses dense rows about 1.5 mm apart, the middle uses medium rows about 3 mm apart, and the base uses wavy downy lines with no fixed spacing. Each barb row starts at the shaft and stops inside the outline. The shaft tapers at the tip and rounds at the base. The downy zone overlaps three wavy lines to suggest softness.
Four practice exercises
Exercise 1
Draw a 6 cm feather outline with a shaft guide and two barb-row zones: sparse at 4 mm and medium at 2 mm. Describe your spacing and row direction.
Show answer and check
The outline is 6 cm long. The shaft guide runs base to tip. Sparse rows are about 4 mm apart in the upper half; medium rows are about 2 mm apart in the lower half. Rows lean slightly toward the tip and stop inside the outline.
Why: Two zones show density change. Spacing values are hypothetical examples. Rows start at the shaft and end inside the outline, which keeps texture readable.
Check: Measure three gaps in each zone with a ruler. Confirm each row touches the shaft guide and stops before the outline.
Exercise 2
Draw a downy base zone 3 cm wide with five wavy lines and a fading shaft. Describe how the shaft changes.
Show answer and check
Five wavy lines fan outward from the base. The shaft line becomes thinner in the downy zone and ends in a small rounded tip. Two wavy lines overlap to suggest fluff.
Why: Wavy, shorter lines read as downy texture. A thinner shaft shows fading without losing the guide line.
Check: Check that at least two downy lines overlap and that the shaft is visibly thinner in the base zone than in the middle.
Exercise 3
Create a three-part practice strip 9 cm long. Draw sparse rows at 6 mm, medium at 3 mm, and dense at 1.5 mm. Describe the visual difference.
Show answer and check
The sparse section shows individual rows with visible paper between them; the medium section shows clear texture; the dense section looks smooth and dark. All rows start at a common guide line.
Why: Changing spacing changes texture density. Each spacing is half the previous one, so the progression is easy to check. The common guide line keeps rows aligned for comparison.
Check: Measure two gaps per section. Confirm dense gaps are smallest and sparse gaps are largest, and that every row starts at the guide line.
Exercise 4
Draw a feather tip 4 cm long with a tapered shaft and dense barb rows. Describe how you prevent rows from crossing the outline.
Show answer and check
The tip outline narrows to a point. The shaft tapers to a fine point. Dense rows are about 1.5 mm apart and shorten near the tip. Each row stops just inside the outline.
Why: Shorter rows near the tip match the narrowing shape. Stopping inside the outline keeps the edge clean.
Check: Trace the outline with a fingertip and confirm no row extends beyond it. Check that the shaft ends in a point, not a blunt bar.
Common mistakes
- Drawing barb rows as a solid dark mass instead of separate lines. Leave small gaps between rows and use lighter pressure. Check that you can see the paper between rows in the sparse and medium zones.
- Making the shaft too thick or too dark. Redraw the shaft as a narrow line with a faint highlight gap. The shaft should guide the eye, not dominate the texture.
- Using the same row spacing everywhere. Vary density by zone: wider spacing near the tip, medium in the middle, and soft wavy lines at the base.
- Letting barb rows cross the outline edge. Stop each row just inside the outline. Check by tracing the outline with a fingertip and confirming no row extends beyond it.
Self-check rubric
- Shaft is a narrow line with a visible highlight gap or a clearly justified alternative.
- Barb rows start at the shaft and stop inside the outline.
- Three density zones are visible: sparse, medium, and dense.
- Downy zone uses wavy, shorter, less parallel lines than the upper rows.
- Texture reads as feather surface, not as a full bird or wing.
- Valid alternatives are accepted if the three structures remain clear.
Questions and answers
Do I need to draw every barb row?
No. Draw enough rows to show density and direction. Sparse rows can suggest texture without filling every space.
How do I know if my downy zone looks soft enough?
Check that the base lines are wavy, shorter, and less parallel than the upper rows. Overlapping a few lines helps.
Can I use a pen instead of a pencil?
Yes, but pencil allows easier adjustment of density. If using pen, plan spacing before drawing.
What does x-height mean here?
X-height is the distance from the baseline to the midline of a letter. It is a handwriting convention; letter styles vary, so use it only as a scale reference if needed.