Free original lessons
Draw Feathers with Layered Vane and Pencil-Stroke Construction
Learn to draw feathers by building a central shaft, layering vane sections, and controlling pencil-stroke direction for a clean, believable result.
Free lesson
Four exercises
Worked answers
Object Drawing Lessons
Feathers reward careful construction more than loose sketching. This lesson isolates the feather itself: you will place a central shaft, build the vane in overlapping layers, and use deliberate pencil-stroke direction to suggest soft barbs without drawing every filament. The convention used here is simple and checkable: the shaft runs from base to tip, barbs angle outward from the shaft toward the tip, and vane layers overlap from base toward tip so each new layer sits slightly over the previous one. Letter styles and handwriting vary, so treat all stroke counts and angles as adjustable examples rather than fixed rules. Measure your own paper and pencil, label any numbers you choose as hypothetical, and judge success by visible layering and consistent stroke direction rather than by a single correct outline.
Practice materials: Printable downloads are not available for this lesson yet. Use the instructions and four exercises below.
Reference illustration
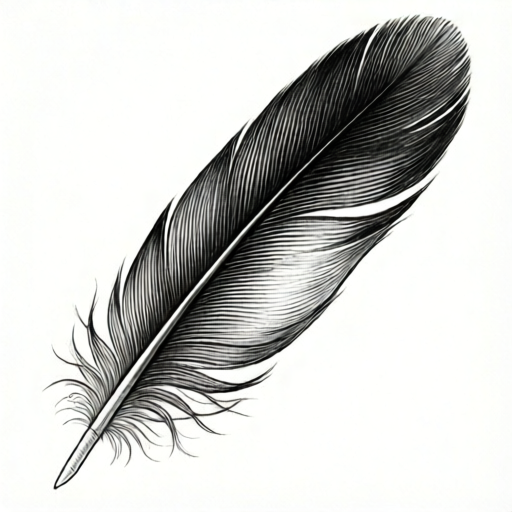
Use the stated measurements and conventions for each exercise.
Set the shaft and vane boundaries
Begin with a light centerline for the shaft (rachis). Mark a base point and a tip point, then decide the widest part of the vane, usually just past the midpoint toward the tip. Draw two gentle boundary curves from base to tip on either side of the shaft; these are guides, not final edges.
Keep the shaft slightly tapered: thicker near the base, thinner at the tip. Use a light pencil so the shaft can be refined later. The vane boundary should feel asymmetric if you want a natural look, but symmetry is acceptable for a practice feather.
- Mark base and tip points about 12 cm apart on your paper (hypothetical example; measure your own space).
- Draw a light centerline between them and taper it from about 2 mm near the base to under 1 mm at the tip.
- Sketch two boundary curves for the vane, widest just past the midpoint.
- Check that both boundaries return to the shaft at the tip without crossing it.
Layer the vane from base to tip
Build the vane in overlapping bands rather than one outline. Start near the base and draw a shallow band of barbs on each side, angling outward and toward the tip. Then add the next band slightly closer to the tip, letting it overlap the previous band. This base-to-tip layering creates the soft, stepped edge typical of a feather.
Keep band widths consistent within a section. If a band looks too wide, narrow the next one rather than erasing heavily. The overlap should be visible but not heavy; a light second pass is enough to show layering.
- Draw the first barb band near the base on the left side, angling outward and toward the tip.
- Repeat on the right side, matching the angle direction but not necessarily the exact length.
- Add a second band closer to the tip, overlapping the first by about one-third of its width.
- Continue in three or four bands until you reach the tip, then refine the outer boundary.
Control pencil-stroke direction
Pencil strokes should follow the barb direction: outward from the shaft and toward the tip. Use short, light strokes rather than long scrubbing marks. Vary stroke length slightly to suggest softness, but keep the direction consistent within each band.
For a layered look, make the strokes in each new band slightly darker or more compact than the previous band. This is a convention, not a universal rule; valid alternatives include lighter tip bands or uniform pressure. The check is whether the direction reads clearly and the layers remain distinguishable.
- Hold the pencil at a comfortable angle and make short strokes outward from the shaft.
- Angle each stroke toward the tip, matching the barb direction you established.
- Keep strokes within their band so layers stay readable.
- Compare adjacent bands: direction should agree, while overlap and pressure can vary.
Refine the shaft and edges
Once the vane is layered, strengthen the shaft with a slightly darker line, keeping the taper. Clean the outer boundary only where it looks muddled; avoid outlining every barb. A few stray strokes beyond the boundary can suggest softness if kept sparse.
Check the whole feather at arm's length. The shaft should read as the center, the vane should show at least three overlapping bands, and stroke direction should be consistent enough to guide the eye from base to tip.
- Darken the shaft lightly, preserving the taper.
- Remove or soften strokes that cross the shaft or break the vane boundary badly.
- Add a few short, sparse strokes at the tip for softness.
- Review at arm's length for layering and direction.
Worked example
A practice feather is 12 cm long with a shaft tapered from 2 mm at the base to 1 mm at the tip. The vane is built in four overlapping bands, each about 3 cm long along the shaft. If the first band overlaps the second by 1 cm, how much of the second band remains uncovered?
Worked answer
2 cm of the second band remains uncovered.
Why: Each band is 3 cm long. An overlap of 1 cm means 3 minus 1 equals 2 cm of the second band is not covered by the first band. This is simple arithmetic using the hypothetical band length; measure your own drawing to check actual overlaps.
Four practice exercises
Exercise 1
On a blank feather outline 10 cm long, mark a tapered shaft from 2 mm at the base to 1 mm at the tip. Draw three overlapping vane bands on the left side only, each 2 cm long along the shaft, with a 0.5 cm overlap between consecutive bands. Describe the stroke direction you use.
Show answer and check
A tapered shaft with three left-side bands, each 2 cm long, overlapping by 0.5 cm, and strokes angled outward from the shaft toward the tip.
Why: The shaft taper is set by the two widths. Three bands of 2 cm cover 6 cm along the shaft, which fits within the 10 cm outline. Overlaps of 0.5 cm mean each new band starts 1.5 cm after the previous start. Stroke direction follows the barb convention: outward and toward the tip.
Check: Measure the shaft widths at base and tip, confirm three bands on the left, check each band length is about 2 cm, and verify strokes angle outward and toward the tip.
Exercise 2
A feather has four vane bands on the right side, each 3 cm long along the shaft, with 1 cm overlaps. The shaft is 14 cm long. Do the four bands fit within the shaft length if the first band starts at the base? Show the arithmetic.
Show answer and check
Yes, they fit. The covered length is 3 + 3 + 3 + 3 minus three overlaps of 1 cm, which equals 9 cm, less than 14 cm.
Why: Four bands of 3 cm total 12 cm. Three overlaps of 1 cm remove 3 cm, leaving 9 cm of covered shaft length. Since 9 cm is less than 14 cm, the bands fit with room to spare.
Check: Add the band lengths, subtract the overlaps, and compare the result with the shaft length. Confirm the number of overlaps is one fewer than the number of bands.
Exercise 3
You draw a feather with a 1.5 mm shaft at the base and a 0.5 mm shaft at the tip. You then add five pencil strokes per band, with four bands. If each stroke is 1 cm long, what total stroke length do you draw? State the unit.
Show answer and check
20 cm total stroke length.
Why: Five strokes per band times four bands equals 20 strokes. Each stroke is 1 cm, so 20 strokes times 1 cm equals 20 cm. The shaft widths are separate measurements and do not affect this count.
Check: Multiply strokes per band by number of bands, then multiply by stroke length. Keep units consistent in centimeters.
Exercise 4
A practice feather is 8 cm long. You plan three bands per side, each 2 cm long along the shaft, with 0.5 cm overlaps. Calculate the covered length per side and state whether the bands fit within the 8 cm shaft.
Show answer and check
Covered length per side is 5 cm, so the bands fit within the 8 cm shaft.
Why: Three bands of 2 cm total 6 cm. Two overlaps of 0.5 cm remove 1 cm, leaving 5 cm covered per side. Since 5 cm is less than 8 cm, the bands fit.
Check: Add band lengths, subtract overlaps (one fewer than bands), and compare with shaft length. Check that both sides use the same arithmetic if symmetrical.
Common mistakes
- Drawing the vane as one solid outline with no internal layering. Build the vane in overlapping bands from base to tip so the layered structure is visible.
- Making pencil strokes run across the shaft or against the barb direction. Angle strokes outward from the shaft and toward the tip, keeping them short and within their band.
- Using heavy pressure everywhere so layers merge into a dark mass. Keep early bands light and increase pressure only slightly in later bands, or vary pressure deliberately.
- Letting the shaft become uniformly thick or disappear under strokes. Taper the shaft from base to tip and redraw it lightly after the vane is built.
Self-check rubric
- Shaft is present, tapered from base to tip, and reads as the center of the feather.
- Vane shows at least three overlapping layers built from base toward tip.
- Pencil strokes angle outward from the shaft and toward the tip within each band.
- Layers remain distinguishable; pressure or stroke density may vary but direction stays consistent.
- Outer boundary is controlled without outlining every barb; sparse stray strokes are acceptable.
- Valid alternatives are accepted: symmetry or asymmetry, lighter or darker tip bands, and varied stroke length, provided layering and direction read clearly.
Questions and answers
Do I need to draw every barb?
No. Layered bands and consistent stroke direction suggest barbs without drawing each one. Sparse detail is usually more readable.
Can the vane be symmetrical?
Yes. Symmetry is acceptable for practice. Asymmetry can look more natural, but it is not required for a valid result.
How many layers should I use?
Three or four overlapping bands are enough to show layering. More bands can work if they remain distinguishable.
What if my pencil strokes vary in length?
Slight variation is fine and can suggest softness. Keep the direction consistent within each band so the layering still reads.