Free original lessons
Draw an American Football: Oval, Seams, Laces, and Shading
Learn to draw a football with a clean oval outline, curved panel seams, a lace row, and simple shading. Includes steps, checks, and practice tasks.
Free lesson
Four exercises
Worked answers
Object Drawing Lessons
This lesson teaches a reliable way to draw an American football as a standalone object. You will build the shape from a tilted oval, add curved panel seams that follow the form, place a centered row of laces, and finish with shading that suggests a rounded surface. The method uses simple checkable geometry and a defined drawing convention so you can judge your own work. All measurements are hypothetical examples; measure your own paper and tools. Work lightly at first, then darken the final lines.
Practice materials: Printable downloads are not available for this lesson yet. Use the instructions and four exercises below.
Reference illustration
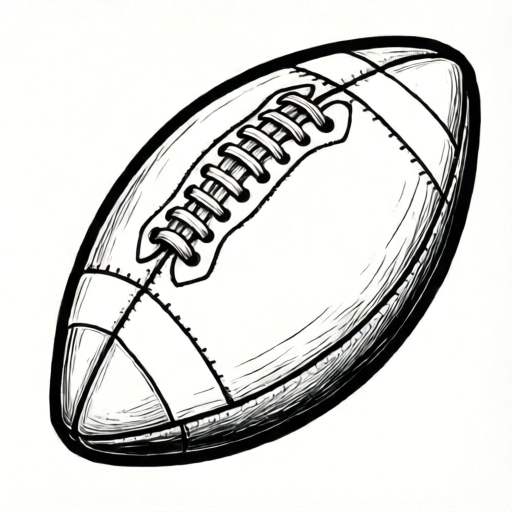
Use the stated measurements and conventions for each exercise.
Set the oval and its tilt
Start with a light construction oval. A football is longer than it is wide, so choose a length-to-width ratio of about 1.6 to 1. For example, on a 14 cm wide paper area, a 12 cm long by 7.5 cm wide oval fits comfortably when untilted. Mark the center point, then draw a horizontal guide line through it and a vertical guide line through it. Tilt the oval by rotating your paper or by drawing the long axis at a slight angle, such as 15 degrees from horizontal. Keep the tilt consistent: the laces will run along the long axis. If you tilt the oval, check that its tilted bounding box still fits your paper: a 12 cm by 7.5 cm oval at 15 degrees spans about 11.7 cm horizontally and about 7.9 cm vertically, which fits a 14 cm wide paper area, so keep the oval within that size or use larger paper.
Check the oval by measuring the distance from the center to the top and bottom along the long axis; they should be equal. Then measure the short axis; it should be shorter than the long axis. If the oval looks like a circle, increase the length. If it looks like a pointed almond, round the ends by redrawing with a smoother curve.
- Draw a light horizontal guide and a light vertical guide crossing at the center.
- Mark the long-axis endpoints at equal distances from the center.
- Mark the short-axis endpoints at equal distances from the center, shorter than the long axis.
- Connect the four endpoints with a smooth oval, keeping the curve continuous.
- Tilt the whole oval slightly by rotating the paper, not by distorting the oval.
Add curved panel seams
A football's surface is divided by seams that curve because they wrap around a rounded form. Draw two long seam curves that run roughly parallel to the long axis, one on each side of the center. These seams should bow outward slightly near the middle and come closer to the outline near the ends. Then add two shorter cross seams that curve across the short axis, one near each end. The cross seams should curve toward the center of the football, not away from it. Keep all seams inside the oval outline.
Use a consistent convention: seams are drawn as single curved lines, not double lines, unless you choose a double-line style for all seams. If you use double lines, keep the gap even. Check that no seam crosses another seam except where the design intends a junction. The lace row will sit between the two long seams, centered on the long axis.
- Draw the left long seam as a gentle curve from near one end to near the other, staying inside the outline.
- Draw the right long seam as a mirror-like curve on the other side of the long axis.
- Draw a short cross seam near the top end, curving toward the center.
- Draw a short cross seam near the bottom end, curving toward the center.
- Check that all seams remain inside the oval and that the two long seams are roughly equidistant from the long axis.
Place the lace row
The laces sit on the top surface, centered between the two long seams and aligned with the long axis. Mark a short segment along the long axis, about one third of the oval's length, centered on the middle. Along this segment, draw a row of small lace holes or loops. A simple convention is five laces: draw five short cross lines evenly spaced, each perpendicular to the long axis. Then connect them with two parallel lines that run along the long axis, forming the lace bed. Keep the spacing even; for example, if the lace segment is 4 cm long and you place five laces at the ends and at the three interior division points, the segment is divided into four equal intervals of 1.0 cm each, so adjacent lace centers are about 1.0 cm apart.
Check the lace row by counting the laces and measuring the gaps. The row should look centered and should not touch the long seams. If the laces look crowded, reduce the number or lengthen the segment. If they look sparse, add one lace and re-space evenly.
- Mark the lace segment along the long axis, centered on the oval.
- Draw two parallel lines along the long axis to form the lace bed.
- Mark evenly spaced points for the laces along the bed.
- Draw short cross lines at each point, perpendicular to the long axis.
- Check centering and even spacing; adjust lightly before darkening.
Shade for roundness and add a cast shadow
Shading should suggest a rounded surface. Choose a light direction, such as from the upper left. Shade the lower right side of the oval more than the upper left. Keep the shading inside the outline and let it fade gradually toward the light side. Use light pencil strokes that follow the curve of the surface. Do not shade the lace row heavily; keep it readable. A cast shadow can be added beneath the football as a separate soft shape, not touching the outline, to suggest the object sits on a surface.
Check the shading by squinting: the football should look darker on the side away from the light and lighter on the side facing the light. The cast shadow should be on the opposite side of the light direction. If the shading looks flat, increase the contrast slightly on the dark side. If the lace row disappears, lighten the shading around it.
- Choose a light direction and mark it lightly outside the oval.
- Shade the side away from the light with light, curved strokes.
- Fade the shading toward the light side.
- Keep the lace row clear by avoiding heavy shading over it.
- Add a soft cast shadow beneath the football, offset away from the light.
Worked example
Draw a football on a 14 cm by 12 cm area with the long axis tilted 15 degrees. Use five laces and a light source from the upper left. Add a cast shadow.
Worked answer
A completed drawing shows a smooth oval about 12 cm long and 7.5 cm wide, tilted 15 degrees. Two long seams curve gently on each side of the long axis, and two short cross seams curve toward the center near the ends. Five evenly spaced laces sit in a centered bed between the long seams. Shading is darker on the lower right, and a soft cast shadow lies below and to the right of the football.
Four practice exercises
Exercise 1
Draw a football with a long axis of 10 cm and a short axis of 6 cm, untilted. Use four laces and a light source from the top. Add a cast shadow.
Show answer and check
A smooth oval 10 cm by 6 cm, with two long curved seams and two short cross seams inside the outline. Four evenly spaced laces centered on the long axis. Shading darker at the bottom, with a cast shadow below the football.
Why: The axes are measured from the center, so the oval is balanced. The lace row is centered and spaced evenly. The light from the top means the bottom is darker and the shadow falls below.
Check: Measure the long and short axes from the center; count four laces and check equal gaps; squint to confirm the bottom is darker and the shadow is below.
Exercise 2
Draw a football tilted 20 degrees with a long axis of 12 cm and a short axis of 7 cm. Use five laces and a light source from the left. Add a cast shadow.
Show answer and check
A smooth oval 12 cm by 7 cm tilted 20 degrees. Curved seams inside the outline, five centered laces, shading darker on the right, and a cast shadow to the right.
Why: The tilt is applied to the whole oval without distorting it. The light from the left makes the right side darker, so the shadow falls to the right.
Check: Check that the oval is not distorted by the tilt; measure lace spacing; confirm the right side is darker and the shadow is on the right.
Exercise 3
Draw a football with a long axis of 9 cm and a short axis of 5.5 cm, tilted 10 degrees. Use three laces and a light source from the upper right. Add a cast shadow.
Show answer and check
A smooth oval 9 cm by 5.5 cm tilted 10 degrees. Curved seams, three centered laces, shading darker on the lower left, and a cast shadow to the lower left.
Why: Three laces are acceptable if evenly spaced and centered. The light from the upper right makes the lower left darker, so the shadow falls to the lower left.
Check: Measure the axes, count three laces with equal gaps, and squint to confirm the lower left is darker with the shadow on that side.
Exercise 4
Draw a football with a long axis of 11 cm and a short axis of 6.5 cm, tilted 25 degrees. Use a double-line seam convention for all seams, five laces, and a light source from the lower left. Add a cast shadow.
Show answer and check
A smooth oval 11 cm by 6.5 cm tilted 25 degrees. Every seam is drawn as a pair of parallel curved lines with an even gap: two long double-line seams flanking the long axis and two short double-line cross seams curving toward the center near the ends. Five evenly spaced laces sit in a centered bed between the long seams. Shading is darker on the upper right, and a soft cast shadow lies to the upper right, offset from the outline.
Why: The double-line convention must be applied to every seam, not just some, so the drawing reads as one consistent style. The light from the lower left makes the upper right darker, so the cast shadow falls to the upper right. The tilt is applied to the whole oval without distorting its proportions.
Check: Measure the long and short axes from the center and confirm the oval is smooth and not distorted by the tilt. Check that each seam is a double line with an even gap and that no seam crosses another unintentionally. Count five laces with equal gaps centered between the long seams. Squint to confirm the upper right is darker and the cast shadow is on that side.
Common mistakes
- Drawing the oval as a perfect circle or as a pointed almond. Measure the long and short axes from the center and adjust until the long axis is clearly longer and the ends are smoothly rounded.
- Making the panel seams straight instead of curved. Redraw each seam as a gentle bow that follows the rounded form, keeping it inside the outline.
- Placing the lace row off-center or touching a seam. Re-mark the center of the long axis, measure equal distances to each long seam, and keep the lace bed between them.
- Shading evenly all over, so the football looks flat. Pick one light direction and shade more on the opposite side, fading toward the light.
Self-check rubric
- Oval outline is smooth, closed, and clearly longer than wide; long and short axes are balanced.
- Two long seams and two short cross seams are curved, inside the outline, and follow a consistent single-line or double-line convention.
- Lace row is centered on the long axis, between the long seams, with even spacing and a countable number of laces.
- Shading shows a clear light direction with darker shading on the opposite side; lace row remains readable.
- Cast shadow is present, separate from the outline, and offset away from the light direction.
- Valid alternatives are accepted: tilt angle, lace count, and seam style may vary if consistent and checkable.
Questions and answers
Do I need special paper or tools?
No. A pencil, eraser, and any paper work. A ruler helps with measuring axes and lace spacing, but you can estimate if you check the proportions.
How many laces should I draw?
Five is a simple convention, but any odd number that fits the lace segment evenly is acceptable if the spacing is consistent and the row is centered.
Can I use double lines for the seams?
Yes, if you use double lines for all seams and keep the gap even. The rubric accepts a consistent convention.
How do I know the shading is correct?
Squint at the drawing. The side away from your chosen light direction should read darker, and the cast shadow should fall on the opposite side.