Free original lessons
Overhead Hair Drawing: Crown, Part, and Fall Lines
Learn to map crown whorl, parting lines, and strand fall direction on a top-down head outline using a simple convention and checkable steps.
Free lesson
Four exercises
Worked answers
Object Drawing Lessons
Drawing hair from above is a mapping problem, not a styling problem. When you look straight down at a head, you see the crown as a small spiral or point, parting lines as gaps that radiate or curve, and every strand as a path that leaves the crown and falls toward the skull edge. This lesson teaches a repeatable convention: treat the crown as the origin, draw parting lines as boundaries between flow zones, and draw fall lines as smooth curves that never cross. You will practice on a blank top-down head outline and check your work with simple arithmetic and visual tests. All examples use hypothetical measurements; measure your own paper and tools if you need real values.
Practice materials: Printable downloads are not available for this lesson yet. Use the instructions and four exercises below.
Reference illustration
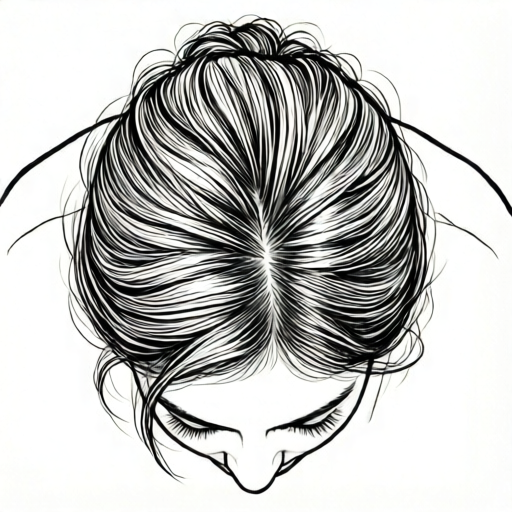
Use the stated measurements and conventions for each exercise.
Set the overhead convention
Place a blank top-down head outline on your page. Mark the center point as the crown origin. Draw a small circle around it to represent the whorl zone; its radius is a chosen value, for example 1 cm on a 15 cm-wide head outline. This circle is not a hair tie or a real anatomical feature; it is a drawing convention that keeps the crown readable.
Define the fall direction as the direction a strand travels away from the crown. On the left side of the head, fall lines generally curve left and down; on the right, they curve right and down. At the back, they curve toward the nape. These are conventions, not universal rules. You may choose a different flow pattern as long as it is consistent and you can explain it.
- Draw the head outline and mark the crown origin at the center.
- Draw a whorl circle of chosen radius around the origin.
- Decide the main fall direction for each side and write it in one word at the edge.
- Draw three guide curves from the whorl circle to the outline, spacing them evenly.
Draw parting lines as zone boundaries
A parting line is a gap where hair is divided. From above, it looks like a line that starts near the crown and runs to the outline. Draw one main part from the whorl circle toward the forehead, and one secondary part toward one ear. Keep the lines slightly curved; straight lines are allowed but must not cross fall lines.
Use the parts to create zones. Each zone should have its own fall direction. For example, the left zone falls left, the right zone falls right, and the back zone falls toward the nape. Label each zone with a letter so you can check coverage later.
- Draw the main part from the whorl circle to the forehead edge.
- Draw a secondary part from the whorl circle to one ear edge.
- Label the zones A, B, and C between the parts.
- Check that every zone touches the whorl circle or a part line.
Map fall lines without crossing
Fall lines are the paths strands take from the crown to the edge. Draw them as smooth curves that start at the whorl circle and end at the outline. They must not cross each other or the parting lines. If two fall lines cross, redraw one so it bends around the other.
Space fall lines evenly within each zone. On a 15 cm-wide head outline, a spacing of about 1.5 cm gives ten lines across the width; this is a hypothetical example. Measure your own outline and choose a spacing that fits. The goal is readable flow, not exact count.
- Start at the whorl circle and draw one fall line per zone.
- Add two more fall lines per zone, keeping spacing even.
- Check for crossings and redraw any line that crosses another.
- Trace each fall line with your finger to confirm it reaches the outline.
Check with arithmetic and visual tests
Use simple arithmetic to check spacing. If your head outline is 12 cm wide and you want 8 fall lines across the width, the spacing is 12 divided by 8, which equals 1.5 cm. If your lines are closer than half the spacing, they will look crowded; if farther than twice the spacing, they will look sparse. These thresholds are chosen examples, not standards.
Run two visual tests. First, the no-cross test: no fall line may cross another fall line or a parting line. Second, the reach test: every fall line must start at the whorl circle and end at the outline. If a line fails either test, redraw it before adding detail.
- Measure the head outline width and record it in centimeters.
- Divide by the number of fall lines to get the spacing.
- Compare actual gaps to the spacing and adjust crowded or sparse areas.
- Run the no-cross test and the reach test on every line.
Worked example
On a top-down head outline 10 cm wide, draw a crown origin at the center, a whorl circle of radius 0.5 cm, one main part to the forehead, one secondary part to the left ear, and six fall lines total. Check spacing and crossings.
Worked answer
The whorl circle is drawn at the center with radius 0.5 cm. The main part runs from the whorl circle to the forehead edge; the secondary part runs to the left ear edge. Three zones are labeled A (right), B (back), and C (left). Six fall lines are drawn: two per zone. The outline width is 10 cm, so the hypothetical spacing is 10 divided by 6, about 1.67 cm. Gaps are checked to be between 0.83 cm and 3.33 cm. No fall line crosses another or a part line, and every fall line starts at the whorl circle and ends at the outline.
Four practice exercises
Exercise 1
A top-down head outline is 14 cm wide. You plan to draw 7 fall lines across the width. What is the hypothetical spacing in centimeters?
Show answer and check
2 cm.
Why: Divide the width by the number of lines: 14 divided by 7 equals 2. This is a chosen example, not a standard.
Check: Multiply the spacing by the number of lines: 2 times 7 equals 14 cm, matching the outline width.
Exercise 2
You draw a fall line that crosses a parting line near the crown. Describe one fix that keeps the line starting at the whorl circle and ending at the outline.
Show answer and check
Redraw the fall line so it bends around the parting line, starting at a different point on the whorl circle and curving outward before reaching the outline.
Why: Crossings break the zone boundary rule. Moving the start point and bending the curve preserves the start and end while avoiding the part line.
Check: Trace the redrawn line: it must start on the whorl circle, end on the outline, and not touch any part line or other fall line.
Exercise 3
On a 12 cm-wide outline, you draw 5 fall lines with gaps of 1 cm, 1 cm, 4 cm, and 4 cm. Using the hypothetical rule that gaps should be between half and twice the average spacing, is the spacing acceptable?
Show answer and check
No. The average spacing is 12 divided by 5, which is 2.4 cm. Half is 1.2 cm and twice is 4.8 cm. The 1 cm gaps are below half, so the spacing is not acceptable.
Why: Compare each gap to the allowed range. The 1 cm gaps are too small, even though the 4 cm gaps are within range.
Check: List the gaps and compare each to 1.2 cm and 4.8 cm. Any gap below 1.2 cm fails the check.
Exercise 4
You want three zones with fall directions left, right, and back. Draw a plan in words: where does the main part go, where does the secondary part go, and how many fall lines per zone if you draw 9 total?
Show answer and check
Main part from the whorl circle to the forehead separates left and right zones. Secondary part from the whorl circle to the back edge separates the back zone from the left or right zone. Draw 3 fall lines per zone for 9 total.
Why: Parts create boundaries between zones with different flow. Equal division gives 9 divided by 3 equals 3 lines per zone.
Check: Confirm each zone touches a part line or the whorl circle, and count 3 lines in each zone for a total of 9.
Common mistakes
- Drawing fall lines that cross each other near the crown. Start each fall line at a different point on the whorl circle and bend lines outward before they meet. Redraw any crossing line so it curves around the other.
- Making the whorl circle too large so it looks like a bald spot. Choose a smaller radius, for example 0.5 cm on a 15 cm-wide outline, and keep the circle as a guide only. Do not shade inside it as skin unless your convention says so.
- Using straight parting lines that ignore fall direction. Curve the parting lines slightly toward the fall direction of each zone. Check that each part separates two zones with different flow.
- Spacing fall lines unevenly without checking. Measure the outline width, divide by the number of lines, and compare gaps. Adjust lines that are closer than half the spacing or farther than twice the spacing.
Self-check rubric
- Crown origin is marked and a whorl guide is present.
- At least one main part and one secondary part are drawn as zone boundaries.
- Fall lines start at the whorl guide and end at the outline.
- No fall line crosses another fall line or a parting line.
- Spacing is checked with arithmetic and adjusted if needed.
- Zones are labeled and each has a consistent fall direction.
- Valid alternative conventions are allowed if explained and checked.
Questions and answers
Do I have to draw a spiral whorl?
No. A small circle or a short curved mark is enough. The convention only requires a clear crown origin that fall lines can start from.
Can parting lines be straight?
Yes, if they do not cross fall lines and they separate zones with different flow. Curved parts are often easier to read from above.
How many fall lines should I draw?
Choose a number that fits your outline and spacing. For a 12 cm-wide outline, 8 lines give 1.5 cm spacing as a hypothetical example. Measure your own outline.
What if my hair flow pattern is different from the example?
Use your own pattern as long as it is consistent. Label each zone and check that fall lines do not cross and reach the outline.