Free original lessons
Owl Wings Drawing: Layered Flight-Feather Construction
Learn to draw owl wings with correct feather-layer order, leading-edge curve, and folded or spread variants using a clear, checkable convention.
Free lesson
Four exercises
Worked answers
Object Drawing Lessons
Owl wings reward careful layering: the leading edge sweeps forward, flight feathers overlap in a fixed order, and the wing can be shown folded or spread. This lesson defines a simple drawing convention so you can build a believable wing from the shoulder outward, check your layer order, and adapt the same geometry to folded and spread poses. All measurements are hypothetical examples; measure your own paper and tools. The planned printable plate and blank outlines are described here but are not yet produced.
Practice materials: Printable downloads are not available for this lesson yet. Use the instructions and four exercises below.
Reference illustration
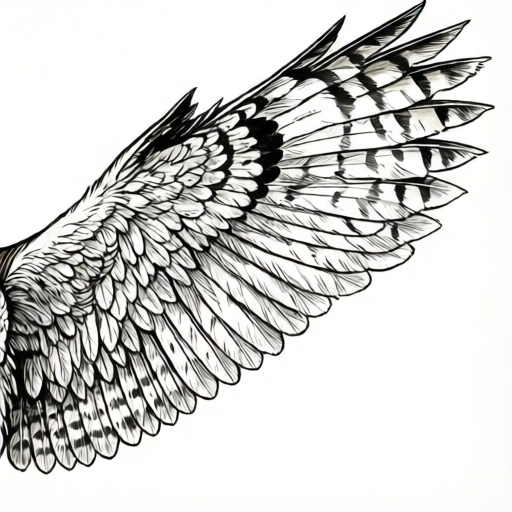
Use the stated measurements and conventions for each exercise.
Wing geometry and the leading-edge curve
Start with a wing axis: a line from the shoulder joint to the wingtip. The leading edge is the forward boundary; it curves gently outward near the shoulder, then straightens toward the tip. The trailing edge is the rear boundary and carries the long flight feathers. Keep the wing thickness modest: a narrow band along the axis, widening slightly at the shoulder.
Use a simple convention: the leading edge is drawn as a smooth curve with one shallow inflection, and the trailing edge is built from overlapping feather tips. For a spread wing, the axis is nearly horizontal; for a folded wing, the axis angles down and back, and the flight feathers stack closer together. Label the shoulder point S, the wrist point W, and the tip T on your sketch so you can check proportions.
- Draw the axis line from S to T; mark W about one-third of the way from S to T.
- Sketch the leading edge as a shallow curve from S through W to T, keeping the curve smooth.
- Mark the trailing-edge zone as a band behind the axis, wider near S and narrower near T.
- Check that the leading edge does not cross the axis and that the tip is the farthest point from S.
Flight-feather layer order
Flight feathers are drawn in layers from the trailing edge inward. The outermost primaries sit at the tip; secondaries sit closer to the shoulder; coverts overlap the bases of the flight feathers. A reliable order is: draw the longest primaries first, then the secondaries, then the coverts, then the smaller covert rows. Each new layer overlaps the previous one toward the leading edge.
Use a consistent overlap rule: every feather is drawn so its tip points away from the shoulder and its base is hidden under the next layer toward the leading edge. This makes the layering readable. Feather width can vary; keep the spacing even enough that the layer order is obvious. If two feathers cross, the one closer to the leading edge is drawn on top.
- Draw three to five primary feathers at the tip, fanning slightly.
- Add secondaries from the wrist toward the shoulder, overlapping the primary bases.
- Draw the main covert row over the bases of the flight feathers.
- Add one or two smaller covert rows nearer the leading edge, each overlapping the row behind it.
- Check the overlap direction: every layer should step toward the leading edge.
Folded and spread variants
A spread wing shows the full fan of flight feathers; a folded wing compresses the same layers into a narrower shape. For the folded variant, rotate the axis downward, shorten the visible trailing-edge band, and stack the flight feathers so only their tips show. The leading edge remains the forward boundary, but the curve is tighter.
Keep the same layer order in both variants. In the folded wing, the primaries cross over the secondaries near the wrist, so draw the primaries last in that local area. In the spread wing, the primaries fan outward and the secondaries remain more parallel. Use the same S, W, T labels to compare the two poses.
- Draw the spread wing first using the layer order above.
- For the folded wing, redraw the axis at a steeper angle and shorten the trailing-edge band.
- Stack the flight feathers so their tips overlap near the wrist.
- Check that the folded wing still shows the leading edge as the forward boundary.
Checking your drawing
Use simple checks rather than a single correct appearance. First, confirm the layer order: primaries at the tip, secondaries toward the shoulder, coverts over the bases. Second, confirm the overlap direction: each layer steps toward the leading edge. Third, confirm the leading-edge curve is smooth and does not cross the axis. Fourth, confirm the folded and spread variants share the same S, W, T structure.
Because letter styles and feather shapes vary, accept any drawing that satisfies these checks. Measure your own paper and pencil; the numerical examples here are hypothetical. A useful self-check is to trace the leading edge with a finger and confirm it is the forward-most boundary at every point.
- Trace the leading edge and confirm it is forward-most.
- Point to each feather layer and name its order.
- Check that every overlap steps toward the leading edge.
- Compare the folded and spread sketches for the same S, W, T structure.
Worked example
On a sheet, draw a spread owl wing using S, W, T labels. Use a hypothetical wing length of 12 cm from S to T, with W at 4 cm from S. Draw three primaries, four secondaries, and one covert row. Then check the layer order and overlap direction.
Worked answer
The axis runs 12 cm from S to T with W at 4 cm. The leading edge is a smooth curve forward of the axis. Three primaries fan at the tip, four secondaries overlap their bases toward the shoulder, and the covert row overlaps the flight-feather bases toward the leading edge. Every overlap steps toward the leading edge, and the leading edge remains forward-most. The drawing passes the four checks.
Four practice exercises
Exercise 1
Draw a spread wing with a hypothetical axis of 10 cm from shoulder S to tip T, wrist W at 3 cm from S. Add two primaries and three secondaries. State the layer order you used.
Show answer and check
Axis 10 cm; W at 3 cm. Two primaries at the tip, three secondaries overlapping toward the shoulder. Layer order: primaries first, then secondaries, then any coverts if added.
Why: The primaries occupy the tip because they are the outermost flight feathers; secondaries sit closer to the shoulder and overlap the primary bases. The wrist position at 3 cm keeps the leading-edge curve shallow near the shoulder.
Check: Trace the leading edge to confirm it is forward-most; point to each feather and confirm primaries are at the tip and secondaries toward the shoulder; confirm each overlap steps toward the leading edge.
Exercise 2
Convert the spread wing from the previous exercise into a folded wing. Keep S, W, T labels. Describe how the trailing-edge band and feather tips change.
Show answer and check
The axis angles down and back; the trailing-edge band is shorter; the flight-feather tips stack closer near the wrist. The layer order stays the same, with primaries crossing over secondaries near the wrist.
Why: Folding compresses the same layers into a narrower shape. Shortening the trailing-edge band and stacking tips near the wrist preserves the geometry while showing the folded pose.
Check: Compare the folded sketch to the spread sketch: S, W, T should still be identifiable; the leading edge should remain forward-most; the layer order should still read from tip to shoulder.
Exercise 3
A sketch shows coverts drawn first, then primaries on top of the coverts. Identify the layer-order mistake and describe the corrected drawing order.
Show answer and check
The mistake is drawing coverts before flight feathers. Correct order: primaries first, then secondaries, then coverts over the flight-feather bases, then smaller covert rows toward the leading edge.
Why: Coverts overlap the bases of flight feathers, so they must be drawn after the flight feathers to appear on top. Drawing them first makes the long feathers look incorrectly layered.
Check: Point to the covert row and confirm it sits over the bases of the primaries and secondaries; confirm no flight feather is drawn on top of a covert.
Exercise 4
Draw a folded wing with a hypothetical axis of 8 cm from S to T and W at 2 cm from S. Add three primaries and two secondaries. Check that the leading edge is forward-most and that the overlap direction is correct.
Show answer and check
Axis 8 cm; W at 2 cm. Three primaries stacked near the wrist, two secondaries toward the shoulder. The leading edge is a tight forward curve; every overlap steps toward the leading edge.
Why: A shorter axis and wrist closer to the shoulder suit the folded pose. Stacking primaries near the wrist shows compression while keeping the layer order readable.
Check: Trace the leading edge; confirm it does not cross the axis; point to each feather and confirm tips point away from the shoulder; confirm each layer overlaps toward the leading edge.
Common mistakes
- Drawing coverts before the flight feathers, so the long feathers appear to sit on top of the coverts. Draw primaries and secondaries first, then add coverts over their bases.
- Making the leading edge cross the wing axis or become jagged. Redraw the leading edge as one smooth curve from shoulder through wrist to tip, keeping it forward of the axis.
- Using the same feather spacing for folded and spread wings. Compress the trailing-edge band and stack feather tips closer in the folded variant while keeping the layer order.
- Letting feather tips point toward the shoulder. Reorient each feather so its tip points away from the shoulder and its base is hidden under the next layer.
Self-check rubric
- Leading edge is a smooth forward boundary that does not cross the wing axis.
- Primaries are at the tip, secondaries toward the shoulder, and coverts overlap the flight-feather bases.
- Every feather layer overlaps toward the leading edge; no tip points toward the shoulder.
- Folded and spread variants share the same shoulder, wrist, and tip structure.
- Feather shapes and spacing may vary, but the layer order and overlap direction remain readable.
Questions and answers
How many flight feathers should I draw?
Use three to five primaries and four to six secondaries as a hypothetical starting point; adjust to your wing size while keeping the layer order clear.
Can I draw the wing without a full owl body?
Yes. This lesson focuses only on the wing geometry and feather layers; the body and facial disk are outside the scope.
What if my feather shapes differ from the example?
That is acceptable. The rubric checks layer order, overlap direction, leading-edge curve, and consistent structure, not a single feather shape.
How do I show a folded wing clearly?
Angle the axis down and back, shorten the trailing-edge band, and stack the flight-feather tips near the wrist while keeping the same layer order.