Free original lessons
Drawing Pangolin Scales: Overlap, Layer Order, and Edge Shading
Learn to draw pangolin scale layering with a clear overlap convention, layer sequence, and shading guide for armored plate edges.
Free lesson
Four exercises
Worked answers
Object Drawing Lessons
Pangolin scales are not flat tiles; they are overlapping armored plates that follow the body contour and create a distinctive layered silhouette. This lesson defines a simple drawing convention for scale overlap, then walks through a repeatable layer sequence and a shading method for plate edges. The convention is explicit so that valid alternatives can be assessed fairly: each scale is drawn as a rounded plate whose visible edge sits above the scale behind it, and the overlap direction is stated before drawing. You will practice reading a body outline, placing scales in rows, and shading edges to show depth. All measurements are hypothetical examples; measure your own paper and tools before drawing.
Practice materials: Printable downloads are not available for this lesson yet. Use the instructions and four exercises below.
Reference illustration
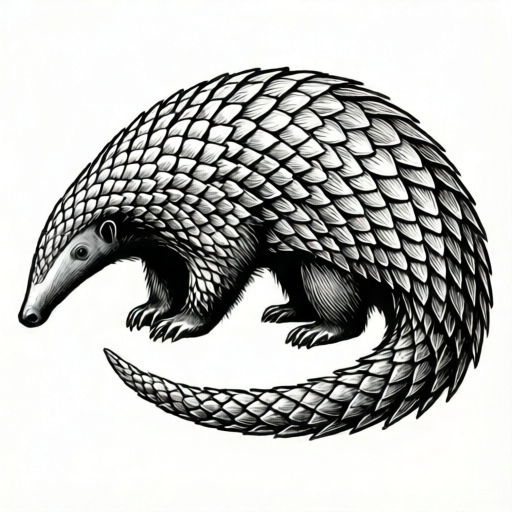
Use the stated measurements and conventions for each exercise.
Define the overlap convention before drawing
A pangolin scale is a plate that overlaps the plate behind it. In this lesson, the convention is: the scale nearer the head sits on top of the scale nearer the tail. This means each new scale is drawn so its front edge covers the rear edge of the scale behind it (toward the tail). State this direction at the start; if you choose the opposite direction, keep it consistent and note it, because both can be valid as long as the layering is coherent.
Draw a light body outline first. Mark a midline from head to tail and a few cross-curves that follow the body form. These guides help rows of scales curve naturally rather than sit in straight lines. Use a soft pencil so guides can be erased later.
- Draw a simple pangolin body outline with head, back, tail, and four legs.
- Mark a midline and three to five cross-curves that follow the body contour.
- Write the overlap direction at the top of the page, for example: front scales over rear scales.
- Keep all guide lines light and removable.
Build scale rows from head to tail
Work in rows that follow the cross-curves. Start at the neck and move toward the tail. In each row, draw scales from the midline outward to both sides. Each scale is a rounded plate with a visible front edge and a partly hidden rear edge. Because the front scale overlaps the rear scale, draw the rear scale first, then draw the front scale so its edge covers the rear edge.
Vary scale size slightly to match the body: smaller near the head and legs, larger along the back and tail. Keep the overlap consistent. A useful check is to trace one row with your finger: every visible edge should point in the same general direction along the body.
- Start at the neck and draw the first row of rear scales lightly.
- Draw the next row of front scales so their edges overlap the rear scales.
- Continue row by row toward the tail, alternating sides from the midline.
- Check that every visible edge follows the stated overlap direction.
Shade armored plate edges for depth
Shading should reinforce the overlap. Decide on a light direction, for example from the upper left. The visible front edge of each scale catches light, while the hidden rear edge sits in shadow. Draw a thin shadow line just under each visible edge, then soften it away from the edge. Avoid shading the entire scale evenly; the goal is to show that one plate sits above another.
Use a simple three-value system: light on the top surface, mid-tone on the curved side, and dark in the narrow gap under the overlapping edge. Keep the dark gap thin so the scales do not look separated. Test the values on a scrap of the same paper before committing to the final drawing.
- Choose a light direction and mark it lightly at the page edge.
- Draw a thin shadow line under each visible scale edge.
- Soften the shadow away from the edge to show the plate above.
- Check that the darkest values sit in the narrow gaps between overlapping plates.
Check the layer sequence and silhouette
Step back and check the drawing as a whole. The silhouette should read as a pangolin: a rounded back, a tapering tail, and scales that follow the body rather than float. Trace the overlap direction along the back and tail; it should remain consistent. If a scale looks reversed, redraw its visible edge rather than adding more shading.
Finally, compare the scale density to your body outline. If the scales are too large, the armored look is lost; if too small, the drawing becomes noisy. Adjust by redrawing a few scales rather than erasing everything.
- Trace the overlap direction from head to tail and note any reversals.
- Check that scales follow the cross-curves and do not sit in straight rows.
- Confirm the silhouette reads as a pangolin with a rounded back and tapering tail.
- Redraw any reversed or oversized scales before final shading.
Worked example
A body outline is 18 cm long from neck to tail base. You plan eight scale rows along the back. Each row should be evenly spaced. What is the spacing between row guide lines, and how do you check it?
Worked answer
Divide 18 cm by 8 rows to get 2.25 cm between row guide lines. Mark the first guide at the neck and the last at the tail base, then place the remaining guides at 2.25 cm intervals. Check by measuring each interval with a ruler; all intervals should read 2.25 cm within your measurement accuracy.
Four practice exercises
Exercise 1
A body outline is 24 cm long from neck to tail base. You want ten scale rows evenly spaced. Calculate the spacing between row guide lines and describe where the first and last guides go.
Show answer and check
Spacing is 24 cm divided by 10 rows, which equals 2.4 cm. Place the first guide at the neck and the last at the tail base, then mark the remaining guides at 2.4 cm intervals.
Why: Even spacing means the total length is divided by the number of intervals, which equals the number of rows when the first and last guides are at the ends.
Check: Measure each interval with a ruler; every interval should read 2.4 cm within your measurement accuracy, and the sum of intervals should equal 24 cm.
Exercise 2
You draw a row of five scales. The overlap convention is front scales over rear scales. Describe the drawing order for that row and state one check that the order was followed.
Show answer and check
Draw the rearmost scale first, then each scale toward the head so that each new scale covers the rear edge of the scale behind it. Check that every visible edge points toward the tail.
Why: Drawing rear scales first allows the front scales to overlap them cleanly; reversing the order would leave rear edges on top and break the convention.
Check: Trace the visible edges with a finger; all should point in the same direction along the body, and no rear edge should sit above a front scale.
Exercise 3
A scale is drawn 3 cm wide and 2 cm tall. The next scale behind it should overlap by one third of its height. Calculate the overlap distance in centimetres and state how much of the rear scale remains visible.
Show answer and check
One third of 2 cm is about 0.67 cm. The overlap distance is 0.67 cm, and the rear scale remains visible for about 1.33 cm of its height.
Why: The overlap is a fraction of the rear scale height; subtracting the overlap from the full height gives the visible remainder.
Check: Measure the visible height of the rear scale with a ruler; it should read about 1.33 cm, and the hidden part should read about 0.67 cm.
Exercise 4
You plan to shade with a light direction from the upper left. For a scale whose visible edge faces the lower right, state where the thin shadow line goes and where the lightest value goes.
Show answer and check
The thin shadow line goes just under the visible edge on the lower right side, and the lightest value goes on the top surface facing the upper left.
Why: The light comes from the upper left, so surfaces facing that direction are lightest, and the narrow gap under the overlapping edge is in shadow.
Check: Check that the darkest values sit in the narrow gaps under visible edges and that the top surfaces facing upper left are the lightest values.
Common mistakes
- Drawing scales as separate tiles with visible gaps all around. Draw each front scale so its edge covers the rear edge of the scale behind it; keep gaps thin and only under the overlapping edge.
- Changing the overlap direction halfway through the body. State the direction before drawing and check each row against it; redraw reversed edges rather than shading over them.
- Shading every scale evenly so the layering disappears. Use a thin shadow under each visible edge and keep the top surface light; the contrast should show which plate sits above.
- Making all scales the same size across the body. Use smaller scales near the head and legs and larger scales along the back and tail, keeping the overlap consistent.
Self-check rubric
- Overlap direction is stated and kept consistent from head to tail.
- Scales are drawn as overlapping plates, not separate tiles with gaps all around.
- Scale rows follow the body contour and cross-curves.
- Scale size varies sensibly across the body while keeping the overlap readable.
- Shading uses a thin shadow under visible edges to show which plate sits above.
- The silhouette reads as a pangolin with a rounded back and tapering tail.
- Valid alternative conventions are accepted if stated and applied consistently.
Questions and answers
Which scale should be on top?
This lesson uses front scales over rear scales, meaning the scale nearer the head covers the rear edge of the scale behind it. The opposite direction can also be valid if stated and kept consistent.
How many rows should I draw?
There is no fixed number. Choose a row count that fits your body outline and keeps scale size readable. A hypothetical example is eight to twelve rows along the back, but adjust to your drawing size.
Can I use a different light direction?
Yes. Choose one light direction and keep it consistent. The shading rule stays the same: light on the top surface and a thin shadow under the visible overlapping edge.
How do I know the drawing is finished?
Check that the overlap direction is consistent, the scales follow the body contour, and the silhouette reads as a pangolin. If those three checks pass, the layering is complete.