Free original lessons
Profile Portrait Drawing: Angle Comparison Guide
Learn to construct a profile portrait using brow-nose-lip-chin alignment, then compare feature placement against front and three-quarter views.
Free lesson
Four exercises
Worked answers
Object Drawing Lessons
Drawing a portrait in profile is not simply tracing an outline. It requires understanding how the brow, nose, lips, and chin align along a vertical guide, and how that alignment shifts when the head turns. This lesson provides a step-by-step construction method for profile view, a comparison framework for front and three-quarter angles, and four self-contained practice tasks. All measurements are hypothetical examples; measure your own reference or model to set your own values. A convention is defined for x-height (baseline to midline of lowercase letters) so that handwritten labels and notes can be assessed fairly, with valid alternatives accepted.
Practice materials: Printable downloads are not available for this lesson yet. Use the instructions and four exercises below.
Reference illustration
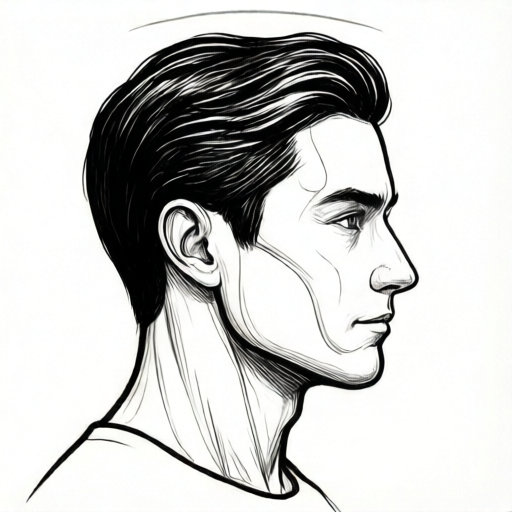
Use the stated measurements and conventions for each exercise.
Establishing the Profile Proportion Guide
Begin with a vertical oval representing the head in profile. Mark a vertical midline from the top of the skull to the chin. Along this line, place four reference points: brow, nose tip, lip line, and chin. In a typical adult profile, the brow sits roughly one-third down from the top of the oval, the nose tip about two-thirds down, the lip line slightly below the nose, and the chin at the bottom edge. These are hypothetical proportions; adjust to your subject.
Draw a light vertical guide through these points. This guide is not a straight line in reality—the brow may project forward, the nose tip further forward, and the chin recede or project. Use the guide to check relative forward-backward positions, not to force a straight line.
- Draw a vertical oval for the head, taller than wide.
- Mark the top, bottom, and a vertical midline.
- Place brow, nose tip, lip line, and chin points along the midline.
- Draw a light vertical guide connecting these points.
- Check that the nose tip projects furthest forward, then brow, then lips, then chin (adjust for your subject).
Comparing Profile, Front, and Three-Quarter Angles
In front view, the face is symmetrical: eyes sit on a horizontal midline, nose is centered, and the distance from brow to chin is divided roughly into thirds (hairline to brow, brow to nose base, nose base to chin). In profile, those thirds become vertical intervals along the side of the head, and the nose projects outward. In three-quarter view, the far eye and far cheek compress, and the nose shifts toward the far side of the face.
Use a side-by-side comparison box: draw three small ovals labeled front, three-quarter, and profile. In each, mark the brow-nose-lip-chin alignment. In front view, these points stack vertically in the center. In three-quarter, they shift toward the far side. In profile, they form a stepped vertical guide along the side. This comparison trains you to see how feature placement changes with angle.
- Draw three ovals side by side: front, three-quarter, profile.
- In the front oval, mark a vertical center line and place brow, nose, lips, chin on it.
- In the three-quarter oval, shift the vertical line toward the far side and compress the far features.
- In the profile oval, place the points along the side edge and note forward projection.
- Compare the three guides and label the differences.
Refining Features and Checking Alignment
Once the guide is set, refine the brow ridge, nose bridge, nostril, lip curves, and chin shape. Keep the eye on the profile line: in profile, the eye sits behind the brow and above the nose bridge. The ear sits roughly between the brow and nose base vertically, and behind the jaw line. Check that the back of the skull curves outward from the neck.
Use a simple arithmetic check: measure the vertical distance from brow to chin in your drawing (in centimeters or arbitrary units). Divide it into thirds. The nose base should fall near the lower third mark, and the lip line slightly below that. If your nose base is far from the lower third, adjust the guide before adding detail.
- Refine brow, nose, lips, and chin along the guide.
- Place the eye behind the brow and above the nose bridge.
- Place the ear between brow and nose base vertically, behind the jaw.
- Measure brow-to-chin distance and divide into thirds.
- Check nose base near lower third mark; adjust if needed.
Worked example
A profile oval is 12 cm tall from brow to chin. Divide into thirds and place nose base and lip line. Describe the alignment.
Worked answer
Brow-to-chin = 12 cm. Thirds = 4 cm each. Nose base at 8 cm from brow (lower third mark). Lip line slightly below 8 cm, about 9 cm. Brow projects forward, nose tip furthest forward, lips slightly behind nose, chin recedes. The guide is stepped, not straight.
Four practice exercises
Exercise 1
Draw a profile oval 10 cm tall from brow to chin. Mark brow, nose tip, lip line, and chin. Divide brow-to-chin into thirds and state where the nose base falls.
Show answer and check
Thirds = 3.33 cm each. Nose base at 6.67 cm from brow (lower third mark). Lip line slightly below, about 7.5 cm. Guide is stepped with nose projecting furthest.
Why: The lower third mark is a check for nose base placement; lip line sits slightly below it. Forward projection is noted, not forced straight.
Check: Measure brow-to-chin in your drawing; divide by 3; compare nose base position to lower third mark. Adjust if off by more than 0.5 cm.
Exercise 2
In a three-oval comparison box, mark brow-nose-lip-chin alignment for front, three-quarter, and profile. Describe one shift between front and three-quarter.
Show answer and check
Front: points stack vertically in center. Three-quarter: points shift toward far side; far eye and cheek compress. Profile: points along side edge with forward projection. Shift: nose moves toward far side in three-quarter.
Why: Angle changes feature placement; the comparison box makes shifts visible without a model.
Check: Check that each oval has a labeled guide and that at least one shift is described in words.
Exercise 3
A profile drawing has brow-to-chin = 9 cm. Nose base is placed at 4 cm from brow. Is this near the lower third mark? Show arithmetic.
Show answer and check
Thirds = 3 cm each. Lower third mark = 6 cm from brow. Nose base at 4 cm is 2 cm above the mark, so it is not near the lower third. Adjust downward.
Why: Simple division and comparison; units consistent in cm.
Check: Recalculate 9 ÷ 3 = 3; 3 × 2 = 6; compare 4 to 6. If difference > 0.5 cm, adjust.
Exercise 4
Write three labels for a profile guide using the x-height convention (baseline to midline). State one valid alternative style.
Show answer and check
Labels: brow, nose, chin. X-height defined as baseline to midline of lowercase letters. Valid alternative: all-capital labels with consistent height, or mixed case with clear midline.
Why: The convention allows consistent assessment while accepting valid handwriting alternatives.
Check: Check that labels are legible and that the stated convention or alternative is applied consistently across labels.
Common mistakes
- Drawing the profile guide as a perfectly straight vertical line. Allow the brow, nose tip, and chin to project or recede; use the guide as a relative check, not a rigid line.
- Placing the eye too far forward, near the nose bridge. In profile, the eye sits behind the brow and above the nose bridge; check against your guide.
- Ignoring the shift of features in three-quarter view. Compress the far eye and cheek, and shift the nose toward the far side; compare with the front and profile guides.
- Using arbitrary proportions without measuring the subject. Measure brow-to-chin distance and divide into thirds; label any chosen numbers as hypothetical examples.
Self-check rubric
- Profile oval is taller than wide and has a clear vertical midline.
- Brow, nose tip, lip line, and chin are marked and connected by a light guide.
- Guide shows forward projection of nose and brow, with chin receding (or adjusted to subject).
- Eye is placed behind brow and above nose bridge.
- Ear is placed between brow and nose base vertically, behind jaw.
- Side-by-side comparison box includes front, three-quarter, and profile ovals with feature shifts labeled.
- Handwritten labels use defined x-height convention (baseline to midline) or a valid alternative style.
- Arithmetic check: brow-to-chin distance divided into thirds, nose base near lower third mark.
- All numerical values are labeled as hypothetical examples or measured from actual reference.
Questions and answers
What is x-height and why is it defined here?
X-height is the distance from the baseline to the midline of lowercase letters in handwritten labels. It is defined so that notes and labels can be assessed consistently, while allowing valid alternative handwriting styles.
Can I use a different proportion guide?
Yes. The brow-nose-lip-chin alignment is a convention; adjust to your subject and measure actual distances. Valid alternatives are accepted if internally consistent.
How do I compare angles without a model?
Use the side-by-side comparison box with three ovals. Mark feature placement in each and note shifts. This is a planning exercise, not a finished portrait.
Are the numerical values in this lesson standard?
No. All numbers are hypothetical examples. Measure your own equipment or reference to set your own values.