Free original lessons
Isometric Product Drawing: Axis, Box Form, and Face Shading
Learn to draw a box-form product in isometric projection using three axes, construction lines, and simple face shading with a clear convention.
Free lesson
Four exercises
Worked answers
Object Drawing Lessons
Isometric projection shows a box-form product with three visible faces: top, left, and right. This lesson teaches a repeatable construction using three axes at 30 degrees from horizontal, then applies a defined shading convention so the drawing reads clearly. You will measure your own tools, label any example numbers as hypothetical, and use a rubric that accepts valid stylistic variation. The focus is construction and legibility, not brand-specific rendering.
Practice materials: Printable downloads are not available for this lesson yet. Use the instructions and four exercises below.
Reference illustration
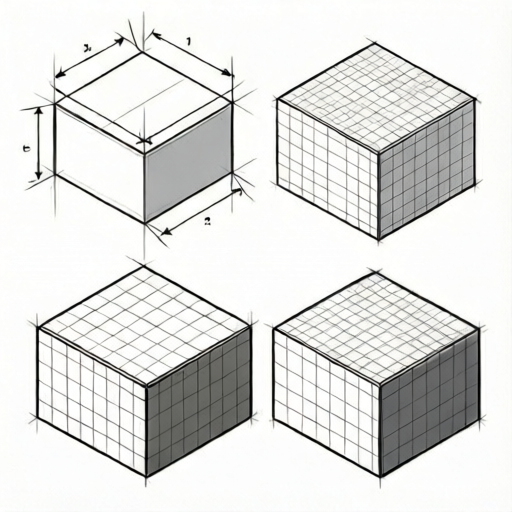
Use the stated measurements and conventions for each exercise.
Set up the three isometric axes
Isometric drawing uses three axes: one vertical and two at 30 degrees from horizontal, spaced 120 degrees apart. Draw a vertical axis first, then two lines at 30 degrees upward from a common origin. These axes define width, depth, and height for a box-form product.
Measure your actual paper and ruler before choosing lengths. For example, if your ruler shows 1 cm per major mark, a hypothetical product box might use 6 cm width, 4 cm depth, and 3 cm height along the axes. These numbers are examples only; use consistent units and check each length against your own equipment.
- Mark an origin point near the lower center of the page.
- Draw a vertical axis upward from the origin.
- Draw one axis at 30 degrees up-right and one at 30 degrees up-left from the origin.
- Label the axes width, depth, and height so construction stays consistent.
Construct the box form
A box-form product is built from three visible faces. Start with the top face as a parallelogram whose sides follow the width and depth axes. Then drop vertical lines from each top corner to form the left and right faces. Keep all parallel edges parallel to their axes.
Check that opposite edges remain equal. If the top face uses 6 cm along width and 4 cm along depth, the opposite edges must match. Any mismatch signals a construction error, not a shading problem.
- Draw the top face using the width and depth axes.
- From each top corner, draw a vertical line equal to the chosen height.
- Connect the lower endpoints to complete the left and right faces.
- Erase or lighten hidden construction lines only after the outline is stable.
Apply the face shading convention
Use an explicitly defined convention: the top face is lightest, the left face is medium, and the right face is darkest. This convention is a teaching choice, not a universal rule. Valid alternatives include reversing left and right tones if you state the convention before drawing.
Shade with parallel strokes or even tone. Keep edges crisp so the three faces remain distinguishable. The rubric rewards consistent convention and clear separation, not a single mandatory tone.
- State your shading convention in one line before shading.
- Fill the top face with the lightest tone.
- Fill the left face with a medium tone.
- Fill the right face with the darkest tone, keeping boundaries sharp.
Check proportions and legibility
Measure the drawn edges against your planned lengths. If a hypothetical height is 3 cm, the vertical edges should measure 3 cm on your ruler. Check that the three axes remain at 30 degrees from horizontal using your own angle tool or paper corner reference.
Legibility matters more than decoration. A viewer should identify the top, left, and right faces immediately. If two faces merge visually, adjust tone separation rather than adding detail.
- Measure each axis length and compare with the plan.
- Confirm the three visible faces are distinct.
- Check that no edge crosses another face incorrectly.
- Record any deviation and correct it before final shading.
Worked example
Construct an isometric box product with hypothetical width 6 cm, depth 4 cm, and height 3 cm. Use the convention top lightest, left medium, right darkest. Describe the construction and shading.
Worked answer
Draw a vertical axis and two 30-degree axes from an origin. Mark 6 cm along width and 4 cm along depth to form the top parallelogram. From each top corner, draw 3 cm vertical edges. Connect lower endpoints to complete left and right faces. Shade top lightest, left medium, right darkest. Check that opposite top edges match 6 cm and 4 cm, and each vertical edge measures 3 cm.
Four practice exercises
Exercise 1
A hypothetical box product has width 5 cm, depth 3 cm, and height 2 cm. Describe how to construct the top face and the two vertical side faces using isometric axes.
Show answer and check
Draw a vertical axis and two 30-degree axes. Mark 5 cm along width and 3 cm along depth to form the top parallelogram. From each top corner, draw 2 cm vertical edges. Connect the lower endpoints to complete the left and right faces.
Why: The top face uses the width and depth axes; vertical edges use the height axis. Equal opposite edges keep the form isometric.
Check: Measure opposite top edges: both width edges should be 5 cm and both depth edges 3 cm. Each vertical edge should measure 2 cm.
Exercise 2
Using the convention top lightest, left medium, right darkest, describe the shading for a box with width 4 cm, depth 4 cm, and height 4 cm. State one valid alternative convention.
Show answer and check
Shade the top face lightest, the left face medium, and the right face darkest. A valid alternative is top lightest, left darkest, right medium, provided the convention is stated first.
Why: The convention creates clear separation between adjacent faces. Alternatives are valid if consistent and legible.
Check: Confirm three distinct tones and that the stated convention matches the applied tones.
Exercise 3
A student draws a top face with width edges of 6 cm and 5 cm. Identify the error and describe the correction using isometric construction.
Show answer and check
The opposite width edges must be equal in isometric projection. Correct by redrawing the top parallelogram so both width edges measure 6 cm along the width axis and both depth edges match the planned depth.
Why: Parallel edges in isometric projection remain equal; unequal opposite edges indicate a construction error.
Check: Measure both width edges and both depth edges; each pair should match.
Exercise 4
Describe how to check that a drawn box product is isometric rather than perspective, using only a ruler and the stated axes.
Show answer and check
Check that the two non-vertical axes are at 30 degrees from horizontal and that parallel edges remain parallel and equal in length. If lines converge or equal planned lengths differ, the drawing is not isometric.
Why: Isometric projection preserves parallel equality; perspective converges lines.
Check: Measure the angle of each axis with your own tool and compare opposite edge lengths against the plan.
Common mistakes
- Drawing the top face as a rectangle instead of a parallelogram. Follow the 30-degree width and depth axes so opposite edges stay parallel.
- Using different heights on the vertical edges. Measure each vertical edge against the same planned height and correct mismatches.
- Shading without stating a convention. Write the tone order for top, left, and right faces before shading.
- Letting two faces share the same tone. Increase separation between adjacent tones while keeping edges sharp.
Self-check rubric
- Three axes are present: one vertical and two at 30 degrees from horizontal.
- Top face is a parallelogram with opposite edges equal and parallel to the width and depth axes.
- All vertical edges use the same planned height.
- A shading convention is stated before shading.
- Top, left, and right faces are visually distinct and edges remain sharp.
- Measurements use consistent units and match the stated plan.
- Valid alternative conventions are accepted if stated and consistently applied.
Questions and answers
Do the axes have to be exactly 30 degrees?
For isometric projection, yes: the two non-vertical axes are at 30 degrees from horizontal. Check with your own angle tool and label any example values as hypothetical.
Can I reverse the left and right shading tones?
Yes, if you state the convention first. The rubric accepts valid alternatives that remain consistent and legible.
How do I know my box is not perspective?
In isometric projection, parallel edges stay parallel and equal lengths remain equal. Perspective would converge lines; avoid that here.
What if my product is not a perfect box?
Start with the box form, then add simple sub-boxes along the same axes. Keep all additions parallel to the three axes.