Free original lessons
Reptile Scale Overlay on a Human Arm: A Drawing Guide
Learn to draw reptile scales on a human arm using a row grid, cylinder wrapping, and a clear convention for scale size and shading.
Free lesson
Four exercises
Worked answers
Object Drawing Lessons
This guide teaches a repeatable method for overlaying reptile scales on a human arm drawing. You will define a scale convention, build a row grid that follows the arm's cylinder, and shade scales so they read as wrapping around the form. The approach works for any arm pose because it relies on measured spacing and direction rather than a single template. All exercises are self-contained; where an example diagram is needed, its key features are described in words. Use the convention and rubric to judge your work, and accept valid alternatives where the brief allows variation.
Practice materials: Printable downloads are not available for this lesson yet. Use the instructions and four exercises below.
Reference illustration
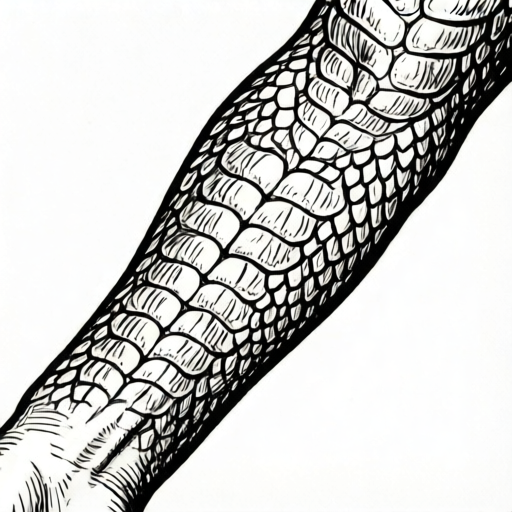
Use the stated measurements and conventions for each exercise.
Define a scale convention before drawing
A convention is a short set of rules you choose and then follow consistently. For reptile scales on a human arm, state three things: scale shape (for example, rounded diamonds), row direction (for example, rows run around the arm's circumference), and scale size relative to the arm (for example, each scale is about one-eighth of the arm's width at the forearm). Write these rules beside your drawing so a viewer can check them.
X-height is baseline to midline; letter styles vary. Apply the same idea to scales: define a baseline (the lower edge of a scale row) and a midline (the row's vertical center). This makes spacing checkable. Do not assume a universal scale size; measure your own arm outline and label any numerical example as hypothetical.
- Choose a scale shape and draw five examples in a row.
- Mark a baseline and midline for that row on scrap paper.
- Measure the arm outline's width at three points and record the values.
- Set a hypothetical scale width, such as one-eighth of the forearm width, and label it as an example.
Build a row grid that follows the arm cylinder
An arm is roughly cylindrical, so scale rows should curve around it. Start with the arm outline. Draw a center line along the arm's length. Then draw cross-curves that bow away from the viewer on the near side and tighten on the far side. These cross-curves are your row baselines. Space them evenly along the center line, using your chosen scale height.
On each baseline, mark scale positions. Near the center line, scales face the viewer and appear widest. Toward the outline edges, scales compress and may show only their side. This compression is the visual cue that the pattern wraps around the cylinder. Keep the row count consistent; if you add a row, add it across the whole arm rather than in one patch.
- Draw the arm outline and a center line.
- Add cross-curves at even intervals along the center line.
- Mark scale positions along each cross-curve, widening near the center and narrowing at the edges.
- Check that every row crosses the arm from edge to edge.
Shade scales to show wrapping and overlap
Shading sells the cylinder. Decide a light direction, such as upper left. Scales on the near side catch more light; scales near the far edge fall into shadow. Draw each scale as a small shape with a lower edge that overlaps the row below. Overlap direction should be consistent: for example, each scale's lower edge sits slightly over the scale beneath it.
Use three tones: light on the upper part of each scale, mid-tone on the sides, and dark in the gaps between scales. On the arm's shadow side, shift all three tones darker. Do not outline every scale with the same weight; heavier lines at overlaps and lighter lines at the top edge help the pattern read as layered.
- Choose a light direction and mark it on the page.
- Draw overlap edges on every scale in one row.
- Apply light, mid, and dark tones consistently.
- Darken the whole pattern gradually toward the shadow edge.
Check the overlay against the arm form
A common failure is a flat pattern that ignores the arm's curve. Check by tracing the center line and asking whether scales on either side of it mirror the compression. Another check is row continuity: no row should stop mid-arm unless the arm outline does. Finally, check scale size consistency: if one scale is twice the width of its neighbor in the same row, either justify it as a deliberate variation or correct it.
Use the rubric to score shape consistency, row continuity, cylinder wrapping, shading logic, and convention clarity. Valid alternatives include different scale shapes, different row directions, and different light directions, provided the convention is stated and followed.
- Trace the center line and compare left and right compression.
- Scan each row for gaps or stops.
- Measure three scales in one row and compare widths.
- Score the drawing with the rubric and note one improvement.
Worked example
An arm outline is 8 cm wide at the forearm. Using a hypothetical scale width of 1 cm, plan one row across the near side and state how many scales fit if the row covers the full width.
Worked answer
Eight scales fit across the full 8 cm width at 1 cm each. Near the center line, draw them at full width; toward the edges, compress them to about half width, so the row still reads as eight positions but the outer scales appear narrower.
Why: The arithmetic is 8 divided by 1 equals 8. Compression at the edges is a drawing convention for cylinder wrapping, not a change in the planned count.
Check: Measure the row's total width and divide by the chosen scale width. Confirm the count matches and that edge scales are visibly narrower than center scales.
Four practice exercises
Exercise 1
An arm outline is 10 cm wide at the upper arm. You choose a hypothetical scale width of 2 cm. How many scales fit across one full row, and how should the outer scales look?
Show answer and check
Five scales fit across the full row. The outer scales should appear narrower than the center scales because they wrap toward the far side of the cylinder.
Why: 10 divided by 2 equals 5. The count is planned across the full width; compression at the edges is a drawing effect, not a change in count.
Check: Divide the row width by the scale width and confirm the result is 5. Check that the two outer scales are visibly narrower than the middle three.
Exercise 2
You draw four rows on an arm. Each row has a baseline. Describe how to check that the rows follow the arm's cylinder rather than lying flat.
Show answer and check
Trace the center line and confirm each baseline bows away from the viewer on the near side and tightens on the far side. Also check that scales near the outline edges are narrower than scales near the center line in every row.
Why: A flat pattern has straight baselines and uniform scale widths. A cylindrical pattern has curved baselines and edge compression.
Check: Place a straight edge along each baseline; it should not lie flat against the page. Compare center and edge scale widths in the same row.
Exercise 3
A drawing shows a light direction from the upper left. The near side of the arm is light, but the far edge is also drawn light. What is the mistake and how do you fix it?
Show answer and check
The mistake is inconsistent shading: the far edge should be darker because it faces away from the light. Fix it by shifting all tones darker toward the far edge while keeping the upper-left light direction.
Why: Shading must follow the chosen light direction across the whole cylinder. A light far edge contradicts the upper-left source.
Check: Mark the light direction on the page and scan the pattern from near to far edge. Tones should grow darker toward the far edge.
Exercise 4
You want to vary scale size deliberately in one patch. State a convention that allows this and describe how a viewer can check it.
Show answer and check
State that scales in the patch are one-half the width of surrounding scales and that the patch is centered on the arm's near side. A viewer can measure three patch scales and three surrounding scales and confirm the one-half ratio.
Why: Deliberate variation is valid if it is stated and measurable. Without a stated convention, size variation looks like an error.
Check: Measure the patch scales and surrounding scales, compute the ratio, and compare it to the stated convention.
Common mistakes
- Drawing scales as a flat wallpaper pattern that does not curve with the arm. Add cross-curves that bow around the cylinder and compress scales near the outline edges.
- Using inconsistent scale sizes within a row without a stated reason. Measure a few scales and keep them within the range set by your convention, or label deliberate variation.
- Shading every scale identically regardless of the arm's shadow side. Shift all tones darker toward the shadow edge and keep the light direction consistent.
- Letting rows stop partway across the arm. Draw each row from edge to edge and check continuity before shading.
Self-check rubric
- Convention stated: shape, row direction, and scale size are written beside the drawing.
- Shape consistency: scales follow the chosen shape within a reasonable range.
- Row continuity: every row crosses the arm from edge to edge.
- Cylinder wrapping: scales compress near the outline edges and widen near the center line.
- Shading logic: light direction is consistent and the shadow side is darker.
- Overlap clarity: lower edges overlap the row below in a consistent direction.
- Valid alternatives accepted: different shapes, row directions, or light directions are allowed if the convention is followed.
Questions and answers
Do I need a specific reptile species for this overlay?
No. The brief is a scale-pattern overlay, not species identification. Choose a shape and size convention and follow it consistently.
How large should each scale be?
Measure your arm outline and set a hypothetical example, such as one-eighth of the forearm width. Label numerical values as examples, not standards.
Can I use a different row direction?
Yes. Rows can run around the circumference or along the arm's length, provided the convention is stated and the wrapping logic is consistent.
What if my arm pose is bent?
Keep the center line and cross-curves following the bend. Compression still applies near the outline edges, and rows should remain continuous across the bend.