Free original lessons
Draw Sarmale: Rolled Cabbage Cylinders in a Pot
Learn to sketch rolled cabbage shapes with tapered leaf wraps, arrange them in a pot using ellipse guides, and shade leaf texture and interior shadow.
Free lesson
Four exercises
Worked answers
Object Drawing Lessons
This lesson teaches a repeatable method for drawing sarmale, the rolled cabbage parcels common in Romanian cooking, as a small group inside a pot. You will build each roll from a tapered cylinder, wrap it with overlapping leaf edges, then place several rolls in a pot whose rim is drawn as an ellipse. The focus is shape construction and simple shading, not cooking or still-life composition. All measurements are hypothetical examples; measure your own paper and tools before drawing. Use a pencil, eraser, and paper. Work lightly at first so you can adjust proportions. The convention for size is: x-height means the distance from baseline to midline of your lowercase letters, used here only as a rough scale reference for small details. Letter styles vary, so treat x-height as a personal guide, not a universal standard.
Practice materials: Printable downloads are not available for this lesson yet. Use the instructions and four exercises below.
Reference illustration
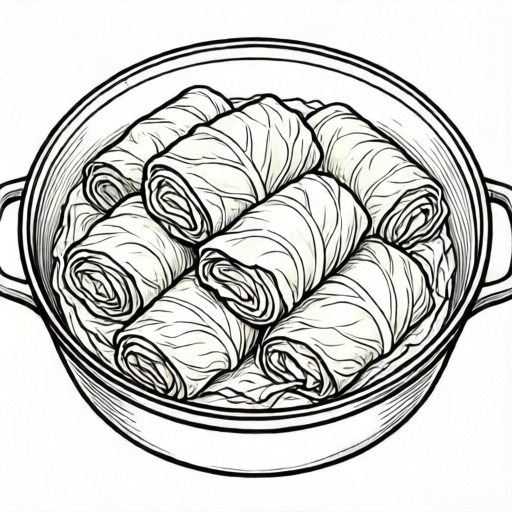
Use the stated measurements and conventions for each exercise.
Build the Rolled Cabbage Cylinder
A sarmale roll is roughly a short cylinder with one end slightly narrower, because the leaf wrap tapers as it folds. Start with a light rectangle for the body, then round the ends. Add a taper by making one end about two-thirds the width of the other. This taper is a convention, not a rule; real rolls vary.
Next, draw the leaf wrap as two or three overlapping curved lines that cross the cylinder diagonally. These lines suggest folded leaf edges. Keep them soft and slightly irregular. A leaf edge can be a gentle wave, not a perfect arc.
- Draw a light rectangle about 3 units long and 1.5 units wide (hypothetical units).
- Round both short ends to make a cylinder.
- Narrow one end to about 1 unit wide to create a taper.
- Add two curved lines across the body to show overlapping leaf edges.
- Erase construction lines lightly, keeping the leaf edges visible.
Place Rolls in the Pot with Ellipse Guides
The pot rim is an ellipse. Draw a horizontal ellipse for the opening, then a second smaller ellipse below it for the interior base. Connect the two with short vertical sides. This gives a simple pot interior.
Arrange three to five rolls inside the pot. Place the back rolls higher and slightly smaller to suggest depth. Overlap the rolls so each one hides part of the one behind it. Keep the tapered ends pointing in varied directions for a natural look.
- Draw a wide ellipse for the pot rim.
- Draw a smaller ellipse below it for the interior base.
- Connect the ellipses with two short vertical lines.
- Place back rolls first, then front rolls, overlapping each.
- Vary the direction of each roll's tapered end.
Shade Leaf Texture and Pot Interior Shadow
Shade the leaf texture with short, curved strokes that follow the wrap direction. Use lighter pressure on the top of each roll and darker pressure near the bottom edge. This suggests a rounded form.
For the pot interior, add a soft shadow along the inner wall opposite your light source. Keep the shadow darkest where the wall meets the base. Do not shade the entire interior evenly; leave some light areas to show depth.
- Choose a light direction, for example from the upper left.
- Add short curved strokes along each leaf wrap.
- Darken the lower edge of each roll slightly.
- Shade the inner pot wall on the side away from the light.
- Leave the rim top mostly light to separate it from the interior.
Worked example
Draw one sarmale roll with a tapered end and two leaf-wrap lines, then place it inside a pot rim ellipse. Use a light source from the upper right.
Worked answer
A short cylinder about 3 units long and 1.5 units wide, with the left end narrowed to about 1 unit. Two curved lines cross the body diagonally. The roll sits inside a wide ellipse pot rim, with the tapered end pointing left. Shading is darker on the lower left of the roll and on the inner left pot wall, because the light comes from the upper right.
Four practice exercises
Exercise 1
Draw a single sarmale roll 4 units long and 2 units wide, with the right end tapered to 1.5 units. Add one leaf-wrap line across the middle. Describe where the line crosses.
Show answer and check
A rounded cylinder 4 units long and 2 units wide, right end narrowed to 1.5 units. One curved leaf-wrap line crosses the body near the middle, from the top edge to the bottom edge, slanting slightly toward the tapered end.
Why: The taper is created by narrowing one end. The leaf-wrap line crosses the body to suggest a folded leaf edge. Slanting toward the taper follows the wrap direction.
Check: Measure the length and width against your hypothetical units. Confirm the right end is narrower than the left. Check that the leaf line touches both the top and bottom edges.
Exercise 2
Draw a pot rim ellipse 6 units wide and 3 units tall. Place two rolls inside: one at the back and one at the front. The front roll should overlap the back roll. State the approximate position of each roll.
Show answer and check
A horizontal ellipse 6 units wide and 3 units tall. The back roll sits near the upper inner edge of the ellipse, slightly smaller. The front roll sits lower and overlaps the back roll's lower edge. Both rolls are inside the ellipse boundary.
Why: The ellipse defines the pot opening. Placing the back roll higher and smaller suggests depth. Overlapping the front roll hides part of the back roll, reinforcing depth.
Check: Verify the ellipse width is about twice its height. Confirm both rolls are fully inside the ellipse. Check that the front roll covers part of the back roll.
Exercise 3
Draw three rolls in a pot with light from the upper left. Shade each roll darker on its lower right side and shade the inner pot wall on the right. Explain why the right side is darker.
Show answer and check
Three overlapping rolls inside a pot ellipse. Each roll has short curved shading strokes on its lower right side. The inner pot wall on the right is shaded darker than the left. The right side is darker because the light comes from the upper left, so the lower right of each roll and the inner right wall face away from the light.
Why: Shading opposite the light source creates a consistent sense of form. The pot interior shadow follows the same logic as the rolls.
Check: Trace an imaginary line from the upper left to each shaded area. Confirm the shaded areas are on the side away from that line. Check that no roll is shaded darker on its upper left.
Exercise 4
Draw four rolls in a pot. Make the two back rolls smaller than the two front rolls. Add leaf-wrap lines to each roll. Describe one valid alternative arrangement that still shows depth.
Show answer and check
Four rolls inside a pot ellipse. The two back rolls are about two-thirds the size of the front rolls and sit higher. Each roll has two curved leaf-wrap lines. A valid alternative: place three rolls in a triangle with one back roll and two front rolls, keeping the back roll smaller and higher.
Why: Size and height differences suggest depth. Leaf-wrap lines identify each roll as a wrapped parcel. The alternative keeps the same depth cues with a different count and placement.
Check: Compare the back rolls to the front rolls: back rolls should be smaller and higher. Confirm every roll has at least one leaf-wrap line. For the alternative, check that the back roll is still smaller and higher than the front rolls.
Common mistakes
- Drawing every roll as a perfect rectangle with flat ends. Round the ends and add a slight taper to one end so the roll reads as a wrapped parcel.
- Making the pot rim a circle instead of an ellipse. Flatten the ellipse horizontally; a pot opening seen from slightly above is wider than it is tall.
- Shading the pot interior evenly dark. Keep a lighter area near the rim and darken only the inner wall opposite the light source.
- Placing all rolls at the same height and size. Make back rolls slightly smaller and higher, and overlap front rolls to show depth.
Self-check rubric
- The roll shape is a rounded cylinder with a visible taper at one end.
- At least two leaf-wrap lines cross the roll body.
- The pot rim is drawn as a horizontal ellipse, not a circle.
- Rolls overlap and vary in size or height to suggest depth.
- Shading follows a consistent light direction on rolls and pot interior.
- Leaf texture uses short curved strokes rather than flat fill.
- Valid alternatives: a roll may taper at either end; leaf lines may wave or curve differently; the number of rolls may be three to five.
Questions and answers
Do I need to draw every leaf edge?
No. Two or three curved lines per roll are enough to suggest the wrap. More lines can make the shape busy.
How many rolls should I place in the pot?
Three to five is a practical range for a small sketch. Use fewer if your pot ellipse is small.
What if my ellipse looks uneven?
Check that the left and right halves are similar in height. Lightly redraw the flatter curve until it looks balanced.
Can I use a different light direction?
Yes. Keep the shadow on the side away from your chosen light and stay consistent across all rolls and the pot interior.