Free original lessons
Draw Seashells with Spiral and Rib Construction
Learn to build seashells using spiral growth and radial rib geometry. Practice with guided steps, common fixes, and four self-contained exercises.
Free lesson
Four exercises
Worked answers
Object Drawing Lessons
This lesson teaches a simplified drawing construction for shells using a spiral coil and repeated rib marks. Shell forms differ; the cone, coil, and rib arrangements below are worksheet drawing choices, not a biological description of every shell. All measurements are hypothetical examples. Use a pencil, eraser, and straightedge.
Practice materials: Printable downloads are not available for this lesson yet. Use the instructions and four exercises below.
Reference illustration
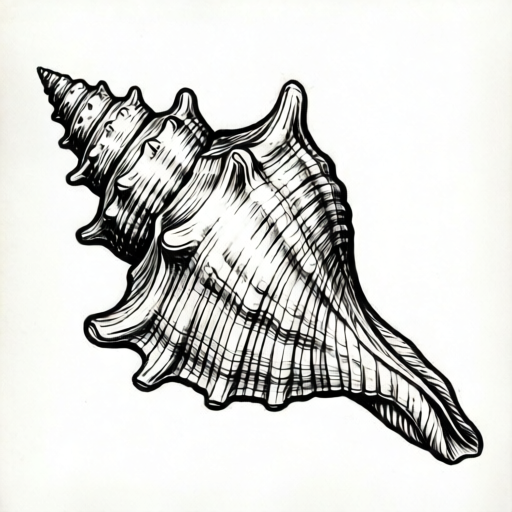
Use the stated measurements and conventions for each exercise.
Spiral growth: the coil as a cone
For this worksheet, build a cone-shaped outline with a rounded broad end and a narrow tip. Draw a light axis from tip to the center of the broad end. This guide sets the direction for a stylized spiral; it is not a claim that every shell has this exact form.
Add three or four light cross-guides between the outer coil and the axis. In this drawing convention, place the guides farther apart near the broad end and closer together near the tip. Use them to keep the spiral marks organized.
Draw overlapping loops that narrow as they approach the tip. Keep the loops touching without crossing. This simplified coil is a construction exercise; compare a reference image if you need the shape of a particular shell.
- Draw a light cone outline with a rounded base and a pointed tip.
- Mark the axis line from tip to base center.
- Add three growth-line arcs crossing the cone at different heights.
- Draw the first coil loop from the outer edge inward, touching the axis.
- Add subsequent loops, each smaller and closer to the tip.
- Erase construction lines only after the coil is clear.
Radial ribs: spacing and curvature
For a ribbed-shell drawing, place curved rib marks across the selected outline. In this worksheet, treat the ribs as arcs that follow the shape and cross the guide arcs at a visible angle. Their direction is a drawing choice, not a universal anatomical rule.
Choose hypothetical spacing of 8 mm at the widest part and 4 mm near the tip. Mark those intervals on a light guide, then carry corresponding marks across the neighboring guide. This keeps the drawn ridges organized. Use line weight to suggest depth: firmer at the crest and lighter in the valley. Small variations are acceptable if the spacing remains checkable.
- Choose a spacing interval and mark it along the widest growth line.
- Project marks to the next growth line with light dots.
- Draw each rib as a curved arc connecting corresponding marks.
- Vary line weight: heavier at crests, lighter at valleys.
- Check that ribs cross growth lines at consistent angles.
- Adjust spacing near the tip to avoid crowding.
Combining spiral and ribs
For this constructed drawing, lay in the spiral first and add rib marks as a separate layer. Keep the marks on the chosen shell outline rather than letting them float outside it. Where a rib crosses a coil loop, continue the line with a small directional change for clarity. This is an illustration convention rather than a statement about all real shells.
Use the growth-line guides to keep ribs aligned. If a rib drifts, erase and redraw from the nearest guide mark. Keep the coil visible as a light line under the ribs; this helps maintain the three-dimensional read.
Finally, add a subtle shadow along the lower edge of the coil and under each rib crest. Keep shadows consistent with a single light source, for example from the upper left. This is a drawing convention, not a rule about real shells.
- Complete the spiral coil with growth-line guides.
- Mark rib intervals along two growth lines.
- Draw ribs as curved arcs, following the coil surface.
- Add light shadow under rib crests and along the lower coil edge.
- Erase construction lines and refine line weight.
- Check alignment: ribs should meet guide marks on both growth lines.
Worked example
Draw a spiral shell with four coil loops and six radial ribs. Use a cone outline 12 cm long and 6 cm wide at the base. Choose a hypothetical rib spacing of 8 mm at the widest growth line, narrowing to 4 mm near the tip.
Worked answer
Cone outline drawn with axis. Four loops from base to tip, each touching the previous. Two growth lines marked: one at the widest part, one halfway to the tip. Six rib marks at 8 mm intervals on the wide line, projected to 4 mm intervals on the upper line. Ribs drawn as curved arcs connecting marks. Light shadow under rib crests and lower coil edge. Construction lines erased.
Why: The cone outline controls the spiral taper. Growth lines provide reference for rib alignment. Narrowing intervals near the tip prevents crowding. Curved ribs follow the shell surface. Shadow adds depth without changing geometry.
Check: Measure rib intervals on both growth lines. On the wide line, six ribs give five intervals at 8 mm = 40 mm total, centered within the 6 cm (60 mm) base with 10 mm margins at each end. On the upper line, five intervals at 4 mm = 20 mm total. Count four loops and six ribs. Check that each rib meets a mark on both growth lines. Verify no coil loops cross.
Four practice exercises
Exercise 1
Draw a spiral shell with three coil loops and five ribs. Use a cone outline 10 cm long and 5 cm wide at the base. Mark rib intervals of 6 mm at the widest growth line and 3 mm near the tip.
Show answer and check
Cone outline with axis. Three loops touching but not crossing. Two growth lines marked. Five rib marks at 6 mm on the wide line, projected to 3 mm on the upper line. Ribs drawn as curved arcs. Light shadow under crests.
Why: Three loops keep the spiral simple. Narrowing intervals from 6 mm to 3 mm prevents crowding. Projecting marks ensures alignment.
Check: Count three loops and five ribs. Measure intervals: 6 mm on wide line, 3 mm on upper line. Check each rib meets a mark on both lines.
Exercise 2
Draw a rib-dominated shell with no visible spiral coil. Use a rounded outline 8 cm wide and 6 cm tall. Mark a center growth line running horizontally across the middle of the shell and two curved edge growth lines that follow the shell outline, one near the top edge and one near the bottom edge. Place eight rib marks along the center line at 8 mm spacing: seven intervals totaling 56 mm, centered within the 80 mm width, so the first mark is 12 mm from the left edge and the last is 12 mm from the right edge. On each curved edge guide, transfer the same eight normalized positions from left to right (15%, 25%, 35%, 45%, 55%, 65%, 75%, and 85% of that guide’s total arc length). Keep their order; the 12 mm margin applies only to the straight centerline, and the curved marks are not evenly spaced by 8 mm. Draw each rib as a curved arc bowing outward, with heavier line weight at the crest.
Show answer and check
Rounded outline 8 cm wide and 6 cm tall. Horizontal center growth line and two curved edge growth lines following the shell outline marked. Eight rib marks placed along the center line at 8 mm intervals (seven intervals, 56 mm total), centered so the first and last marks sit 12 mm from the left and right edges. On each curved edge guide, place marks at the same normalized arc-length positions from left to right: 15%, 25%, 35%, 45%, 55%, 65%, 75%, and 85%. Preserve order; do not copy the straight-line 12 mm margin or claim equal 8 mm spacing on the curves. Ribs drawn as arcs bowing outward, heavier at crests.
Why: Without a coil, ribs carry the form. The straight centerline uses equal 8 mm intervals. Curved guides use the same normalized left-to-right fractions, so corresponding marks remain ordered without treating curved distance as horizontal distance. Curved arcs prevent a flat look, and heavier crest lines suggest rib height.
Check: Count eight ribs. Measure spacing on the horizontal center line: 8 mm between adjacent marks (seven intervals, 56 mm total), with 12 mm margins at each end of the 80 mm width. On each curved edge guide, check that marks remain in left-to-right order at normalized arc-length fractions 15%, 25%, 35%, 45%, 55%, 65%, 75%, and 85%. The 12 mm margins and equal 8 mm intervals apply only to the straight centerline. Check that each rib is a curved arc bowing outward, not a straight vertical line.
Exercise 3
Draw a spiral shell with four loops and seven ribs. Use a cone outline 14 cm long and 7 cm wide. Mark rib intervals of 9 mm at the widest line and 4.5 mm near the tip. Add a shadow from the upper left.
Show answer and check
Cone outline with axis. Four loops. Two growth lines. Seven rib marks at 9 mm and 4.5 mm. Curved ribs aligned. Shadow along lower right edge and under crests.
Why: Four loops and seven ribs balance detail and clarity. Halving the interval near the tip maintains proportion. Shadow from upper left creates consistent depth.
Check: Count four loops and seven ribs. Measure 9 mm and 4.5 mm intervals. Check shadow direction is consistent.
Exercise 4
Draw a shell combining spiral and ribs: three loops, six ribs, cone outline 12 cm long and 6 cm wide. Use rib intervals of 7 mm at the wide line and 3.5 mm near the tip. Vary one rib spacing slightly and explain why.
Show answer and check
Cone outline. Three loops. Six ribs with guide intervals of 7 mm at the wide line and 3.5 mm near the tip; one rib drawn 1 mm offset from its guide mark, making the two adjacent intervals 6 mm and 8 mm while the others remain 7 mm. Explanation: slight variation avoids mechanical repetition and is allowed by the rubric.
Why: Combining systems requires ribs to follow the coil. A small variation tests understanding of alignment versus rigid spacing.
Check: Count three loops and six ribs. On the wide line, confirm the guide marks are at 7 mm intervals (five intervals = 35 mm total); then confirm one rib is drawn 1 mm offset from its guide mark, so the adjacent intervals become 6 mm and 8 mm while the remaining intervals stay at 7 mm. On the tip line, confirm guide marks at 3.5 mm intervals and that the offset rib remains within 1 mm of its guide mark. Check that all ribs remain curved arcs aligned across both growth lines.
Common mistakes
- Drawing the spiral as a flat circle instead of a cone-wrapped coil. Start with a cone outline and axis; make each loop flatten against the cone surface.
- Spacing ribs evenly across the whole shell without narrowing near the tip. Use two growth lines with different intervals; project marks to keep ribs aligned but closer near the tip.
- Making ribs straight lines that ignore the shell curvature. Draw ribs as gentle arcs that bow with the shell surface; check against growth-line guides.
- Letting coil loops cross each other. Keep loops touching but not overlapping; redraw any loop that crosses a previous one.
Self-check rubric
- Spiral coil follows a cone taper with three to five loops.
- Growth-line guides are present and used for rib alignment.
- Ribs are curved arcs, not straight lines, and align across growth lines.
- Rib spacing narrows toward the tip using a stated hypothetical interval.
- Line weight distinguishes rib crests from valleys.
- Shadow is consistent with a single light source.
- Construction lines are erased or faint.
- Valid alternatives: loop count, rib count, and slight spacing variation are acceptable if alignment and taper are maintained.
Questions and answers
Do I need a ruler for rib spacing?
A ruler helps, but you can use a marked strip of paper. Measure your own paper and choose a hypothetical interval such as 8 mm at the widest part.
How many coil loops should I draw?
Three to five loops are enough for a clear spiral. Fewer loops look simple; more loops crowd the tip.
Can I vary rib spacing?
Yes. Slight variation is allowed. Keep the overall pattern consistent and check alignment at growth lines.
What if my shell looks flat?
Add a light shadow along the lower coil edge and under rib crests. Keep the light source consistent.