Free original lessons
Draw a Figure on Stationary Cardio Equipment: Pose Construction Guide
Learn to sketch a person using a treadmill, bike, or elliptical by building pose from machine contact points, with clear steps, checks, and practice tasks.
Free lesson
Four exercises
Worked answers
Object Drawing Lessons
Drawing someone on stationary cardio equipment is easier when you treat the machine as a fixed frame and the body as a set of connected angles. This guide shows how to place contact points first, then build the figure from the hips outward, using a simple stick-and-shape convention. You will practice reading poses from machine geometry, checking proportions with basic arithmetic, and adapting letter-style body shapes without losing balance. All measurements are hypothetical examples; measure your own reference or equipment if you need exact values.
Practice materials: Printable downloads are not available for this lesson yet. Use the instructions and four exercises below.
Reference illustration
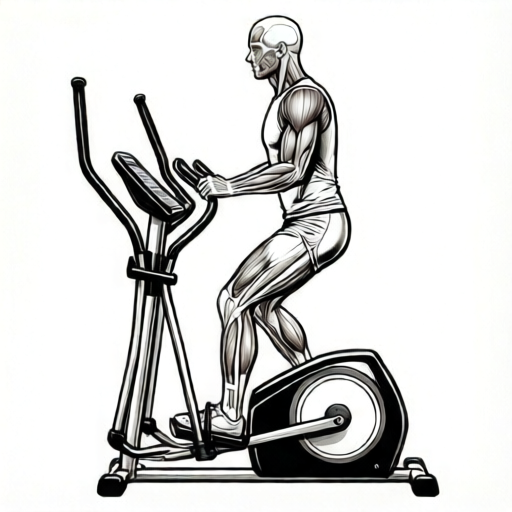
Use the stated measurements and conventions for each exercise.
Set the machine frame and contact points
Begin by drawing the machine as a simple side-view outline: deck, handlebars, seat, pedals, and console. Mark three contact points: feet or pedals, hands or handlebars, and seat or standing foot. These anchors keep the figure from floating.
Use a light construction line for the machine's main axis. For a treadmill, the deck is a long rectangle; for a bike, the seat and handlebars form a triangle with the pedals; for an elliptical, the pedals trace an oval path. Keep the machine outline simple so the figure remains the focus.
- Draw the machine outline with one horizontal baseline and one vertical support line.
- Mark contact points with small crosses: left foot, right foot, left hand, right hand, and seat contact if present.
- Label the direction of motion with a single arrow so the pose reads clearly.
- Check that all contact points sit on the machine outline, not in empty space.
Build the body from hips to head
Place the hip joint first. For upright poses, set it halfway between the seat contact and the standing foot. For seated poses, set it at the seat contact so the body stays anchored to the machine. From the hip, draw the spine as a gentle curve toward the shoulders. Then add the head as an oval whose midline aligns with the spine's top.
Next, draw the legs as two-segment lines from hip to knee to foot contact. The knee bends toward the direction of the pedal or deck. Arms run from shoulder to elbow to hand contact, with elbows slightly bent unless the pose is a straight-arm lean.
- Mark the hip joint and draw the spine curve to the shoulder line.
- Add the head oval and a short neck line; keep the head above the shoulders.
- Draw both legs as hip-knee-foot chains, matching the pedal or deck contacts.
- Draw both arms as shoulder-elbow-hand chains, matching the handlebar contacts.
- Check that no limb crosses the machine outline without a contact point.
Use a letter-style convention for body shapes
This guide uses a letter-style convention: the torso is a narrow capital I or a slight S, the upper arm is a lowercase l, the thigh is a lowercase n, and the head is an O. These are construction shapes, not final anatomy. You may substitute your own consistent shapes as long as the joints remain clear.
X-height is measured from baseline to midline, not from baseline to cap height. For the torso, set the baseline at the hip and the midline at the shoulder; the torso height is the x-height. Letter styles vary, so a taller or shorter torso is valid if the limb proportions stay consistent.
- Choose one shape for the torso and keep it consistent across the figure.
- Set the hip baseline and shoulder midline; measure torso height as x-height.
- Draw limbs with two segments each, marking the joint clearly.
- Compare limb lengths: thigh and upper arm should be similar; lower leg and forearm should be similar.
- Adjust the head size so it fits roughly seven to eight times into the total figure height.
Check balance and motion cues
A stationary pose still needs a center of gravity. Drop a vertical line from the head through the support foot or seat. For a treadmill walk, the support foot is under the hip; for a bike, the seat carries most weight; for an elliptical, the standing foot shifts with the pedal.
Add one motion cue: a bent knee, a leaning torso, or a hand gripping the handlebar. Avoid adding many cues at once, because the pose becomes unclear. Check that the machine arrow and the body lean agree.
- Draw a vertical balance line from the head to the main support point.
- Confirm the torso lean matches the machine direction arrow.
- Add one clear motion cue and remove any conflicting cue.
- Check that the figure's feet or seat remain on the machine contacts.
Worked example
A side-view treadmill walk: left foot on the deck at the front, right foot lifted behind, both hands on the front handlebar, torso upright. Draw the pose using the contact-first method and check balance.
Worked answer
Machine outline: long deck rectangle, front handlebar vertical, console box. Contact crosses: left foot at front deck, right foot slightly above rear deck, left hand and right hand on handlebar. Hip joint above left foot. Spine curve rises to shoulders slightly behind the hands. Head oval above shoulders. Left leg: hip to knee slightly bent to front foot. Right leg: hip to knee bent back, foot lifted. Arms: shoulder to elbow to hand contacts, elbows slightly bent. Balance line from the head falls over the left (support) foot on the deck, so the pose reads as supported. Motion cue: right knee lifted behind.
Four practice exercises
Exercise 1
Side-view stationary bike: seat contact at hip, left foot on forward pedal, right foot on rear pedal, both hands on handlebar. Describe the contact points and the leg angles.
Show answer and check
Contacts: seat at hip, left foot forward pedal, right foot rear pedal, two hand contacts on handlebar. Left leg: hip to knee more bent, foot forward. Right leg: hip to knee less bent, foot rear. Torso leans slightly forward to handlebar.
Why: The seat carries the hip, so the hip joint sits at the seat contact. Pedal positions determine knee bend: forward pedal shortens the hip-to-foot distance, so the knee bends more.
Check: Measure the hip-to-foot distance for each leg on your drawing. The forward pedal leg should have a shorter distance and a more bent knee than the rear pedal leg.
Exercise 2
Side-view elliptical: left foot on the forward pedal, right foot on the rear pedal, hands on moving handles. The torso is upright. Where should the balance line fall, and how do you check it?
Show answer and check
The balance line should fall between the two pedal contacts, closer to the foot bearing more weight. Check by dropping a vertical line from the head; it should pass between the pedals and not outside the machine outline.
Why: On an elliptical, weight shifts between pedals. An upright torso keeps the center of gravity near the midpoint of the two contacts.
Check: Draw the vertical line from the head oval. If it falls outside the pedal span, adjust the hip position or torso lean until it falls between the contacts.
Exercise 3
A treadmill pose shows a runner with both feet off the deck and both hands off the handlebar. Using the boundary of this guide, explain why this pose is excluded and how to revise it to a stationary cardio pose.
Show answer and check
Both feet off the deck and both hands off the handlebar describe free-motion running, which is outside the stationary cardio boundary. Revise by placing one foot on the deck and one hand on the handlebar, keeping the other foot lifted behind.
Why: The guide covers poses built from stationary machine contacts. A pose with no contact points cannot be anchored to the machine frame.
Check: Count the contact crosses on the machine outline. A valid stationary pose has at least two contacts, including one foot or seat contact.
Exercise 4
Using the x-height convention, a figure has torso height 3 units from hip baseline to shoulder midline, thigh length 3 units, lower leg length 3 units, and head height 1 unit. Estimate total figure height and state one proportion check.
Show answer and check
Total height is approximately 3 (torso) + 3 (thigh) + 3 (lower leg) + 1 (head) = 10 units, ignoring neck and foot thickness. One check: thigh equals torso height, which is acceptable in this convention. However, a 1-unit head in a 10-unit figure fits about ten times into total height, which is smaller than the guide's seven-to-eight-head convention. Either enlarge the head to about 1.25–1.4 units, or state explicitly that this is a deliberate stylistic deviation from the convention.
Why: The x-height convention measures torso from hip baseline to shoulder midline. Adding segment lengths gives a simple estimate; the check compares like segments.
Check: Re-measure each segment on the drawing with the same unit. Confirm torso, thigh, and lower leg values match your stated numbers within one small division.
Common mistakes
- Drawing the figure before the machine, so feet and hands float. Draw the machine outline and contact crosses first, then build the body from those anchors.
- Making the torso too long relative to the legs. Measure torso height as x-height from hip baseline to shoulder midline, then compare with thigh length.
- Bending both knees in the same direction on a bike pose. Match each knee to its pedal position; the forward pedal leg is more bent, the rear pedal leg is straighter.
- Using a single arm shape for both arms when one hand grips a handlebar. Draw each arm as a separate shoulder-elbow-hand chain and check the hand contact cross.
Self-check rubric
- Machine outline includes at least three contact points marked before the figure is drawn.
- Hip joint is placed relative to the seat or support foot, not floating.
- Spine curve connects hip to shoulder line and head sits above shoulders.
- Each limb is drawn as a two-segment chain with a clear joint.
- Torso height is measured as x-height from hip baseline to shoulder midline.
- Balance line from head passes through or near the main support point.
- One motion cue is present and does not conflict with the machine direction arrow.
- Letter-style shapes are used consistently, or an alternative consistent convention is explained.
Questions and answers
Do I need to draw the whole machine?
No. A simple outline with contact points is enough. The figure's pose should read from the contacts and the machine's main axis.
How do I know if the proportions are right?
Use the x-height convention: torso height from hip baseline to shoulder midline. Compare thigh to upper arm and lower leg to forearm; they should be similar in your chosen style.
Can I use different body shapes?
Yes. The letter-style convention is a starting point. Any consistent set of shapes that keeps joints clear and contacts accurate is valid.
What if my reference photo shows a different pose?
Adapt the contact points to your reference. The steps still apply: machine frame, contacts, hips, spine, limbs, then balance check.