Free original lessons
Draw Numeral Zero: Outline Construction and Stroke Order
Learn to draw the numeral zero using outline construction and numbered stroke order, with clear conventions, practice tasks, and a fair rubric for valid variations.
Free lesson
Four exercises
Worked answers
Object Drawing Lessons
This lesson teaches a reliable method for drawing the numeral zero by building an outline first, then applying a consistent stroke order. The approach separates shape planning from final marking, which helps beginners produce a balanced zero and helps experienced drawers make deliberate style choices. You will use a simple convention: the zero is an oval ring whose height is measured from baseline to midline, with a hollow center. Letter styles vary, so the rubric rewards structural clarity and stroke logic rather than a single universal shape. All measurements below are hypothetical examples; measure your own paper and tools before drawing.
Practice materials: Printable downloads are not available for this lesson yet. Use the instructions and four exercises below.
Reference illustration
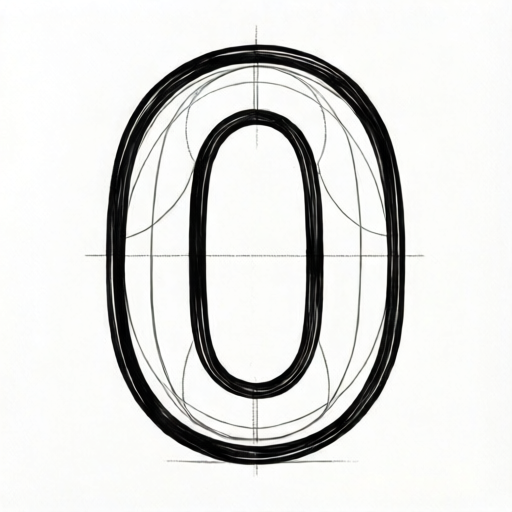
Use the stated measurements and conventions for each exercise.
Set the convention before drawing
Define the zero as a closed oval ring. The baseline is the bottom reference line; the midline is the top reference line for this numeral. X-height means the distance from baseline to midline. Do not confuse midline with the center of the oval. Choose a height between baseline and midline that fits your practice row, and record it as a hypothetical value such as 20 mm for the exercise.
Decide the width-to-height ratio. A common starting ratio is 0.6, meaning width equals 0.6 times the height. If height is 20 mm, width is 12 mm. These numbers are examples, not standards. Measure your actual paper and pencil to confirm the values are practical.
- Mark a baseline and a midline lightly.
- Choose a hypothetical height, for example 20 mm, and mark top and bottom guides.
- Choose a hypothetical width ratio, for example 0.6, and mark left and right guides.
- Label the center point of the oval for reference.
Build the outline in four arcs
Outline construction means drawing the boundary of the zero before committing to a single continuous stroke. Divide the oval into four arcs: top-left, top-right, bottom-right, and bottom-left. Each arc connects two guide points. Keep the ring thickness even by planning an inner boundary offset inward by a chosen amount, such as 2 mm in this hypothetical example.
Check symmetry by comparing opposite arcs. A valid zero may be slightly narrower at the top or wider at the bottom, but the outline should close cleanly and the hollow center should remain visible.
- Draw the outer top-left arc from the top guide to the left guide.
- Draw the outer top-right arc from the top guide to the right guide.
- Draw the outer bottom-right arc from the right guide to the bottom guide.
- Draw the outer bottom-left arc from the bottom guide to the left guide.
- Offset inward by the chosen ring thickness and repeat the four arcs to form the inner boundary.
- Erase construction guides only after the outline is stable.
Apply numbered stroke order
Stroke order reduces hesitation and keeps the ring consistent. Use a four-stroke order that follows the outline arcs: stroke 1 top-left, stroke 2 top-right, stroke 3 bottom-right, stroke 4 bottom-left. Join each stroke to the previous one at the guide points. If you prefer a continuous single stroke, treat it as one stroke that follows the same four-arc path; the rubric accepts this as a valid alternative.
Keep pressure even and pause at each guide point to check alignment. The final zero should read as a closed ring with a clear hollow center, not as a filled oval or an open curve.
- Trace the outer boundary in the four-stroke order.
- Trace the inner boundary in the same order.
- Compare ring thickness at top, bottom, left, and right.
- Adjust any arc that breaks the closed ring.
Check and refine
Use simple arithmetic checks. If height is 20 mm and width ratio is 0.6, width should be 12 mm. If ring thickness is 2 mm, the inner width is 12 minus 4 equals 8 mm, and inner height is 20 minus 4 equals 16 mm. These are hypothetical examples; substitute your measured values.
A valid zero may lean slightly, vary in ring thickness, or use a continuous stroke. The key checks are closure, visible hollow center, consistent stroke order, and balanced proportions.
- Measure outer height and width with a ruler.
- Measure inner height and width.
- Confirm the ring closes at all four guide points.
- Confirm the hollow center is visible and not filled.
Worked example
Draw one zero with height 20 mm, width ratio 0.6, and ring thickness 2 mm. Use the four-stroke outline order and show the inner boundary.
Worked answer
Outer height 20 mm, outer width 12 mm. Inner height 16 mm, inner width 8 mm. Draw four outer arcs in order top-left, top-right, bottom-right, bottom-left, then four inner arcs offset inward by 2 mm. The ring closes at all guide points and the hollow center is visible.
Four practice exercises
Exercise 1
Draw a zero with hypothetical height 24 mm, width ratio 0.5, and ring thickness 3 mm. State outer and inner dimensions before drawing.
Show answer and check
Outer width 12 mm, inner height 18 mm, inner width 6 mm. Draw four outer arcs then four inner arcs offset by 3 mm.
Why: Width equals 24 times 0.5 equals 12 mm. Inner height equals 24 minus 6 equals 18 mm. Inner width equals 12 minus 6 equals 6 mm.
Check: Measure outer height and width, then inner height and width. Confirm the ring closes and the hollow center is visible.
Exercise 2
Draw a zero with hypothetical height 18 mm and width ratio 0.7. Use a continuous stroke that follows the four-arc path. Label the stroke as one continuous stroke.
Show answer and check
Outer width 12.6 mm. A continuous stroke follows top-left, top-right, bottom-right, bottom-left and closes the ring.
Why: Width equals 18 times 0.7 equals 12.6 mm. The continuous stroke is a valid alternative if it follows the same path and closes.
Check: Confirm the ring closes, the hollow center is visible, and the stroke path matches the four-arc order.
Exercise 3
Draw a zero with hypothetical height 20 mm and width ratio 0.6, but make the top slightly narrower than the bottom. Explain why this is valid.
Show answer and check
Outer height 20 mm, outer width 12 mm at the widest point. The top is narrower by a small amount, but the ring closes and the hollow center remains clear.
Why: Letter styles vary. Slight asymmetry is acceptable when closure, hollow center, and stroke logic are preserved.
Check: Check closure at all guide points, visible hollow center, and consistent stroke order. Compare top and bottom widths to confirm the variation is deliberate.
Exercise 4
Draw a zero with hypothetical height 16 mm, width ratio 0.75, and ring thickness 2 mm. Then measure and state whether the inner width is at least half the outer width.
Show answer and check
Outer width 12 mm, inner width 8 mm. Inner width is 8 mm, which is at least half of 12 mm.
Why: Width equals 16 times 0.75 equals 12 mm. Inner width equals 12 minus 4 equals 8 mm. Half of outer width is 6 mm, so 8 mm is greater.
Check: Measure outer and inner widths. Confirm inner width is at least half the outer width and the ring closes.
Common mistakes
- Drawing a filled oval instead of a ring. Plan an inner boundary offset inward by a chosen thickness before marking the final outline.
- Skipping the outline and drawing one rushed curve. Build the four outer arcs first, then the four inner arcs, and only then refine.
- Using inconsistent stroke order between attempts. Number the four arcs and follow the same order each time, or declare a continuous-stroke alternative before starting.
- Treating midline as the oval center. Mark baseline and midline as height references, then mark the oval center separately.
Self-check rubric
- Closed ring: the outline returns to its starting guide without gaps.
- Hollow center: the inner boundary is visible and not filled.
- Stroke order: four-arc order or declared continuous-stroke alternative is followed consistently.
- Proportion: height and width match the chosen hypothetical ratio within a reasonable margin.
- Ring thickness: inner boundary is offset consistently, allowing minor variation.
- Valid alternatives: slight asymmetry, lean, or continuous stroke are accepted if closure and hollow center remain clear.
Questions and answers
Must the zero be perfectly symmetrical?
No. Valid zeros may be slightly narrower at the top or wider at the bottom. The rubric checks closure, hollow center, stroke logic, and balance rather than exact symmetry.
Can I draw the zero in one continuous stroke?
Yes. A continuous stroke that follows the same four-arc path is a valid alternative. State your choice before drawing so the stroke order can be checked.
What does x-height mean here?
X-height is the distance from baseline to midline. It is a height reference, not the center of the oval.
Are the numerical values required?
No. Values such as 20 mm height, 0.6 width ratio, and 2 mm ring thickness are hypothetical examples. Measure your own paper and tools and label your chosen values as examples.