Free original lessons
Twin Figure Pose Comparison: Mirrored Drawing Exercise
Learn to draw two twin figures with mirrored poses using a simple stick-and-shape convention, check symmetry with a midline, and practice independent pose boxes.
Free lesson
Four exercises
Worked answers
Object Drawing Lessons
This exercise teaches you to draw two simplified twin figures whose poses mirror each other across a vertical midline. You will use a consistent body convention: head as an oval, torso as a tapered rectangle, limbs as two-segment lines with joint dots, and feet as short baseline marks. The goal is pose comparison, not portrait detail or clothing design. You will learn to place a midline, build one figure, reflect key joint positions, and verify mirror accuracy with simple measurements. All numerical values are hypothetical examples for practice; measure your own paper and tools.
Practice materials: Printable downloads are not available for this lesson yet. Use the instructions and four exercises below.
Reference illustration
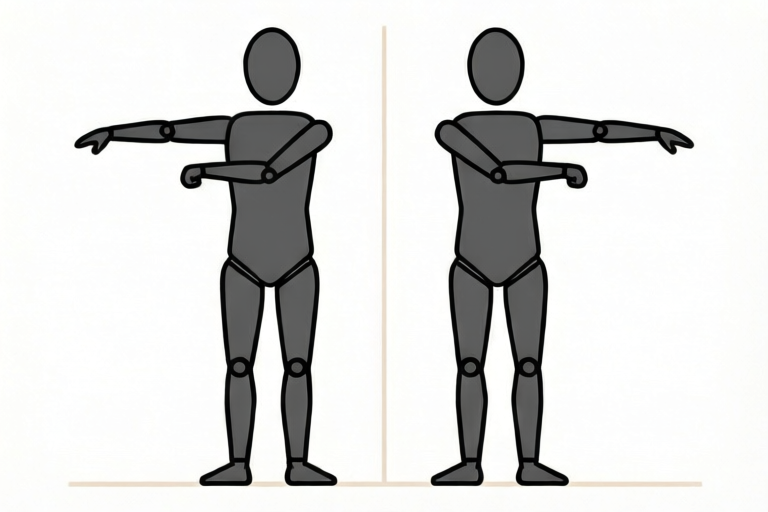
Use the stated measurements and conventions for each exercise.
Set up the midline and body convention
Place your paper in landscape orientation. Draw a light vertical midline through the center. This line is the mirror axis. Mark a baseline near the bottom for both figures' feet. Decide a figure height in hypothetical units, for example 12 cm from baseline to top of head. Keep both figures the same height unless your exercise prompt states otherwise.
Use this convention for every figure: head oval about one-sixth of total height; torso a tapered rectangle from shoulders to hips; arms and legs as two straight segments joined by a dot at elbow or knee; hands and feet as short marks. Draw lightly so you can adjust joint positions. Label left and right on your own figure only as a checking aid, then remove labels before comparing.
- Draw a vertical midline and a horizontal baseline.
- Mark shoulder height, hip height, and head-top height on the midline.
- Draw the first figure on one side using the body convention.
- Mark each joint with a small dot and note its horizontal distance from the midline.
- Reflect each joint dot to the opposite side at the same distance from the midline.
- Connect reflected dots using the same segment lengths and angles mirrored.
- Compare both figures against the midline and adjust.
Mirror the pose by reflecting joint positions
Mirroring is not copying the same drawing beside the first. It is reflecting each joint across the midline. If the first figure's left elbow is 3 cm left of the midline and 7 cm above baseline, the twin's corresponding elbow is 3 cm right of the midline at the same height. Use a ruler to measure horizontal distances from the midline, not from the paper edge.
Keep segment lengths equal between twins. If the first figure's upper arm is 4 cm, the mirrored upper arm is also 4 cm. Angles mirror: a forearm angled 30 degrees inward on the first figure becomes 30 degrees inward on the twin, but toward the opposite side. Check that head tilt, shoulder slope, and hip tilt also mirror. A small tilt of 5 degrees is enough to show pose difference without portrait detail.
- Measure each joint's horizontal distance from the midline on figure one.
- Transfer the same distance to the opposite side at the same height.
- Draw mirrored segments with equal lengths.
- Check head, shoulder, hip, knee, and elbow positions in that order.
- Erase construction labels and compare silhouettes.
Use a blank pose box for independent practice
A pose box is a rectangle with a midline and baseline already drawn. Use it to practice a new mirrored pose without step-by-step guidance. Choose one simple pose change, such as one arm raised or one knee bent. Draw figure one, reflect the joints, then draw figure two. Keep the box size consistent so measurements remain comparable.
For self-checking, record three distances: shoulder distance from midline, elbow distance from midline, and knee height above baseline. The twin's values should match within your chosen tolerance. A hypothetical tolerance of 0.5 cm is reasonable for pencil work on a 12 cm figure; measure your actual tools and paper to set your own.
- Draw or use a blank pose box with midline and baseline.
- Choose one pose change and state it in words.
- Draw figure one and mark joint dots.
- Reflect joints and draw figure two.
- Measure three check distances and record them.
Compare and refine the twin poses
Comparison means checking whether the two figures are mirror images, not whether they are identical copies. Place a straight edge along the midline. Look for joints that are farther from the midline on one side than the other. Check that corresponding segment lengths match. If a knee is lower on one figure, the mirrored knee should be at the same height, not the same side.
Refine by adjusting one joint at a time. Do not redraw the whole figure. If the elbow is off by 1 cm, move only that dot and reconnect its two segments. Re-measure after each change. Stop when your three check distances match within tolerance and the silhouettes read as mirrored poses.
- Check joint distances from midline in pairs.
- Check segment lengths in pairs.
- Adjust one joint dot at a time.
- Re-measure and confirm mirror accuracy.
Worked example
A first figure has its left elbow 3 cm left of the midline and 7 cm above baseline, and its right knee 2 cm right of the midline and 4 cm above baseline. The upper arm is 4 cm and the thigh is 5 cm. Describe the mirrored joint positions for the twin.
Worked answer
The twin's corresponding elbow is 3 cm right of the midline and 7 cm above baseline. The twin's corresponding knee is 2 cm left of the midline and 4 cm above baseline. The mirrored upper arm remains 4 cm and the mirrored thigh remains 5 cm. Connect the reflected dots with equal-length segments to complete the mirrored pose.
Four practice exercises
Exercise 1
Figure one has its left shoulder 2 cm left of the midline at 10 cm above baseline and its right hip 3 cm right of the midline at 6 cm above baseline. State the twin's corresponding shoulder and hip positions.
Show answer and check
Twin's corresponding shoulder: 2 cm right of midline at 10 cm above baseline. Twin's corresponding hip: 3 cm left of midline at 6 cm above baseline.
Why: Mirroring reflects horizontal distance across the midline while keeping height unchanged. Left becomes right and right becomes left at the same distance.
Check: Measure each stated distance from the midline with a ruler and confirm the heights match the original values.
Exercise 2
A first figure's forearm is 3 cm long and angled 20 degrees inward toward the midline. The twin's forearm is drawn 4 cm long and angled 20 degrees inward. Identify the error and state the correction.
Show answer and check
The length is wrong. The twin's forearm should be 3 cm, matching the first figure, while the 20-degree inward angle is mirrored toward the opposite side.
Why: Mirroring preserves segment lengths and mirrors angles. Changing length breaks the twin comparison.
Check: Compare the two forearm lengths with a ruler and confirm both angles are equal but directed toward opposite sides of the midline.
Exercise 3
In a pose box, figure one's left knee is 1.5 cm left of the midline and 5 cm above baseline. The twin's corresponding knee is placed 1.5 cm left of the midline and 5 cm above baseline. Is this a correct mirror? Explain.
Show answer and check
No. The twin's knee should be 1.5 cm right of the midline at 5 cm above baseline. Placing it on the same side copies the position instead of reflecting it.
Why: A mirror reflection changes the side of the midline while keeping distance and height. Same-side placement is a copy, not a mirror.
Check: Measure the horizontal distance from the midline on each side and confirm the twin's knee is on the opposite side at the same height.
Exercise 4
Figure one has upper arm 4 cm, forearm 3 cm, thigh 5 cm, and shin 4 cm. The twin is drawn with upper arm 4 cm, forearm 3 cm, thigh 5 cm, and shin 5 cm. State whether the twins pass the segment-length check and what to adjust.
Show answer and check
They do not pass because the shin lengths differ. Adjust the twin's shin to 4 cm to match figure one.
Why: Corresponding segment lengths must match for a valid mirrored pose comparison. One mismatched segment is enough to fail the check.
Check: List all four segment lengths for both figures and compare each pair with a ruler; adjust any pair that differs beyond the stated tolerance.
Common mistakes
- Copying the first figure beside itself instead of reflecting joints. Measure each joint's distance from the midline and place the twin's joint on the opposite side at the same distance and height.
- Using different segment lengths for the twins. Record upper arm, forearm, thigh, and shin lengths for figure one and reuse the same lengths for figure two.
- Measuring from the paper edge instead of the midline. Place the ruler zero at the midline for every horizontal measurement.
- Adding portrait features or clothing that hide pose errors. Keep the convention simple: oval head, tapered torso, two-segment limbs, joint dots, and short feet marks.
Self-check rubric
- Midline and baseline are clearly drawn and used for measurement.
- Both figures use the same defined body convention.
- Corresponding joint distances from the midline match within the stated tolerance.
- Corresponding segment lengths match within the stated tolerance.
- The two poses read as mirrored rather than copied or unrelated.
- Portrait detail and clothing design are excluded as required.
- Valid alternative conventions are accepted if consistently applied and checkable.
Questions and answers
Do the twins have to look identical in every detail?
No. The exercise compares mirrored poses. Head shape, hair, and clothing are outside the boundary. Use the same body convention for both figures and focus on joint reflection.
What if my mirrored figure is slightly off?
Use a stated tolerance, such as a hypothetical 0.5 cm for a 12 cm figure. Measure your own paper and tools to choose a workable tolerance. Adjust one joint at a time.
Can I use a different body convention?
Yes, if you define it clearly and apply it consistently to both figures. The rubric allows valid alternatives as long as mirror checking remains possible.
How do I know the pose is actually mirrored?
Check three pairs of joint distances from the midline and confirm corresponding segment lengths match. The silhouettes should read as opposite poses.