Free original lessons
Starfish Symmetry Drawing: Radial Axis and Arm Completion
Learn to draw a starfish with radial symmetry by placing a central axis, marking five equal arms, and completing outlines symmetrically on a printable plate.
Free lesson
Four exercises
Worked answers
Object Drawing Lessons
A starfish is a useful subject for practicing radial symmetry because its five arms repeat around a central point. In this lesson you will define a radial symmetry axis, mark equal angular spacing, and complete arm outlines so that each arm mirrors its neighbors. The convention is simple: treat the center as the origin, draw one reference arm, then repeat its shape at equal angles. Handwriting and line style may vary, so the rubric rewards consistent spacing and mirrored proportions rather than a single perfect outline. All measurements below are hypothetical examples; measure your own paper and tools before drawing.
Practice materials: Printable downloads are not available for this lesson yet. Use the instructions and four exercises below.
Reference illustration
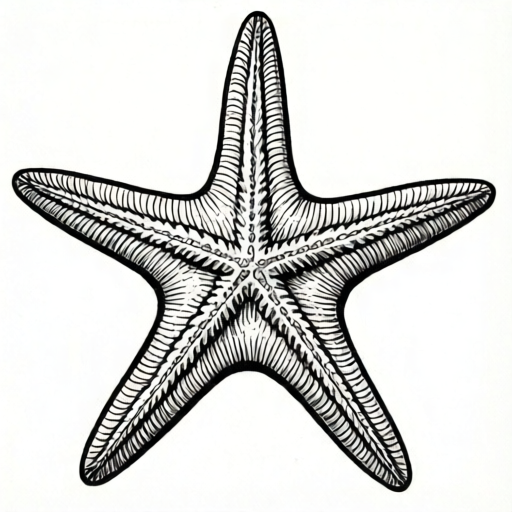
Use the stated measurements and conventions for each exercise.
Set the center and radial axis
Begin by choosing a center point on the page. A radial symmetry axis is any straight line through that center; for a starfish, the most useful axis passes through the tip of one arm and the center. This axis acts as a reference for measuring angles and distances.
Use a ruler to draw a light vertical axis through the center. Label the top end A and the center O. If your paper is 20 cm wide, a hypothetical center at 10 cm from the left edge keeps the drawing balanced. Measure your actual paper rather than assuming these values.
- Mark the center O with a small dot.
- Draw a light straight line through O; label one end A.
- Measure the distance from O to the paper edge along the axis and note it.
- Keep the axis faint so it can be erased or hidden later.
Space five arms equally
A five-arm starfish divides the full turn into five equal angles. Since a full turn is 360 degrees, each arm is separated by 72 degrees. You can mark these angles with a protractor or by folding a paper circle into five equal sectors.
Place the protractor at O with its baseline on the axis. Mark points at 72, 144, 216, and 288 degrees. These marks show the directions of the five arm tips. Check that the angle between neighboring marks is the same everywhere.
- Align the protractor center with O and the baseline with the axis.
- Mark 72 degrees, then 144, 216, and 288 degrees.
- Draw faint rays from O through each mark.
- Measure the angle between each pair of neighboring rays; each should be about 72 degrees.
Draw one reference arm and mirror it
Draw the first arm along the vertical axis. Give it a tapered outline: wider near the center and narrower at the tip. Mark a midpoint on the arm and note its width. This reference arm sets the proportion for the other four.
For each remaining ray, repeat the same length and width at the midpoint. Because the arms are rotated copies, the outline should look the same when turned around the center. Small differences in line style are acceptable; large differences in length or width break radial symmetry.
- Draw the reference arm along the vertical axis with a tapered outline.
- Measure its length from O to the tip and its width at the midpoint.
- On each faint ray, mark the same length and midpoint width.
- Connect the marks to form four more arm outlines.
- Check that each arm tip lies on its ray and that neighboring arms are evenly spaced.
Complete the central disk and check symmetry
Starfish arms meet at a central disk. Draw a small circle or rounded polygon around O so the arm bases connect smoothly. The disk should be centered on O and similar in size in every direction.
To check radial symmetry, rotate the paper by 72 degrees and compare the arm that moves into the reference position. If the outline matches in length and width, the drawing is consistent. You can also measure each arm length and midpoint width with a ruler.
- Draw a central disk centered on O.
- Erase or lighten the construction rays.
- Measure all five arm lengths; they should be equal within your chosen tolerance.
- Rotate the paper by 72 degrees and compare outlines.
- Adjust any arm that differs noticeably in length or width.
Worked example
A student draws a starfish on a 20 cm by 20 cm page with center O at 10 cm from each edge. The reference arm is 6 cm long and 2 cm wide at its midpoint. The student marks rays at 72, 144, 216, and 288 degrees. What length and midpoint width should each of the other four arms have, and what total angle separates the first and last arm?
Worked answer
Each of the other four arms should be 6 cm long and 2 cm wide at its midpoint. The first and last arm are separated by 288 degrees, or equivalently 72 degrees in the other direction around the center.
Four practice exercises
Exercise 1
A starfish drawing uses a center O and five arms. The first arm is drawn along a vertical axis. At what angle from the vertical axis should the second arm be drawn if the arms are equally spaced?
Show answer and check
72 degrees.
Why: A full turn is 360 degrees. Five equal arms divide 360 by 5, giving 72 degrees between neighboring arms.
Check: Multiply 72 by 5 to get 360, confirming the five intervals complete one full turn.
Exercise 2
A reference arm is 8 cm long and 3 cm wide at its midpoint. A student draws a second arm 7 cm long and 3 cm wide at its midpoint. Describe one adjustment that would improve radial symmetry.
Show answer and check
Lengthen the second arm to 8 cm so its length matches the reference arm.
Why: Radial symmetry requires matching proportions at equal angles. The midpoint width already matches, but the length differs by 1 cm.
Check: Measure both arms from the center to the tip; the difference should be 0 cm after adjustment.
Exercise 3
On a paper circle centered at O, a student marks five arm tips. The straight-line distance between neighboring tips is 4 cm for four pairs but 5 cm for one pair. What does this suggest about the angular spacing?
Show answer and check
The pair with a 5 cm separation is spaced more widely than the others, so the arms are not equally spaced.
Why: On a circle centered at O, equal angles produce equal chord lengths between neighboring tips. A larger chord indicates a larger angle.
Check: Measure all five chord lengths; they should be equal if the angles are equal.
Exercise 4
A starfish drawing has a central disk of radius 1.5 cm centered at O. One arm outline starts 2 cm from O instead of at the disk edge. Is this a symmetry problem, and what is a simple fix?
Show answer and check
Yes, the arm base is disconnected from the central disk. Move the arm base inward so it meets the disk edge at 1.5 cm from O.
Why: In a radial starfish drawing, each arm should connect to the central disk at the same radius. A 2 cm start leaves a gap of 0.5 cm.
Check: Measure the distance from O to each arm base; all should be about 1.5 cm.
Common mistakes
- Spacing arms by eye without measuring angles. Mark 72-degree intervals with a protractor or folded paper circle before drawing outlines.
- Making one arm much longer than the others. Measure the reference arm length and transfer that length to every ray.
- Drawing the central disk off-center. Keep the disk centered on O and check equal distances from O to the disk edge in several directions.
- Changing arm width randomly along each arm. Mark a midpoint width on the reference arm and repeat that width at the same relative position on every arm.
Self-check rubric
- Center O is clearly marked and the central disk is centered on it.
- Five arm directions are marked at equal angles of about 72 degrees.
- Each arm tip lies on its ray and all arm lengths match the reference length within the chosen tolerance.
- Midpoint widths match the reference width at the same relative position on each arm.
- Construction lines are light or erased, and the final outline reads as a starfish with radial symmetry.
- Valid alternatives: line style, tip shape, and surface texture may vary, provided spacing and proportions remain consistent.
Questions and answers
What is a radial symmetry axis in a starfish drawing?
It is a straight line through the center that helps you measure and repeat arm positions. A starfish has five arms, so the axis is one of several reference lines separated by 72 degrees.
Do all five arms need to be identical?
For clear radial symmetry, the arms should have the same length and similar width at matching positions. Small stylistic differences in line quality are acceptable, but large differences in proportion break the symmetry.
Can I draw a starfish with six arms?
Yes, but the angle changes. For six arms, divide 360 by 6 to get 60 degrees between arms. The same method applies: mark equal angles, draw one reference arm, and repeat it.
How can I check my drawing without a protractor?
Fold a paper circle into five equal sectors by trial, or measure the distance between neighboring arm tips along a circle centered on O. Equal chord lengths indicate equal angles.