Free original lessons
Surfing Drawing: Figure, Board, Wave and Stance
Learn to draw a surfer with correct board geometry, wave curve and stance using simple proportions, checkable steps and a clear rubric.
Free lesson
Four exercises
Worked answers
Object Drawing Lessons
This lesson teaches a single surfing figure on a board riding a wave. You will build the board outline, place the figure with a stable stance, and shape a wave that supports the pose. The method uses simple proportions and checkable arithmetic so you can verify your drawing without tracing. All measurements are hypothetical examples; measure your own paper and tools. The convention for figure height is baseline to midline of the head, and letter styles vary, so valid alternatives are allowed where the rubric says so.
Practice materials: Printable downloads are not available for this lesson yet. Use the instructions and four exercises below.
Reference illustration
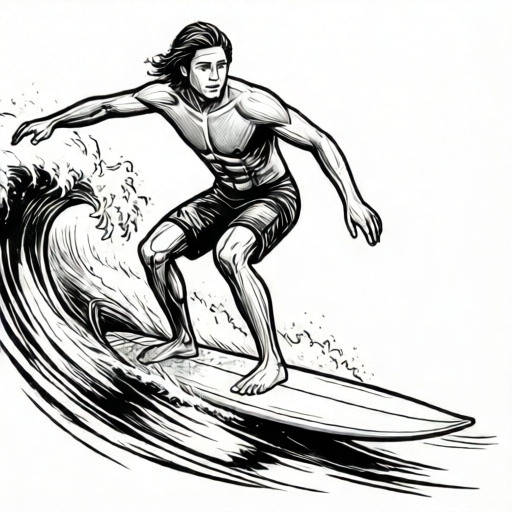
Use the stated measurements and conventions for each exercise.
Board geometry first
Start with the board because it sets the figure's scale and angle. Draw a long rounded shape: a nose, a tail and two gentle side curves. A useful proportion is board length about 1.6 times the figure's standing height. If your figure is 10 cm tall, the board is about 16 cm long. These numbers are hypothetical; adjust to your paper.
Angle the board slightly upward at the nose to suggest forward motion. Keep the side curves shallow so the board reads as a surfboard, not a leaf. Mark the midpoint of the board; the figure's feet will straddle this area.
- Draw a center line for the board at your chosen angle.
- Mark nose and tail points; total length equals 1.6 times figure height.
- Add shallow side curves and round the nose and tail.
- Mark the board midpoint and a foot zone about one third of the board length wide.
Stance and figure placement
Place the figure so the feet sit inside the foot zone. A stable surfing stance has knees bent, hips low and shoulders roughly over the board center. Draw the figure from baseline to midline: the baseline is the foot line, the midline is the top of the head. If the figure is 10 cm tall, the hips sit near 4 cm above baseline and the shoulders near 7 cm.
The front arm reaches forward and the back arm balances behind. Keep the head upright and the gaze forward. Letter styles vary, so the face can be simple; the rubric checks stance geometry, not facial detail.
- Mark baseline and midline for the figure height.
- Place feet inside the foot zone, shoulder-width apart.
- Draw bent knees and hips near 40 percent of figure height.
- Add shoulders near 70 percent and arms for balance.
- Check that the head sits at midline and the gaze is forward.
Wave curve construction
Build the wave as two curves: a rising face and a curling lip. The face curve should pass under the board so the board sits on the wave, not floating. A simple check is that the board's midpoint touches the wave face. The lip curls forward but stays clear of the figure.
Use a shallow S-curve for the face and a tighter arc for the lip. Keep the wave height about half the board length. If the board is 16 cm, the wave face is about 8 cm tall. These are hypothetical examples; measure your own drawing.
- Draw the wave face as a shallow S-curve under the board.
- Mark wave height at about half the board length.
- Add a curling lip that arcs forward without crossing the figure.
- Check that the board midpoint touches the wave face.
Checking and refining
Check three relationships: board length to figure height, foot placement inside the foot zone, and board contact with the wave. Use a ruler or a marked strip of paper. If the board is too short, the figure looks oversized; if the feet leave the foot zone, the stance looks unstable.
Refine line weight last: heavier outline for the board and figure, lighter for the wave. Keep the drawing readable at a glance. Valid alternatives include a slightly different arm position or a simpler face, as long as the stance and board geometry pass the rubric.
- Measure board length and compare to 1.6 times figure height.
- Confirm both feet are inside the foot zone.
- Confirm the board midpoint touches the wave face.
- Adjust line weight for clarity.
Worked example
A figure is 12 cm tall from baseline to midline. Find board length, hip height and shoulder height using the lesson ratios.
Worked answer
Board length = 1.6 × 12 = 19.2 cm. Hip height = 0.4 × 12 = 4.8 cm. Shoulder height = 0.7 × 12 = 8.4 cm. Wave height = 0.5 × 19.2 = 9.6 cm.
Four practice exercises
Exercise 1
A figure is 10 cm tall. Calculate board length and wave height using the lesson ratios.
Show answer and check
Board length = 16 cm; wave height = 8 cm.
Why: Board length is 1.6 times figure height: 1.6 × 10 = 16 cm. Wave height is half board length: 16 ÷ 2 = 8 cm.
Check: Measure your drawing: board should be about 16 cm and wave face about 8 cm.
Exercise 2
A board is 18 cm long. Where should the foot zone be and how wide is it?
Show answer and check
Foot zone centered at board midpoint, about 6 cm wide.
Why: Foot zone width is one third of board length: 18 ÷ 3 = 6 cm. It straddles the midpoint.
Check: Mark midpoint and measure 3 cm each side; both feet must fit inside.
Exercise 3
A figure is 14 cm tall. Find hip and shoulder heights above baseline.
Show answer and check
Hips at 5.6 cm; shoulders at 9.8 cm.
Why: Hip height = 0.4 × 14 = 5.6 cm. Shoulder height = 0.7 × 14 = 9.8 cm.
Check: Measure from baseline with a ruler; values should match within about 0.5 cm.
Exercise 4
Your board midpoint sits 1 cm above the wave face. What adjustment keeps the ratios valid?
Show answer and check
Lower the board or raise the wave face by 1 cm so the midpoint touches.
Why: The board must contact the wave; moving either element by the gap restores contact without changing proportions.
Check: Re-measure the gap; it should be zero at the midpoint.
Common mistakes
- Drawing the board too short relative to the figure. Measure figure height from baseline to midline and make board length about 1.6 times that value.
- Placing feet outside the foot zone or too close together. Mark a foot zone about one third of board length wide and place feet shoulder-width apart inside it.
- Letting the board float above the wave. Adjust the wave face so the board midpoint touches the curve.
- Making the wave lip cross the figure. Shorten the lip arc or move it forward so it stays clear of the body.
Self-check rubric
- Board length is between 1.5 and 1.7 times figure height.
- Both feet are inside the foot zone and shoulder-width apart.
- Knees are bent and hips sit near 40 percent of figure height.
- Shoulders sit near 70 percent of figure height and head reaches midline.
- Board midpoint touches the wave face.
- Wave lip does not cross the figure.
- Line weight distinguishes board and figure from the wave.
- Valid alternatives in arm position or face detail are accepted if stance and geometry pass.
Questions and answers
Do I need to draw a realistic face?
No. The rubric checks stance and board geometry. A simple face is acceptable; letter styles vary.
What if my paper is small?
Scale all values down proportionally. The ratios matter more than absolute centimeters.
Can the surfer face left or right?
Yes. Mirror the stance and wave direction; the same checks apply.
How do I know the stance is stable?
Feet inside the foot zone, knees bent, hips low and shoulders near board center.