Free original lessons
Vegetation Drawing: Leaf Clusters, Branching, and Ground Cover
Learn to draw vegetation using leaf-cluster shapes, branching structure, and ground-cover texture with clear conventions, checks, and practice tasks.
Free lesson
Four exercises
Worked answers
Object Drawing Lessons
Vegetation drawing is not about copying every leaf. It is about building believable masses from a few repeatable shapes and checking their structure. This lesson defines a simple convention: a leaf cluster is drawn as a rounded or lobed outline whose top edge sits near the midline of the cluster and whose bottom edge sits near the baseline, so the cluster has a readable x-height. Individual leaf marks inside the cluster may vary in style, angle, and spacing; the convention fixes only the outer envelope and the baseline-to-midline proportion. You will practice three skills: shaping leaf clusters, connecting them with branching structure, and adding ground-cover texture that reads as a surface rather than a row of identical marks. All measurements are hypothetical examples; measure your own paper and tools before setting any numerical value.
Practice materials: Printable downloads are not available for this lesson yet. Use the instructions and four exercises below.
Reference illustration
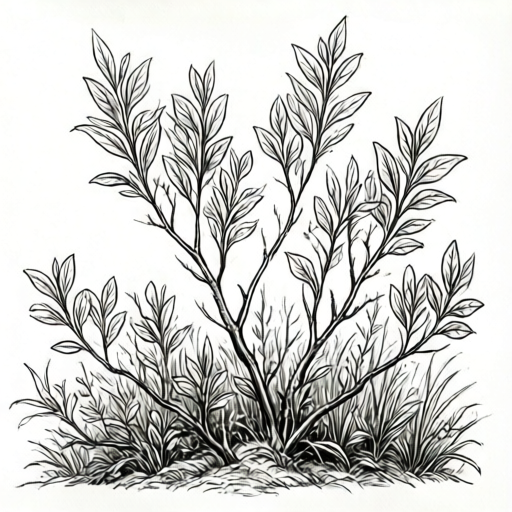
Use the stated measurements and conventions for each exercise.
Leaf-cluster shapes and the x-height convention
A leaf cluster is a single visual mass made of several leaf marks. Draw its outer envelope first: a soft rounded shape, a lobed shape, or a fan shape. Place the bottom of the envelope on a baseline you can see, and keep the top of the envelope near a midline you have marked. The distance from baseline to midline is the cluster x-height. This gives every cluster a consistent size family even when the internal leaf marks differ.
Inside the envelope, draw leaf marks as short strokes, small ovals, or tiny wedges. Vary their angle slightly and leave small gaps so the cluster does not become a solid blob. A valid alternative is to draw the envelope lightly and then fill it with overlapping leaf marks that extend slightly past the envelope; the cluster still reads correctly if the overall mass keeps the baseline-to-midline proportion.
- Mark a baseline and a midline on your paper; label the gap as the cluster x-height.
- Draw a light envelope for one cluster, keeping its bottom on the baseline and its top near the midline.
- Add six to ten leaf marks inside the envelope, varying angle and spacing.
- Check that the cluster reads as one mass at arm's length and that its height stays close to the marked x-height.
Branching structure that supports clusters
Branching structure is the skeleton that holds clusters in place. Draw a main stem as a slightly curved line, then add secondary branches that leave the stem at different heights. Each secondary branch should end where a cluster will sit. Keep branch lines thinner than cluster outlines so the structure stays visible but does not dominate.
A useful check is the fork test: at every fork, the two branch lines should meet at a clear point, and the angle between them should be wide enough to see. Avoid branches that cross without a fork point, because they read as tangles rather than structure. You may draw branches first and clusters second, or clusters first and branches second; both orders are valid if the final fork points are clear.
- Draw one main stem with a gentle curve.
- Add three secondary branches at different heights, each ending at a planned cluster position.
- Place a cluster envelope at each branch end, keeping the baseline-to-midline proportion.
- Run the fork test: every branch junction has a clear meeting point and a visible angle.
Ground-cover texture and cluster density
Ground cover is texture that sits below the vegetation mass. Use short marks, small arcs, or tiny tufts arranged in overlapping rows. Vary the spacing so the texture reads as a surface, not a fence. A simple convention is to keep ground-cover marks shorter than the cluster x-height and to let some marks overlap the baseline slightly.
Cluster density controls depth. Draw foreground clusters larger and with more internal leaf marks; draw background clusters smaller and with fewer marks. A density panel can show three clusters in a row: sparse, medium, and dense. Check that the dense cluster still shows gaps and that the sparse cluster still reads as a mass. Numerical sizes are hypothetical; measure your own paper to choose a workable x-height.
- Draw a ground-cover band below the baseline using short overlapping marks.
- Draw three clusters in a row with sparse, medium, and dense internal marks.
- Compare the three clusters at arm's length; the dense one should feel heavier but not solid.
- Place a foreground cluster and a background cluster; check that the foreground one is larger and more detailed.
Worked example
On a page with a marked baseline and midline 3 cm apart (a hypothetical example), draw a small vegetation patch: one main stem, two secondary branches, three leaf clusters, and a ground-cover band. Use the x-height convention and run the fork test.
Worked answer
Mark the baseline and midline 3 cm apart. Draw a gently curved main stem. Add two secondary branches at different heights, each ending at a planned cluster position; check that each junction has one clear meeting point and a visible angle. Draw three cluster envelopes with bottoms on the baseline and tops near the midline, then fill each with six to ten varied leaf marks. Add a ground-cover band of short overlapping marks below the baseline, keeping marks shorter than 3 cm. At arm's length, the three clusters read as masses, the branches show clear forks, and the ground cover reads as a surface.
Four practice exercises
Exercise 1
Draw one leaf cluster using a rounded envelope. Mark a baseline and a midline 2 cm apart (hypothetical example). Fill the envelope with eight leaf marks that vary in angle. Check the cluster at arm's length.
Show answer and check
A rounded envelope with its bottom on the baseline and top near the midline, filled with eight varied leaf marks, reading as one mass at arm's length.
Why: The envelope fixes the cluster shape and the baseline-to-midline gap fixes the x-height proportion. Varied internal marks keep the cluster from looking like a grid while the outer mass stays readable.
Check: Measure the envelope height against the 2 cm gap; it should be close. At arm's length, confirm the cluster reads as one mass and that no two leaf marks are identical in angle and length.
Exercise 2
Draw a main stem with three secondary branches at different heights. Each branch ends at a planned cluster position. Run the fork test and describe one junction.
Show answer and check
A main stem with three secondary branches, each ending at a cluster position, with every junction showing one clear meeting point and a visible angle.
Why: Branching structure must support clusters. The fork test catches tangles by requiring a single meeting point and a readable angle at each junction.
Check: Trace each branch to its junction. Confirm two lines meet at one point and the angle is visible. Confirm each branch end matches a planned cluster position.
Exercise 3
Draw a ground-cover band below a baseline using short overlapping marks. Keep marks shorter than a 1.5 cm cluster x-height (hypothetical example). Use at least three overlapping rows with varied spacing.
Show answer and check
A ground-cover band of short overlapping marks in at least three rows, with varied spacing and marks shorter than 1.5 cm, reading as a surface.
Why: Ground cover is texture, not a fence. Overlapping rows and varied spacing create a surface, and keeping marks shorter than the cluster x-height keeps the texture subordinate to the vegetation mass.
Check: Measure several marks against the 1.5 cm gap; all should be shorter. At arm's length, confirm the band reads as a surface and that no single row dominates.
Exercise 4
Draw three clusters in a row: sparse, medium, and dense. Use the same envelope shape and x-height for all three. Then draw one foreground cluster and one background cluster, making the foreground larger or more detailed.
Show answer and check
Three clusters with the same envelope and x-height but different internal mark counts, plus a foreground cluster that is larger or more detailed than the background cluster.
Why: Cluster density controls depth. Keeping the envelope and x-height constant isolates density as the variable, and comparing foreground and background clusters shows how size and detail signal depth.
Check: Compare the three clusters: the dense one should have more marks but still show gaps. Compare foreground and background: the foreground should be larger or more detailed. Confirm all clusters keep the baseline-to-midline proportion.
Common mistakes
- Drawing every leaf as an identical mark in a perfect grid. Vary angle, length, and spacing slightly while keeping the cluster envelope and x-height proportion.
- Letting branches cross without a clear fork point. Redraw junctions so two branch lines meet at one visible point with a readable angle.
- Making ground cover a single row of identical tufts. Use overlapping rows with varied spacing and keep marks shorter than the cluster x-height.
- Making the densest cluster a solid blob with no gaps. Leave small gaps between leaf marks and check the cluster still reads as a mass at arm's length.
Self-check rubric
- Leaf clusters keep a readable baseline-to-midline proportion and read as single masses at arm's length.
- Internal leaf marks vary in angle, length, or spacing; valid alternative styles are accepted.
- Branch junctions pass the fork test: one clear meeting point and a visible angle.
- Each cluster sits at or near a branch end, showing structure supports the vegetation.
- Ground cover uses overlapping rows with varied spacing and reads as a surface.
- Cluster density shows depth: foreground clusters are larger or more detailed than background clusters.
- Checks are stated in consistent units and any numerical values are labeled as hypothetical examples.
Questions and answers
Do I have to draw leaf clusters in one exact style?
No. The convention fixes the outer envelope and the baseline-to-midline proportion. Internal leaf marks may be strokes, ovals, or wedges, and clusters may be rounded, lobed, or fan-shaped.
How do I know my branching structure is correct?
Use the fork test: every junction has one clear meeting point and a visible angle between branch lines. Branches should end where clusters sit.
What numbers should I use for x-height or cluster size?
Any numbers in this lesson are hypothetical examples. Measure your own paper and tools, then choose a baseline-to-midline gap that fits your page.
Can I draw clusters before branches?
Yes. Either order is valid if the final fork points are clear and each cluster sits at a branch end.