HomeHow to Draw Avian Leg Scales: A Tile-by-Tile Guide Free original lessons
How to Draw Avian Leg Scales: A Tile-by-Tile Guide
Learn to draw bird leg scales as small overlapping tiles, with joint transitions, shading, and a practice panel for realistic feet.
Free lesson
Four exercises
Worked answers
Object Drawing Lessons
Avian leg scales are small, tile-like plates that cover the foot and lower leg. Unlike snake scales, they are discrete, often rounded or polygonal, and arranged in rows that shift at joints. This guide teaches a repeatable method: outline the leg, divide it into scale rows, draw individual tiles with consistent size, then shade and transition at the ankle and toes. You will use a simple convention: each scale is a closed shape with a baseline (bottom edge) and a midline (top edge) that defines its height. Letter styles vary, so treat the tile shape as a flexible guide, not a single correct answer. All measurements are hypothetical examples; measure your own paper and tools. The practice panel and scale-size guide are planned resources, not yet built.
Practice materials: Printable downloads are not available for this lesson yet. Use the instructions and four exercises below.
Reference illustration
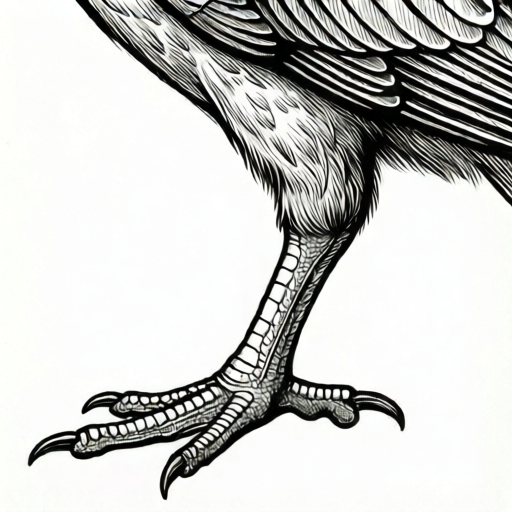
Use the stated measurements and conventions for each exercise.
Setting up the leg outline and scale-size guide
Begin with a light pencil outline of the lower leg and foot. Mark the ankle joint and the toe joints. Decide a scale-size guide: for example, on a 15 cm tall leg drawing, make the smallest toe scales about 2 mm wide and the largest ankle scales about 5 mm wide. These numbers are hypothetical; adjust to your paper and desired detail.
Draw a few horizontal guide lines across the leg to mark scale rows. Rows should be closer together near joints and slightly wider on the straight shank. Keep the lines light so they can be erased.
- Outline the leg and foot with a light pencil.
- Mark the ankle and toe joints with small dots.
- Choose a scale-size guide (e.g., 2 mm toe scales, 5 mm ankle scales) and write it in the margin.
- Draw 4–6 horizontal row guides across the leg, spacing them closer near joints.
Drawing individual scale tiles
Work row by row from the ankle downward. In each row, draw closed tile shapes that touch at their seams but do not overlap heavily. Use a baseline (bottom edge) and a midline (top edge) to keep heights consistent. Tiles can be rounded rectangles, pentagons, or hexagons; choose one style and repeat it. Leave a thin seam line between tiles (tiles touch at the seam) to suggest the seam.
At the ankle, transition from larger shank scales to smaller foot scales over two transition rows by stepping the tile width down in equal increments (e.g., from 6 mm shank tiles to 4.5 mm in the first transition row and 3 mm in the second), or use a single bridging tile at the joint followed by the smaller foot tiles. At toe joints, draw a slightly larger tile that bridges the joint, then resume smaller tiles.
- Start at the top row and draw tiles left to right.
- Keep each tile’s height within the row guide.
- Leave a thin seam line (e.g., about 0.5 mm) between tiles; tiles should touch at the seam.
- At the ankle, step tile width down in equal increments over two rows (e.g., 6 mm → 4.5 mm → 3 mm), or use one bridging tile followed by smaller foot tiles.
- At each toe joint, draw one bridging tile, then continue smaller tiles.
Shading and joint transitions
Shade each tile with a light source from the upper left. Put a soft shadow on the lower right edge of each tile and a thin highlight on the upper left. Use a 2H pencil for highlights and a 2B for shadows. At joints, darken the seam between the bridging tile and its neighbors to show compression.
Check consistency: tiles on the shank should be slightly larger than toe tiles. If a tile looks too large, redraw it within the row guide. Keep shading simple; the pattern should read as tiles, not feathers.
- Choose a light direction (e.g., upper left).
- Shade the lower right edge of each tile.
- Add a thin highlight on the upper left edge.
- Darken seams at the ankle and toe joints.
- Erase row guides and check tile size consistency.
Worked example
Draw a 10 cm tall bird leg with an ankle at 6 cm from the top. Use a scale-size guide of 3 mm for shank tiles and 1.5 mm for toe tiles. Show one bridging tile at the ankle and shade with light from the upper left.
Worked answer
Outline the leg and mark the ankle at 6 cm. Draw 5 shank rows above the ankle with 3 mm wide tiles, then 3 foot rows below with 1.5 mm tiles. At the ankle, draw one 3 mm bridging tile that spans the joint, then continue with 1.5 mm tiles. Shade each tile’s lower right edge and highlight the upper left. Check: shank tiles are twice as wide as toe tiles; the bridging tile touches both rows; seams are visible.
Four practice exercises
Exercise 1
A 12 cm leg drawing has an ankle at 7 cm from the top. The shank rows are each 4 mm tall (row height is set independently of tile width). How many full shank rows fit above the ankle?
Show answer and check
7 cm = 70 mm; 70 ÷ 4 = 17.5, so 17 full rows fit above the ankle.
Why: Convert the ankle height to millimetres, then divide by the stated row height. Round down to full rows.
Check: Multiply 17 rows × 4 mm = 68 mm, which is less than 70 mm; 18 rows would be 72 mm, too tall.
Exercise 2
On a 9 cm toe, you draw 3 rows that are each 2 mm tall. What total length do the rows cover?
Show answer and check
3 × 2 mm = 6 mm, covering 6 mm of the toe length.
Why: Multiply the number of rows by the row height, keeping both in the same unit (mm).
Check: 6 mm is less than 90 mm (9 cm), so the rows fit; add rows until the toe is covered.
Exercise 3
A shank tile is 5 mm wide and a toe tile is 2.5 mm wide. What is the ratio of shank to toe tile width?
Show answer and check
5 ÷ 2.5 = 2, so the ratio is 2:1.
Why: Divide the larger width by the smaller width to find the ratio.
Check: 2.5 mm × 2 = 5 mm, confirming the ratio.
Exercise 4
You need to transition from 6 mm ankle tiles to 3 mm foot tiles over two rows. What widths should the two transition rows use?
Show answer and check
Row 1: 4.5 mm; Row 2: 3 mm. (Halve the difference: 6 → 4.5 → 3.)
Why: Subtract the final width from the starting width (6 − 3 = 3 mm), divide by two steps (1.5 mm per step), and subtract each step.
Check: 4.5 mm is halfway between 6 mm and 3 mm; the second row matches the foot tile width.
Common mistakes
- Drawing scales as continuous snake-like bands. Draw each scale as a separate closed tile with a visible seam; do not connect tiles into long strips.
- Using the same tile size everywhere. Reduce tile width in equal steps over two rows (e.g., 6 mm → 4.5 mm → 3 mm); use the scale-size guide.
- Ignoring joint transitions. Add one bridging tile at each joint and darken the seam to show compression.
- Shading every tile identically. Vary shadow strength slightly and keep a consistent light direction; highlight upper left, shadow lower right.
Self-check rubric
- Tiles are closed shapes with visible seams, not continuous bands.
- Tile size follows the scale-size guide: shank tiles larger than toe tiles.
- At least one bridging tile appears at the ankle or a toe joint.
- Shading uses a consistent light direction with highlight upper left and shadow lower right.
- Row guides are erased or faint, and the leg outline remains clear.
- Valid alternatives: rounded rectangles, pentagons, or hexagons are all acceptable if consistent.
Questions and answers
What is the difference between avian scales and snake scales?
Avian leg scales are small, discrete tiles with seams; snake scales are often overlapping and continuous along the body. Draw bird scales as separate closed shapes.
How many rows should I draw?
For a 15 cm leg drawing, 6–10 rows on the shank and 3–5 rows per toe are a practical starting point. Adjust to your scale-size guide.
Can I use a single tile shape?
Yes. Choose rounded rectangles, pentagons, or hexagons and repeat. The rubric allows valid alternatives as long as tiles are closed, consistent, and sized by row.
How do I check my drawing?
Measure tile widths against your scale-size guide, confirm seams are visible, and check that joint bridging tiles are present.