HomeDrawing Human Ears: Shape and Fold Construction Free original lessons
Drawing Human Ears: Shape and Fold Construction
Learn to draw human ears by building outer contour and inner fold structure from simple landmarks, with front and side view practice.
Free lesson
Four exercises
Worked answers
Object Drawing Lessons
Ears are often skipped or drawn as flat C-shapes because their folds are hard to parse. This lesson breaks the outer ear into a small set of landmarks and shows how to construct the contour first, then layer the inner folds. You will work in two views, front and side, using a consistent convention: the ear height is set to one unit U, where U is a chosen vertical distance you measure on your paper (for example, the distance from a baseline to a midline you draw). Letter styles vary, so treat all proportions as adjustable guides rather than fixed rules. The goal is a believable ear that reads clearly at small size and holds up when enlarged.
Practice materials: Printable downloads are not available for this lesson yet. Use the instructions and four exercises below.
Reference illustration
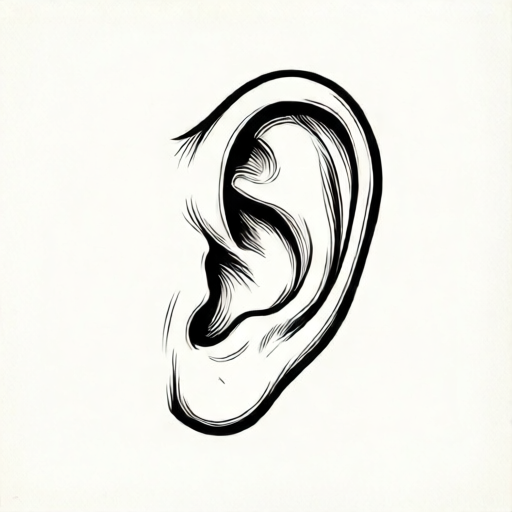
Use the stated measurements and conventions for each exercise.
Landmarks and the Outer Contour
Begin with four landmarks: the top of the ear, the lobe bottom, the front attachment near the jaw, and the back rim. In side view, the ear sits roughly between the brow line and the base of the nose, but measure your own reference rather than assuming. In front view, the ear appears narrower and the folds compress.
Draw the outer contour as a continuous line that starts at the front attachment, rises over the top, curves down the back rim, and returns to the lobe. Keep the line light so you can adjust it. The contour is not a perfect oval; it often has a slight notch at the top and a fuller curve at the back.
- Mark the four landmarks with small dots.
- Connect the dots with a light, continuous contour line.
- Check that the top and lobe are not too symmetrical; ears usually lean slightly.
- Refine the contour only after the landmarks feel balanced.
Inner Folds: Helix, Antihelix, and Concha
The inner structure is a set of ridges and valleys. The helix is the outer rim fold; the antihelix is the inner ridge that forks near the top; the concha is the bowl-shaped depression; the tragus is the small flap near the front. Draw these as nested curves, not as separate objects.
Work from the outer rim inward. The helix follows just inside the contour, leaving a thin rim. The antihelix runs parallel to the helix but stops short of the lobe. The concha sits between the antihelix and the front attachment. Keep the folds shallow in front view and deeper in side view.
- Draw the helix as a line just inside the contour.
- Add the antihelix as a second, shorter curve that forks near the top.
- Place the concha as a soft bowl between the antihelix and the front.
- Add the tragus as a small bump near the front attachment.
- Soften any fold that looks like a hard outline; folds are transitions, not borders.
Front and Side View Construction
In side view, the ear is widest and the folds are most visible. In front view, the ear is compressed and the concha may be partly hidden. Use the same landmark order in both views, but change the spacing: front view narrows the back rim and brings the tragus forward.
A practical convention is to set the ear height as one unit U, where U is a chosen vertical distance you measure on your paper, such as the distance from a baseline to a midline you draw. Letter styles vary, so this unit is a guide, not a standard. For example, if you choose a hypothetical U of 20 mm on your paper, the ear height would be about 20 mm in side view. Measure your actual paper and adjust.
- Draw a light baseline and midline and measure the distance between them to define one unit U.
- In side view, place the ear height equal to one unit U.
- In front view, reduce the visible width by about one third while keeping the height.
- Compare both views side by side and adjust the fold depth, not the landmark order.
Checking Proportion and Readability
A finished ear should read at a glance: the outer contour should be clear, the helix should not merge with the antihelix, and the concha should feel like a depression rather than a flat patch. Squint at the drawing to test readability.
Use simple arithmetic to check placement. If the ear height is one unit U and the top landmark sits at 0.8 units above the baseline, the lobe bottom should sit near −0.2 units (0.2 units below the baseline). Alternatively, if the lobe bottom is at 0.2 units above the baseline, the top landmark should be at 1.2 units above the baseline. These numbers are hypothetical examples; measure your own reference and keep units consistent.
- Squint to confirm the outer contour reads first.
- Check that the helix and antihelix remain separate curves.
- Verify the lobe bottom and top landmark are within the planned height.
- Erase construction dots only after the folds are stable.
Worked example
Construct a side-view ear using one unit U of 20 mm (hypothetical example). Place the top landmark at 1.2 units above the baseline and the lobe bottom at 0.2 units above the baseline. Describe the contour and fold order.
Worked answer
Mark the baseline and midline 20 mm apart. Place the top landmark at 24 mm above the baseline and the lobe bottom at 4 mm above the baseline. Draw the outer contour from the front attachment over the top, down the back rim, and to the lobe. Add the helix just inside the contour, then the antihelix as a shorter forked curve, then the concha as a soft bowl, and finally the tragus near the front. Check that the ear height is 20 mm between landmarks (24 − 4 = 20) and that the folds remain separate.
Four practice exercises
Exercise 1
Draw a side-view ear with a unit U of 25 mm (hypothetical example). Place the top landmark at 1.2 units and the lobe bottom at 0.2 units above the baseline. List the fold order.
Show answer and check
Top landmark at 30 mm, lobe bottom at 5 mm above the baseline. Fold order: outer contour, helix, antihelix, concha, tragus.
Why: The unit defines the height; multiplying 25 mm by 1.2 and 0.2 gives the landmark positions. The fold order moves from outer rim inward.
Check: Measure the distance between landmarks (30 − 5 = 25 mm, one unit) and confirm the helix and antihelix do not merge.
Exercise 2
Draw a front-view ear using the same 25 mm unit but reduce the visible width by one third. Describe where the concha sits.
Show answer and check
Keep the height at 25 mm and reduce the width to about two thirds. The concha sits between the antihelix and the front attachment, partly hidden.
Why: Front view compresses the back rim, so the width shrinks while the height stays. The concha remains a depression near the front.
Check: Compare the front and side drawings side by side; the front ear should look narrower but the same height.
Exercise 3
A student draws an ear with the top landmark at 18 mm and the lobe bottom at 2 mm above a baseline, using a 20 mm unit U. Is the ear height consistent with one unit? Explain.
Show answer and check
The ear height is 16 mm, which is 0.8 units, not one full unit. Adjust either the landmarks or the unit to match the intended height.
Why: Subtract 2 mm from 18 mm to get 16 mm; divide by 20 mm to get 0.8. The planned height was one unit, so the drawing is short.
Check: Re-measure the landmark distances and confirm the arithmetic: 18 minus 2 equals 16; 16 divided by 20 equals 0.8.
Exercise 4
Draw a side-view ear and then redraw it with the antihelix removed. Describe how the readability changes and what fix restores it.
Show answer and check
Without the antihelix, the inner structure collapses into a single bowl and the ear reads flat. Restore readability by adding a shorter forked curve between the helix and concha.
Why: The antihelix separates the helix from the concha; removing it merges the folds. A forked curve restores the nested structure.
Check: Squint at both drawings; the restored version should show two distinct inner ridges.
Common mistakes
- Drawing the ear as a flat C-shape with no inner folds. Add the helix and antihelix as nested curves before refining the contour.
- Making the ear too symmetrical in front view. Compress the back rim and bring the tragus forward to match the view.
- Treating folds as hard outlines. Soften transitions and keep fold lines lighter than the outer contour.
- Using a fixed ear height without measuring the paper. Measure your actual equipment and label any chosen numbers as hypothetical examples.
Self-check rubric
- Outer contour is continuous and reads clearly at small size.
- Helix, antihelix, concha, and tragus are distinguishable.
- Front and side views use consistent landmark order.
- Proportions are checked with a stated unit and simple arithmetic.
- Valid alternative ear shapes are accepted if the fold structure remains readable.
Questions and answers
Do I need to know anatomy to draw ears?
No. This lesson uses visible landmarks and fold structure, not clinical anatomy or hearing mechanics.
Why does the front view look narrower?
The ear is seen edge-on in front view, so the back rim compresses and the concha is partly hidden.
Can I use a different ear height?
Yes. The unit U convention is a guide; letter styles vary, so adjust the unit to your reference.
How do I know the folds are correct?
Check that the helix, antihelix, and concha remain separate and that the ear reads clearly when squinting.