Free original lessons
Cross-Contour Animal Drawing: Wrapped Surface Lines
Learn to draw an animal using cross-contour lines that wrap around its body, showing volume and form without relying on fur texture or outline-only drawing.
Free lesson
Four exercises
Worked answers
Object Drawing Lessons
Cross-contour lines are surface lines that travel across a form, like stripes wrapping around a cylinder. Unlike a single outline, they describe how a body turns in space. In this lesson you will draw an animal by placing a few wrapped lines that follow the body's curvature, then check them against simple landmarks. The goal is believable volume, not fur detail. You will use a defined convention: lines run from one visible edge to another, bending with the surface, and spacing tightens where the form curves away. Letter styles and line weight may vary; the rubric accepts any consistent, checkable choice.
Practice materials: Printable downloads are not available for this lesson yet. Use the instructions and four exercises below.
Reference illustration
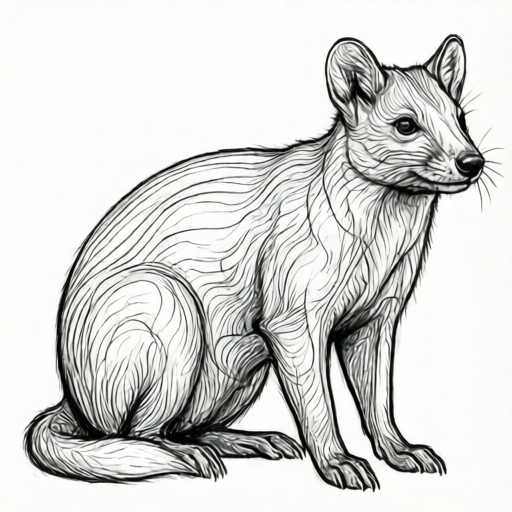
Use the stated measurements and conventions for each exercise.
What Cross-Contour Lines Do
A contour line traces an edge. A cross-contour line crosses the surface, so it reveals whether a shape is flat, rounded, or dented. On an animal, a cross-contour line might start at the back, wrap over the shoulder, and end at the chest. Where the body is round, the line bows outward; where it narrows, the line pinches. Spacing matters: lines crowd together where the surface turns away from you and spread apart on flatter areas.
Use a simple convention so your drawing can be checked. Draw each cross-contour line as one continuous stroke from a visible edge to another visible edge. Do not let it stop in the middle of the body unless it meets a real feature such as a leg joint. Keep line direction consistent across the whole animal: if lines wrap left-to-right on the torso, they should wrap left-to-right on the legs too, adjusting for the leg's angle.
- Choose one animal pose and sketch a light outline of its main body masses: head, torso, upper legs, lower legs.
- Mark two or three landmarks on each mass, such as top of shoulder, mid-back, and belly line.
- Draw one cross-contour line across the torso from back edge to belly edge, bowing it to match the roundness.
- Add two more torso lines, spacing them wider on flat areas and tighter near curved edges.
- Repeat on the head and legs, letting lines wrap around each mass rather than crossing straight through.
Reading Volume From Line Spacing
Spacing is your volume signal. If three lines are evenly spaced across a torso, the surface reads as a gentle curve. If they bunch near one edge, that edge is turning away sharply. This is a checkable rule: pick any two adjacent lines and compare their gap at the top and bottom of the body. A large change in gap means a strong curve; a small change means a flatter surface.
Avoid making every line parallel. Real animal bodies have bulges and hollows. A shoulder may push lines outward, while the flank lets them relax. You can test your spacing by covering the outline with your hand: the remaining lines alone should still suggest a rounded body. If they look like flat stripes, adjust the bow and spacing.
- Draw three lines across the torso with deliberately uneven spacing.
- Check the gap between line one and line two at the top edge and at the bottom edge; note the difference.
- If the difference is small everywhere, increase the bow near the shoulder or hip.
- Cover the outline and judge whether the lines alone suggest volume.
- Adjust one line at a time and recheck the gaps.
Keeping Lines Consistent Across the Animal
Consistency makes cross-contour drawing readable. Decide a wrapping direction before you start: for example, lines travel from the animal's back toward its belly. On the head, they travel from crown toward muzzle. On a leg, they travel from outer side toward inner side. When the leg angles, the line still follows that same relative direction, so the viewer sees one coherent surface system.
A common failure is letting lines change direction mid-body or cross each other without meaning. Cross-contour lines should not form an X unless two surfaces genuinely overlap, such as a front leg crossing a back leg. Check by tracing each line with your finger from start to end: it should stay on one surface and end at a visible edge or a real joint.
- State your wrapping direction in one sentence before drawing.
- Draw the torso lines first and confirm they all follow that direction.
- Draw head lines using the same relative direction, adjusted for the head's tilt.
- Draw leg lines from outer to inner side, keeping the wrap consistent.
- Trace each line and remove or redraw any that stop mid-surface or cross without an overlap reason.
Checking Your Drawing Without Fur Texture
This task excludes fur-texture rendering. Do not add individual hairs, shading scribbles, or stippling to suggest fur. The cross-contour lines themselves must carry the volume. A valid drawing may use clean lines, slightly varied line weight, or a single accent line, but the form must read from the wrapped lines alone.
Use a simple check: squint at the drawing. The animal's main masses should still feel round or angular as intended. Then compare two lines on the same mass: their spacing change should match the mass's curvature. Finally, confirm every line starts and ends at a visible edge or joint. If a line floats or fades into the middle, it fails the convention.
- Squint to test whether volume survives without detail.
- Compare spacing change on each mass to the intended curvature.
- Confirm each line has a clear start and end at an edge or joint.
- Remove any fur-like marks and replace them with one corrective cross-contour line if needed.
- Recheck the whole animal for consistent wrapping direction.
Worked example
A simplified side-view animal has a torso drawn as a rounded rectangle 8 cm wide and 5 cm tall. Draw three cross-contour lines wrapping from the back edge to the belly edge. The shoulder end is rounder than the hip end. Describe where spacing should tighten and how to check it.
Worked answer
Draw three lines from the back edge to the belly edge, all wrapping in the same direction. Near the shoulder, make the lines bow more and place them closer together at the back edge, because that end turns away sharply. Near the hip, let the lines spread wider and bow less. Check by measuring the gap between line one and line two at the back edge and at the belly edge: the shoulder gap should change more than the hip gap. Confirm each line starts at the back edge and ends at the belly edge, with no mid-surface stops.
Four practice exercises
Exercise 1
A simplified animal torso is drawn as a circle 6 cm across. Draw two cross-contour lines wrapping left-to-right. Line A is near the top, line B is near the middle. Describe the expected spacing change and give one check.
Show answer and check
Both lines bow with the circle. Near the left and right edges the gap between A and B should be smaller than at the center, because the surface turns away at the edges. Check by comparing the A-B gap at the left edge and at the center: the edge gap should be visibly smaller.
Why: A circle curves away at its edges, so wrapped lines crowd there. The center is flatter, so spacing widens. This follows the spacing rule without needing fur detail.
Check: Measure the gap between A and B at the left edge and at the center using a ruler; confirm the edge gap is smaller.
Exercise 2
An animal leg is drawn as a tapered tube 4 cm wide at the top and 2 cm wide at the bottom. Draw three cross-contour lines wrapping around the leg. Where should spacing be tightest, and how do you verify endpoints?
Show answer and check
Spacing should be tightest near the bottom where the tube narrows and turns away more sharply. Each line should start at the outer edge and end at the inner edge of the leg. Verify by tracing each line from outer to inner edge and confirming no line stops mid-surface.
Why: A narrowing tube has stronger curvature near the narrow end, so lines crowd there. Clear endpoints keep the wrapping readable.
Check: Trace each line with a finger from outer edge to inner edge; confirm three complete traces and tighter gaps near the bottom.
Exercise 3
A head is drawn as an oval 5 cm wide and 4 cm tall, tilted slightly. You choose a wrapping direction from crown to muzzle. Draw two lines and state one consistency check across the head and torso.
Show answer and check
Draw two lines from crown edge to muzzle edge, bowing with the oval and tightening near the crown. The consistency check is that both head lines and the torso lines follow the same relative direction, adjusted for tilt. Trace each line to confirm it ends at a visible edge.
Why: A tilted oval still has a crown-to-muzzle surface direction. Keeping that relative direction across masses makes the whole animal coherent.
Check: Compare the direction of head lines to torso lines; confirm they share the same relative wrap and each line has two visible endpoints.
Exercise 4
A front leg overlaps a back leg in side view. You draw cross-contour lines on both legs. When is a crossing line allowed, and what check confirms it is valid?
Show answer and check
A crossing line is allowed only where the front leg genuinely overlaps the back leg, because two surfaces overlap there. Check by confirming the crossing occurs at the overlap boundary and that each line still starts and ends at a visible edge or joint. Lines that cross away from the overlap are invalid.
Why: Cross-contour lines describe one surface; crossing is meaningful only when surfaces overlap. The overlap boundary is the only valid crossing location.
Check: Locate the overlap boundary and confirm any crossing happens there; trace each line to a visible endpoint and reject crossings elsewhere.
Common mistakes
- Drawing cross-contour lines as straight parallel stripes across the body. Bow each line to follow the surface and vary spacing so lines crowd where the form turns away.
- Letting lines stop in the middle of a body mass. Extend each line to a visible edge or a real joint so it reads as wrapping the whole surface.
- Changing wrapping direction between the torso and legs. State one relative direction before drawing and adjust each line to that direction on every mass.
- Adding fur texture to compensate for weak volume. Remove texture marks and strengthen the cross-contour spacing and bow instead.
- Making all spacing even, so the animal looks flat. Compare gaps at two edges of each mass and deliberately tighten spacing near curved edges.
Self-check rubric
- All cross-contour lines start and end at a visible edge or a real joint.
- Wrapping direction is consistent across torso, head, and legs, with adjustments for angle.
- Spacing changes between adjacent lines match the intended curvature of each mass.
- No fur-texture rendering is used to carry volume; lines alone show form.
- Lines do not cross unless two surfaces genuinely overlap.
- The drawing can be checked by tracing each line and comparing two gap measurements.
Questions and answers
How many cross-contour lines should I draw on the torso?
Three to five is enough for a clear check. Fewer may not show volume; more can clutter the surface. Choose a number you can trace and verify.
Can I use curved lines that cross each other?
Only where two surfaces genuinely overlap, such as one leg in front of another. Otherwise, crossing lines break the wrapping convention and make volume ambiguous.
Does line weight matter?
It can vary, but it is not required. The rubric checks wrapping direction, spacing change, and clear endpoints, not a single correct weight.
What if my animal is angular rather than round?
Use tighter spacing near sharp turns and flatter bows on broad planes. The same spacing check applies: a large gap change signals a strong turn.