Free original lessons
Realistic Koala Drawing: Fur Texture and Facial Proportion
Learn to draw a realistic koala head with measured facial proportions and layered fur strokes, using a clear convention and checkable steps.
Free lesson
Four exercises
Worked answers
Object Drawing Lessons
This lesson focuses on a realistic koala head study, not a cartoon or a full-body pose. You will set facial proportions with simple measurements, then build fur texture in layers using a defined stroke convention. All measurements are relative to your own drawing, so the method works at any size. Use a pencil, paper, and an eraser. The convention for fur is: each stroke is a short tapered mark that starts at the skin surface and lifts away, with direction following the form. Valid alternatives are allowed: strokes may be curved or straight, dense or sparse, as long as direction and taper are consistent. X-height means the distance from the baseline to the midline of a letter; here it is used only as a scale reference for eye-line placement, not as a universal letter style. Letter styles vary, so treat x-height as a relative unit you define on your page.
Practice materials: Printable downloads are not available for this lesson yet. Use the instructions and four exercises below.
Reference illustration
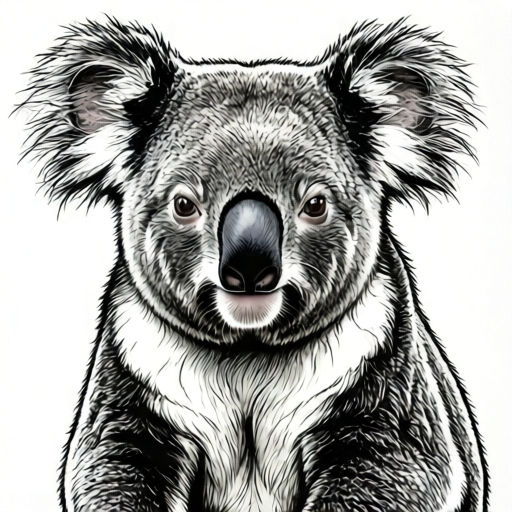
Use the stated measurements and conventions for each exercise.
Set the head shape and facial proportion
Begin with a light oval for the cranium and a wider lower oval for the muzzle. Koalas have a broad, flat face with a large nose and widely spaced eyes. Define a vertical center line and a horizontal eye line. Use a chosen unit, such as the width of the nose, to space the eyes: place each eye about one nose-width from the center line. Mark the nose bridge from the eye line down to the nose tip. The nose is large and rounded, often wider than the space between the eyes.
Check proportion by comparing distances, not by absolute size. The distance from the eye line to the nose tip should be roughly equal to the distance from the nose tip to the chin. The ears sit high and wide, with rounded rims. Keep the muzzle short. If the muzzle looks long, shorten it rather than enlarging the nose.
- Draw a light vertical center line and a horizontal eye line.
- Place two eye marks, each about one nose-width from the center line.
- Mark the nose tip below the eye line at about the same distance as eye line to chin.
- Add rounded ear rims high and wide on each side.
- Erase construction lines lightly before adding fur.
Build fur texture in layers
Fur texture comes from direction, taper, and overlap. Use the convention: short tapered strokes that follow the form and lift away from the surface. Start with sparse strokes on the cheeks and forehead, then add a second layer at a slightly different angle. Do not fill every gap; leave small light areas to suggest volume. On the nose, use smooth shading rather than fur strokes. Around the eyes, keep strokes short and radiating outward.
Vary stroke length: longer on the cheeks, shorter on the forehead and around the ears. Overlap strokes so each new layer crosses the previous one slightly. This creates depth without needing many tones. If a stroke looks like a scratch, soften its start and taper its end.
- Lightly mark fur direction on the cheeks, forehead, and ears.
- Draw a first sparse layer of tapered strokes following the form.
- Add a second layer at a slightly different angle, overlapping the first.
- Keep the nose smooth and shaded, not furry.
- Leave small light gaps to suggest volume.
Add tonal shading and final checks
Use light pressure for distant fur and firmer pressure for shadowed areas under the ears and around the muzzle. Build tone gradually. Check that the darkest areas are under the chin and inside the ear rims, while the forehead remains lighter. Compare the eye line, nose tip, and chin distances again after shading; fur can visually shift proportions.
A valid alternative is to use cross-hatching instead of tapered strokes, provided the direction still follows the form. The rubric accepts any consistent fur convention that shows direction and taper or directional hatching.
- Shade under the ears and chin with light layers.
- Darken the ear rims and the sides of the nose.
- Recheck eye-line, nose-tip, and chin distances.
- Soften any stroke that looks like a scratch.
- Erase stray construction marks.
Worked example
A learner draws a koala head with a nose width of 3 cm. They place each eye 3 cm from the center line and set the eye line 4 cm above the nose tip. They plan the chin 4 cm below the nose tip. Check the proportion and suggest one fur improvement.
Worked answer
The eye spacing matches one nose-width (3 cm), and the eye-line to nose-tip distance (4 cm) equals the nose-tip to chin distance (4 cm), so the proportion is consistent. For fur, add a second layer of short tapered strokes on the cheeks at a slightly different angle, overlapping the first layer and leaving small light gaps.
Four practice exercises
Exercise 1
A drawing has a nose width of 2 cm. Each eye is placed 2 cm from the center line. The eye line is 3 cm above the nose tip, and the chin is planned 5 cm below the nose tip. State whether the vertical proportion is consistent and give the corrected chin distance if needed.
Show answer and check
The vertical proportion is not consistent. The chin should be about 3 cm below the nose tip, not 5 cm.
Why: The eye-line to nose-tip distance is 3 cm, so the nose-tip to chin distance should be close to 3 cm for a short muzzle.
Check: Compare the two vertical distances directly; they should be approximately equal.
Exercise 2
Describe how to add a second fur layer on the forehead using the lesson convention. Include stroke length, direction, and overlap.
Show answer and check
Draw short tapered strokes radiating outward from the center of the forehead, following the rounded form. Overlap the first layer slightly at a different angle and leave small light gaps.
Why: Short tapered strokes that follow the form create texture without flattening the head; a second angle adds depth.
Check: Confirm each stroke tapers, follows the form, and crosses the first layer without filling every gap.
Exercise 3
A learner shades the nose with long fur strokes. Using the lesson, explain what to change and why.
Show answer and check
Replace the fur strokes on the nose with smooth shading, because the nose should read as smooth rather than furry.
Why: The convention reserves fur strokes for furry areas; the nose is a smooth form and needs tonal shading instead.
Check: Check that no long fur strokes cross the nose and that tone changes gradually.
Exercise 4
You define an x-height of 1 cm on your page. The eye line is 2 x-heights above the nose tip. How far below the nose tip should the chin be, and what relative check confirms it?
Show answer and check
The chin should be about 2 cm below the nose tip, because 2 x-heights equals 2 cm. The check is that eye-line to nose-tip equals nose-tip to chin.
Why: Using the same unit keeps vertical distances comparable; equal distances support the short muzzle.
Check: Measure both vertical distances with the same unit and compare.
Common mistakes
- Making the muzzle too long, which creates a bear-like profile. Shorten the muzzle and keep the nose large and rounded; recheck eye-line to nose-tip against nose-tip to chin.
- Drawing fur as long parallel lines that flatten the form. Use short tapered strokes that follow the form and overlap in layers.
- Placing the eyes too close together. Space each eye about one nose-width from the center line and compare with the nose width.
- Filling every gap with dark strokes. Leave small light gaps and build tone gradually to suggest volume.
Self-check rubric
- Facial proportion: eyes about one nose-width from the center line; eye-line to nose-tip close to nose-tip to chin.
- Head shape: broad face, short muzzle, large rounded nose, high rounded ears.
- Fur texture: strokes follow form, taper or hatch consistently, and overlap in at least two layers.
- Tone: gradual shading with darkest areas under ears and chin; nose smooth, not furry.
- Convention: a clearly defined fur convention is used consistently; valid alternatives accepted.
Questions and answers
Do I need to draw the whole body?
No. This lesson is a head study only; full-body pose construction is outside the boundary.
Can I use straight strokes instead of curved ones?
Yes, if the direction follows the form and the strokes taper or hatch consistently.
How do I know the proportions are right?
Compare relative distances: eye line to nose tip should be close to nose tip to chin, and eyes about one nose-width from the center line.
What does x-height mean here?
It is a relative scale unit from baseline to midline; define it on your page and use it only for spacing checks, not as a fixed letter style.