Free original lessons
Axonometric Chair Drawing: Three-Axis Block-In and Seat Plane
Learn to draw a chair in axonometric projection using a three-axis grid, seat plane, and leg alignment. Includes worked example, practice tasks, and a validation plan.
Free lesson
Four exercises
Worked answers
Object Drawing Lessons
Axonometric projection shows a chair from a fixed angle so parallel edges stay parallel. This lesson teaches a reliable construction: establish three axes, block in the seat plane, align the legs, then refine. You will use a simple convention: vertical lines stay vertical; the two receding directions follow fixed angles you choose and label. All measurements are hypothetical examples; measure your own paper and tools. The goal is consistent axis alignment, not a single universal chair style.
Practice materials: Printable downloads are not available for this lesson yet. Use the instructions and four exercises below.
Reference illustration
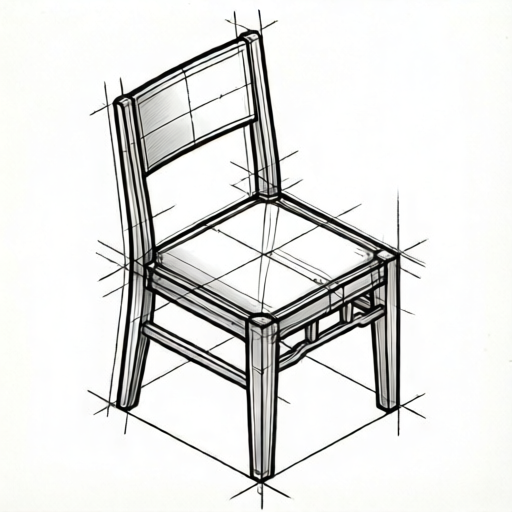
Use the stated measurements and conventions for each exercise.
Set the three axes and label the grid
Begin by drawing a small origin point. From it, draw one vertical axis for height. Draw a second axis at a chosen angle for width (for example, 30 degrees above horizontal to the right). Draw a third axis at a matching angle for depth (for example, 30 degrees above horizontal to the left). These angles are hypothetical; choose values that fit your page and record them.
Label the axes H (height), W (width), and D (depth). Keep all lines parallel to one of these three axes. A printable plate with a labeled three-axis grid is planned, not yet built; for now, construct the grid yourself with a ruler and pencil.
- Mark an origin and draw the vertical H axis.
- Draw the W axis to the right at your chosen angle; label the angle.
- Draw the D axis to the left at your chosen angle; label the angle.
- Check that the two receding axes are mirror images if you want a symmetrical view.
Block in the seat plane on the axes
The seat is a parallelogram in axonometric projection. Choose a seat width and depth in hypothetical units, such as 6 units wide and 5 units deep. Measure along the W axis for width and along the D axis for depth. Connect the endpoints with lines parallel to the opposite axis to close the parallelogram.
Keep the seat plane level: its edges must be parallel to W and D, never to H. Mark the seat corners clearly. This plane is the reference for leg placement and back height.
- From the origin, measure 6 units along W and mark point A.
- From the origin, measure 5 units along D and mark point B.
- From A, draw a line parallel to D; from B, draw a line parallel to W; mark their intersection C.
- Connect origin to A, A to C, C to B, and B to origin to complete the seat parallelogram.
Align the legs and add the back
Legs are vertical in this convention, so each leg line is parallel to H. Place four leg tops at the seat corners. Decide a leg length, such as 4 units, and measure downward along H from each corner. Because the seat is a parallelogram, the four leg bottoms form a matching parallelogram offset downward.
For the back, choose a back height above the rear seat edge, such as 5 units. Draw vertical lines from the two rear seat corners upward, then connect their tops with a line parallel to the seat's rear edge. Add a simple back panel as a parallelogram between those verticals. Keep every new edge parallel to H, W, or D.
- At each seat corner, draw a short vertical tick downward.
- Measure 4 units down each vertical and mark the four leg bottoms.
- Connect adjacent leg bottoms with lines parallel to the seat edges to check alignment.
- From the two rear corners, draw verticals 5 units up; connect tops parallel to the rear seat edge.
- Close the back panel with lines parallel to H and the rear seat edge.
Check alignment and refine
Before adding detail, test parallelism: hold a ruler along each edge and compare it with its axis. Opposite seat edges should be parallel; opposite leg lines should be parallel. If a line drifts, erase and redraw from the correct axis.
Refinement is optional. You may round corners or vary leg thickness, but keep the underlying axis structure visible. A blank isometric grid area for redrawing and modifying seat height is planned, not yet built; use your own grid for now.
- Trace each edge mentally and name its axis: H, W, or D.
- Mark any edge that is not parallel to its axis and correct it.
- Redraw one leg to confirm the vertical convention.
- Label your chosen angles and units so the drawing can be checked.
Worked example
Using a vertical H axis, a W axis 30 degrees above horizontal to the right, and a D axis 30 degrees above horizontal to the left, construct a chair with a 6-by-5 seat, 4-unit legs, and a 5-unit back. All units are hypothetical.
Worked answer
Draw the origin and three axes. Mark 6 units along W and 5 units along D; close the seat parallelogram with parallels. From each corner, draw 4-unit verticals downward and connect the bottoms with seat-parallel lines to check. From the two rear corners, draw 5-unit verticals upward and connect the tops parallel to the rear seat edge; close the back panel. Every edge is parallel to H, W, or D.
Four practice exercises
Exercise 1
Construct a chair with a 4-by-3 seat, 3-unit legs, and a 4-unit back using H vertical, W at 30 degrees right, and D at 30 degrees left. All units are hypothetical.
Show answer and check
A parallelogram seat 4 units along W and 3 units along D; four 3-unit vertical legs from the corners; two 4-unit verticals from rear corners with a top edge parallel to the rear seat edge; back panel closed with axis-parallel lines.
Why: The seat uses W and D only; legs and back use H for height; the back top follows the rear seat edge direction.
Check: Use a ruler to confirm opposite seat edges are parallel and every leg is vertical; measure the labeled unit to verify 4, 3, 3, and 4.
Exercise 2
Redraw the same chair but raise the seat by 2 units along H while keeping the leg length 3 units. Describe the new positions.
Show answer and check
The seat parallelogram moves up 2 units; leg tops move with it; leg bottoms are 3 units below the new corners; the back rises from the new rear corners by 4 units.
Why: Raising the seat changes only its H position; W and D dimensions stay the same, and legs remain vertical.
Check: Confirm the seat edges are still parallel to W and D, legs are vertical and 3 units long, and the back is 4 units above the new rear edge.
Exercise 3
A student draws a seat 5 units wide along W and 4 units deep along D but closes it with a horizontal line. Identify the error and state the correction.
Show answer and check
The closing line is not parallel to D or W. Replace it with a line parallel to D from the width endpoint and a line parallel to W from the depth endpoint; their intersection closes the parallelogram.
Why: In axonometric projection, the seat's opposite edges must be parallel to the two receding axes.
Check: Compare each seat edge with the labeled W and D axes; every edge should match one of them.
Exercise 4
Design a chair with a 7-by-4 seat and 5-unit legs, but choose your own receding angles and label them. State one check you will use.
Show answer and check
Any labeled angles are acceptable if the seat is a parallelogram using W and D, legs are vertical and 5 units, and the back follows the rear edge. A valid check is comparing opposite edges with a ruler for parallelism.
Why: The convention allows chosen angles; consistency and labeling matter more than a specific angle.
Check: Verify the recorded angles match the drawn axes and that all edges are parallel to H, W, or D.
Common mistakes
- Drawing the seat as a rectangle instead of a parallelogram. Measure width along W and depth along D, then close the shape with lines parallel to the opposite axis.
- Making legs converge as in perspective. Keep all leg lines parallel to the vertical H axis; axonometric projection does not converge.
- Using inconsistent units between seat and legs. Record one unit length and measure every dimension with it; label the unit on the page.
- Letting the back panel edges drift off-axis. Draw the back from the rear seat corners using only H, W, or D parallels, then check each edge.
Self-check rubric
- Three axes are drawn, labeled, and their angles recorded.
- Seat is a parallelogram with edges parallel to W and D.
- All four legs are parallel to H and equal in length within the chosen convention.
- Back panel edges are parallel to H and the rear seat edge.
- Construction lines are visible enough to check alignment.
- Valid alternatives are accepted if axis consistency and labeled conventions are maintained.
Questions and answers
Do I need a specific angle for the receding axes?
No. Choose angles that fit your page, label them, and keep all parallel edges consistent with those choices.
Can I change the seat height?
Yes. Move the seat plane up or down along H while keeping its edges parallel to W and D, then reposition the legs from the new corners.
Is a rounded chair acceptable?
Yes, if the axis construction remains consistent. The rubric rewards alignment and clear construction, not a single chair style.
How do I check my drawing without a grid?
Use a ruler to compare opposite edges for parallelism and confirm each edge matches H, W, or D.