Free original lessons
Isometric Chair Drawing on Three Axes
Learn to draw a simple chair in isometric view using three axes, with step-by-step construction, common fixes, and four practice tasks.
Free lesson
Four exercises
Worked answers
Object Drawing Lessons
Isometric drawing shows a three-dimensional object using three equally spaced axes: one vertical and two at 30 degrees to the horizontal. This lesson builds a simple chair from a seat, four legs, and a backrest, all aligned to those axes. You will use a consistent drawing convention: every edge must be parallel to the vertical axis or to one of the two 30-degree axes, and opposite edges stay parallel. Lettering styles may vary; if you add labels, keep them legible and consistent. All numerical values here are hypothetical examples for practice, not manufacturing standards. Measure your own paper and tools if you adapt the steps.
Practice materials: Printable downloads are not available for this lesson yet. Use the instructions and four exercises below.
Reference illustration
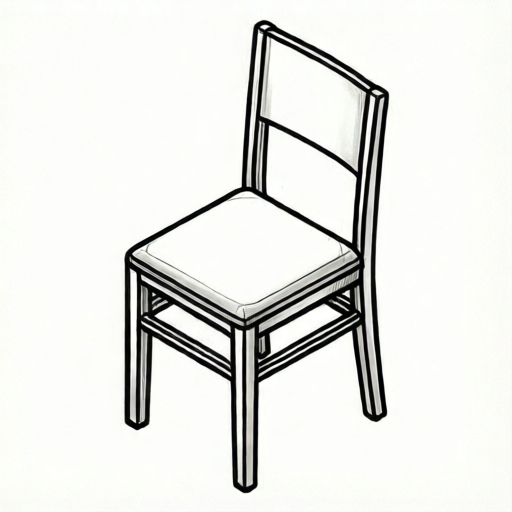
Use the stated measurements and conventions for each exercise.
Set up the three-axis grid
Draw a vertical axis for height. From the same origin, draw two axes at 30 degrees above the horizontal, one to the left and one to the right. These represent depth and width. Keep the angle consistent by checking against a 30-degree template or by measuring equal rise and run: for every 10 units across, rise about 5.77 units. Label the axes height, width, and depth so every later line has a direction.
Use light construction lines. The chair will be built from boxes and prisms aligned to these axes, so stray lines are easy to erase later.
- Mark an origin point near the lower center of the page.
- Draw a vertical line upward from the origin for height.
- Draw a line at 30 degrees up-right for width.
- Draw a line at 30 degrees up-left for depth.
- Check that the two slanted axes are mirror images and that all three meet cleanly.
Build the seat as an isometric box
The seat is a flat rectangular slab. In isometric view, its top face is a parallelogram whose edges follow the width and depth axes. Choose hypothetical seat dimensions, for example 40 units wide, 35 units deep, and 4 units thick. Draw the top face first, then project the thickness downward along the vertical axis. Keep opposite edges parallel to the same axis. A common error is drawing the seat as a true rectangle, which breaks the isometric convention.
Keep opposite edges parallel to the same axis. A common error is drawing the seat as a true rectangle, which breaks the isometric convention.
- From a corner point, draw a width-axis line 40 units long.
- From the same corner, draw a depth-axis line 35 units long.
- Complete the parallelogram by drawing parallel lines from the far ends.
- From each corner, drop a vertical line 4 units for thickness.
- Connect the lower corners to form the visible side faces.
Add four legs and a backrest
Legs are vertical prisms. Place them under the seat corners, using short vertical lines and small parallelograms for their cross-sections. For a simple chair, make each leg 30 units tall and 4 units square in cross-section. The backrest rises from the rear edge of the seat: two vertical posts plus a horizontal top rail aligned to the width axis. Draw only the visible edges. Hidden lines may be shown lightly if they help check alignment, but the final drawing should read clearly.
Draw only the visible edges. Hidden lines may be shown lightly if they help check alignment, but the final drawing should read clearly.
- Mark four leg positions under the seat corners.
- Draw each leg as a vertical line pair with a small top parallelogram.
- From the rear seat corners, extend two vertical posts upward 35 units.
- Connect the post tops with a width-axis rail.
- Erase construction lines that are not part of the chair.
Check proportions and axis alignment
A finished isometric chair should have every edge parallel to one of the three axes. Check that seat edges match width or depth, legs are vertical, and the backrest rail matches width. Compare lengths along each axis using a simple unit count. If a line drifts, redraw it from a confirmed corner rather than patching.
Use the rubric to judge clarity, axis consistency, and completeness rather than exact artistic style.
- Trace each edge and name its axis.
- Count units along width, depth, and height to confirm proportions.
- Check that no seat edge is horizontal in the drawing.
- Confirm all four legs reach the same ground level.
- Review the backrest for parallel posts and a level top rail.
Worked example
Using hypothetical dimensions, draw a simple chair with a seat 30 units wide, 20 units deep, and 3 units thick; four legs 25 units tall and 3 units square; and a backrest 30 units tall above the seat. Describe the construction in order.
Worked answer
Start with the three-axis origin. Draw the seat top as a parallelogram: 30 units along width, 20 units along depth, with opposite edges parallel. Drop each corner 3 units vertically and connect the lower corners for thickness. Mark four leg positions under the seat corners. Draw each leg as a vertical prism 25 units tall with a 3-unit square top. From the two rear seat corners, extend vertical posts 30 units above the seat. Connect the post tops with a width-axis rail. Erase construction lines and check that all edges follow height, width, or depth. As a check, count units along each axis: seat 30 by 20 by 3, legs 25 tall, backrest posts 30 tall, rail 30 wide; confirm every edge is parallel to one of the three axes and all four leg bottoms share one ground level.
Four practice exercises
Exercise 1
A seat is 24 units wide, 18 units deep, and 2 units thick. Describe how to draw its top face and thickness on the three-axis grid.
Show answer and check
Draw a parallelogram with one pair of edges 24 units along width and the other pair 18 units along depth. From each corner, drop a vertical line 2 units and connect the lower corners to show thickness.
Why: The top face uses the two slanted axes; thickness uses the vertical axis. Opposite edges stay parallel.
Check: Confirm the top face has two 24-unit width edges and two 18-unit depth edges, and every thickness line is vertical and 2 units long. Also check that opposite edges remain parallel.
Exercise 2
A chair has legs 20 units tall and 2 units square. The seat is at height 20. Describe where to place the four legs and how to draw one leg.
Show answer and check
Place legs under the four seat corners. For one leg, draw a small 2-unit square parallelogram at the top, then extend vertical lines 20 units down and connect the bottom corners.
Why: Legs are vertical prisms; their cross-sections follow width and depth, while height follows the vertical axis.
Check: Check that each leg top sits at the seat underside and each leg bottom is 20 units below, with all four bottoms at the same level. Confirm each leg's vertical edges are parallel to the height axis.
Exercise 3
A backrest has two posts 28 units tall above the seat and a top rail 30 units wide. Describe the construction and one alignment check.
Show answer and check
From the rear seat corners, draw two vertical posts 28 units upward. Connect their tops with a line 30 units along the width axis. Check that both posts are vertical and the rail is parallel to the seat's width edges.
Why: Posts use the height axis; the rail uses the width axis. Parallelism confirms correct axis use.
Check: Measure or count 28 units on each post and 30 units on the rail; confirm the rail is parallel to a known width edge and both posts are parallel to the height axis.
Exercise 4
A student draws a seat as a rectangle with horizontal top and bottom edges. Identify the error and describe the correction using the three-axis convention.
Show answer and check
The error is using horizontal edges instead of the 30-degree width and depth axes. Redraw the seat as a parallelogram with edges along width and depth, then add vertical thickness.
Why: In isometric drawing, no seat edge should be horizontal; only the vertical axis is upright.
Check: Trace each seat edge and confirm it is parallel to width, depth, or height, not horizontal. Check that opposite edges are parallel and that thickness lines are vertical.
Common mistakes
- Drawing the seat as a flat rectangle instead of a parallelogram. Redraw the seat edges along the 30-degree width and depth axes, then complete the parallelogram.
- Making legs slanted instead of vertical. Use only the vertical axis for leg height; keep leg cross-sections aligned to width and depth.
- Using inconsistent 30-degree angles on the two slanted axes. Measure equal rise and run for both slanted axes, or use a 30-degree template.
- Forgetting the seat thickness so the chair looks paper-thin. Project each top corner downward by the chosen thickness and connect the lower corners.
Self-check rubric
- All chair edges are parallel to one of the three isometric axes.
- Seat is drawn as a parallelogram with visible thickness.
- Four legs are vertical and reach a consistent ground level.
- Backrest has two vertical posts and a width-axis top rail.
- Proportions are consistent with the chosen unit counts.
- Drawing is clear, with unnecessary construction lines removed.
- Valid alternative styles are accepted if axis alignment and structure remain correct.
Questions and answers
Do I need a ruler or grid?
A ruler helps keep axis lengths consistent, but a light freehand grid works if you check angles and parallel edges carefully.
Can I change the chair dimensions?
Yes. The numbers here are hypothetical examples. Keep the three-axis directions and simple unit arithmetic consistent.
Should I show hidden edges?
Light hidden lines can help you check leg placement, but the final drawing may omit them for clarity.
How do I know the drawing is isometric?
Every edge should be parallel to the vertical axis or one of the two 30-degree axes, and opposite edges should remain parallel.