Free original lessons
Circle, Center Line, and Tilt: Constructing Faces in Perspective
Learn to build a face from a circle, vertical and horizontal center lines, and a tilt angle. Place features consistently on upright and tilted heads.
Free lesson
Four exercises
Worked answers
Object Drawing Lessons
This lesson teaches a reliable construction method for drawing a face using a circle, a vertical center line, a horizontal center line, and a tilt angle. You will learn to place the eyes, nose, mouth, and ears on upright and tilted heads so features stay aligned with the head's orientation. The method uses simple geometry and checkable proportions. All measurements are hypothetical examples; measure your own paper and tools. The focus is construction, not shading or expression.
Practice materials: Printable downloads are not available for this lesson yet. Use the instructions and four exercises below.
Reference illustration
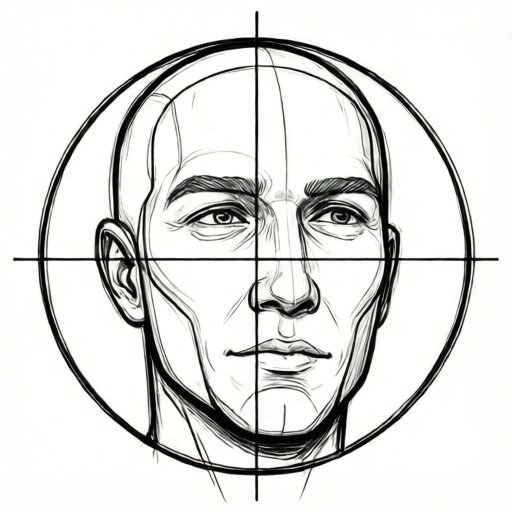
Use the stated measurements and conventions for each exercise.
The circle and center lines
Start with a circle drawn lightly. The circle represents the cranium, not the whole head. Draw a vertical center line through the circle's center; this line marks the midline of the face. Draw a horizontal center line through the center; this marks the eye line. These two lines are the reference grid for every feature.
The vertical center line divides the face into left and right halves. The horizontal center line sits at the eye level. On an upright head, the vertical line is straight up and down. On a tilted head, the whole grid rotates by the tilt angle, but the lines stay perpendicular to each other.
- Draw a circle lightly with a diameter of about 8 cm (hypothetical example).
- Mark the center point and draw a vertical line through it, extending slightly beyond the circle.
- Draw a horizontal line through the center, perpendicular to the vertical line.
- Label the top, bottom, left, and right intersections of the circle with the center lines.
Placing features on the upright head
On the upright head, the eye line is the horizontal center line. Eyes sit on this line, spaced so that one eye width fits between them. The nose base sits about halfway between the eye line and the bottom of the circle. The mouth line sits about one-third of the way from the nose base to the bottom of the circle. Ears span from the eye line to the nose base.
Use the vertical center line to keep the nose and mouth centered. The vertical center line runs midway between the eyes, with one eye width of space between the inner corners when the face is upright. Check that the distance from the top of the circle to the eye line equals the distance from the eye line to the bottom of the circle.
- Mark eye positions on the horizontal center line, leaving one eye width between them.
- Mark the nose base halfway between the eye line and the bottom of the circle.
- Mark the mouth line one-third of the way from the nose base to the bottom of the circle.
- Draw ear shapes from the eye line down to the nose base on both sides.
Tilting the grid for perspective
To tilt the head, rotate the entire grid (circle, vertical line, horizontal line) by the tilt angle. For a tilt to the left, rotate the grid counterclockwise. For a tilt to the right, rotate it clockwise. The features rotate with the grid, so the eye line stays perpendicular to the vertical center line.
After rotating, place features using the same proportions along the rotated lines. The eye line is still the horizontal center line of the rotated grid. The nose base and mouth line are measured along the rotated vertical line. This keeps features consistent with the head's orientation.
- Draw a circle and center lines as before.
- Choose a tilt angle, for example 20 degrees (hypothetical example).
- Rotate the entire grid by the tilt angle around the circle's center.
- Place eyes on the rotated horizontal line, nose and mouth along the rotated vertical line, and ears parallel to the rotated vertical line.
Checking alignment and proportion
Check that the vertical center line passes through the nose bridge and the middle of the mouth. Check that the eye line passes through both eye centers. On a tilted head, the eye line should be perpendicular to the vertical center line. Measure distances along the rotated lines, not along the page edges.
Use a simple arithmetic check: if the circle diameter is 8 cm, the radius is 4 cm. The eye line is at the center, so the distance from the top of the circle to the eye line is 4 cm, and from the eye line to the bottom is 4 cm. The nose base is 2 cm below the eye line. The distance from the nose base to the bottom is 2 cm; one-third of that is about 0.67 cm, so the mouth line is about 2.67 cm below the eye line. These values are hypothetical examples; adjust to your drawing size.
- Verify the vertical center line bisects the nose and mouth.
- Verify the eye line passes through both eye centers and is perpendicular to the vertical line.
- Measure the distance from the top of the circle to the eye line and compare with the distance from the eye line to the bottom.
- Check that the nose base is halfway between the eye line and the bottom of the circle along the vertical line.
Worked example
Construct an upright face using a circle of diameter 8 cm. Place the eye line at the center, the nose base halfway between the eye line and the bottom of the circle, and the mouth line one-third of the way from the nose base to the bottom. Describe the positions in centimeters from the eye line.
Worked answer
The circle radius is 4 cm. The eye line is at the center, so it is 0 cm from itself. The bottom of the circle is 4 cm below the eye line. The nose base is halfway, so 2 cm below the eye line. The mouth line is one-third of the way from the nose base to the bottom: the distance from nose base to bottom is 2 cm, so one-third is about 0.67 cm below the nose base, or about 2.67 cm below the eye line. Eyes sit on the eye line, spaced with one eye width between them. Ears span from the eye line to the nose base.
Four practice exercises
Exercise 1
An upright circle has diameter 10 cm. The eye line is at the center. Where is the nose base if it is halfway between the eye line and the bottom of the circle? Give the distance below the eye line.
Show answer and check
2.5 cm below the eye line.
Why: The radius is 5 cm. The bottom of the circle is 5 cm below the eye line. Halfway is 2.5 cm below the eye line. Wait: the distance from eye line to bottom is 5 cm, so halfway is 2.5 cm. The answer is 2.5 cm below the eye line.
Check: Measure the radius (5 cm), confirm the bottom is 5 cm below the eye line, and divide by 2 to get 2.5 cm.
Exercise 2
A head is tilted 20 degrees to the left. The vertical center line is rotated counterclockwise by 20 degrees. If the eye line was horizontal before tilting, what is its angle relative to the page's horizontal edge after tilting?
Show answer and check
20 degrees counterclockwise from the page's horizontal edge.
Why: Rotating the entire grid counterclockwise by 20 degrees rotates the horizontal eye line by the same angle. The eye line remains perpendicular to the vertical center line.
Check: Use a protractor to measure the angle between the eye line and the page's horizontal edge; it should be 20 degrees.
Exercise 3
On an upright head with circle diameter 12 cm, the mouth line is one-third of the way from the nose base to the bottom of the circle. The nose base is halfway between the eye line and the bottom. How far below the eye line is the mouth line?
Show answer and check
4 cm below the eye line.
Why: Radius is 6 cm. Bottom is 6 cm below eye line. Nose base is halfway: 3 cm below eye line. Distance from nose base to bottom is 3 cm. One-third of 3 cm is 1 cm. Mouth line is 3 cm + 1 cm = 4 cm below the eye line.
Check: Measure radius 6 cm, nose base at 3 cm, mouth line at 4 cm; confirm 4 cm is one-third of the way from 3 cm to 6 cm.
Exercise 4
A tilted head has its vertical center line rotated 15 degrees clockwise. The nose base is marked 2 cm along the rotated vertical line below the eye line. Describe how to check that the nose base lies on the vertical center line.
Show answer and check
Place a straightedge along the rotated vertical center line and confirm the nose base mark lies on that line. Also check that the eye line is perpendicular to the vertical line at the circle's center.
Why: The nose base must lie on the vertical center line regardless of tilt. A straightedge along the rotated line verifies alignment. The perpendicular check confirms the grid is consistent.
Check: Use a straightedge and a right-angle corner to verify alignment and perpendicularity.
Common mistakes
- Drawing features parallel to the page edges instead of the tilted grid. Rotate the feature placement lines with the grid. Eyes, nose, and mouth should follow the rotated center lines, not the horizontal and vertical edges of the paper.
- Placing the eye line at the top of the circle instead of the center. The horizontal center line passes through the circle's center. Measure from the top and bottom of the circle to confirm the line is centered.
- Making the nose base too high or too low. Mark the nose base halfway between the eye line and the bottom of the circle along the vertical center line. Measure both distances to check.
- Forgetting to keep the vertical and horizontal center lines perpendicular after tilting. Use a right-angle check or a corner of a sheet of paper to confirm the two center lines meet at 90 degrees after rotation.
Self-check rubric
- Circle is drawn lightly and center lines pass through the center.
- Vertical and horizontal center lines are perpendicular before tilting.
- Features are placed using the center lines, not the page edges.
- On tilted heads, the entire grid is rotated and features follow the rotated lines.
- Eye line passes through both eye centers; nose and mouth lie on the vertical center line.
- Proportions along the rotated lines match the upright proportions.
- Valid alternative conventions are accepted if consistently applied and explained.
Questions and answers
What does the circle represent?
The circle represents the cranium, the upper part of the head. The jaw and chin are added below the circle. The center lines help place features consistently.
How do I choose a tilt angle?
Any angle between about 10 and 30 degrees works for practice. Use a protractor or estimate. The method is the same for any angle; just rotate the entire grid.
Do I need to draw the jaw before placing features?
No. Place the eyes, nose, and mouth using the center lines first. Then add the jaw and chin below the circle, keeping them aligned with the vertical center line.
How can I check my tilted face?
Check that the eye line is perpendicular to the vertical center line, that the nose and mouth lie on the vertical line, and that the distances along the rotated lines match the upright proportions.