Free original lessons
Draw a Person Looking Down: Head Tilt and Neck Construction
Learn to draw a downward gaze by tilting the head and aligning the neck. Practice with a construction plate, avoid common mistakes, and check your work.
Free lesson
Four exercises
Worked answers
Object Drawing Lessons
Drawing a person looking down requires coordinating two things: the tilt of the head and the alignment of the neck. When the head tips forward, the neck must support it without looking broken or stiff. This guide gives you a clear convention for measuring tilt, a step-by-step construction method, and practice tasks that you can solve from the text alone. You will use simple checkable arithmetic and a consistent unit system. All measurements are hypothetical examples unless you measure your own equipment. The focus is on head angle and neck construction, not facial expression or full-body pose.
Practice materials: Printable downloads are not available for this lesson yet. Use the instructions and four exercises below.
Reference illustration
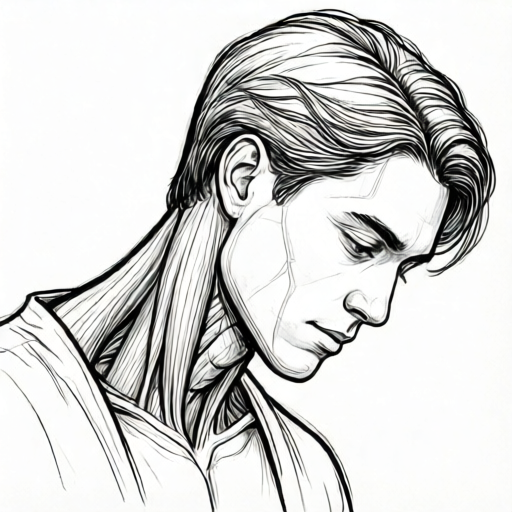
Use the stated measurements and conventions for each exercise.
Establishing the Downward Head Angle
Start by deciding how far the head tips forward. Use a simple convention: measure the tilt as the angle between the vertical midline of the face (from the top of the head to the chin) and a true vertical line. A neutral upright head is 0 degrees. A slight downward gaze is about 15 degrees, a moderate look-down is about 30 degrees, and a strong look-down is about 45 degrees. These numbers are hypothetical examples; you can choose any angle that suits your drawing.
Draw a vertical guide line on your paper. This is your reference. Then draw the head's midline at your chosen angle from the top of the head to the chin. The chin moves forward and down relative to the top of the head. Keep the midline straight; a curved midline will make the head look distorted. Mark the top of the head and the chin along this line. The distance between them is the head length. For a typical adult head, a hypothetical head length of 8 units works well, but you can use any consistent unit.
Next, place the facial features relative to the tilted midline. The eyes sit roughly halfway between the top of the head and the chin along the midline. The nose base sits about two-thirds of the way down from the top. The mouth sits about three-quarters of the way down. Because the head is tilted, these features shift forward and downward in the drawing. Draw horizontal feature lines perpendicular to the tilted midline, not to the page. This keeps the face consistent with the angle.
- Draw a true vertical guide line on your paper.
- Choose a tilt angle (for example, 30 degrees) and draw the head midline from top of head to chin at that angle from vertical.
- Mark the top of the head and the chin on the midline; label the distance as head length (for example, 8 units).
- Place the eye line at half the head length along the midline, the nose base at two-thirds, and the mouth at three-quarters.
- Draw feature lines perpendicular to the tilted midline, not horizontal to the page.
Constructing the Neck to Support the Tilt
The neck connects the head to the torso. When the head looks down, the neck appears shorter in front and longer in back. Draw the neck as a simple cylinder or two parallel lines from the base of the skull to the shoulders. The front of the neck runs from under the chin to the collarbone area. The back of the neck runs from the back of the skull to the upper back. Because the head is tilted forward, the front neck line will be more vertical and the back neck line will slope backward.
Use the head length as your unit. A hypothetical neck length of 4 units (half the head length) works for many adult figures, but you can adjust. Measure from the chin down to the shoulder line along the front of the neck. The shoulder line should be roughly horizontal to the page unless you choose otherwise. The neck should not bend sharply; it should look like a smooth support. Check that the back of the neck connects to the back of the skull, not to the middle of the head.
Align the neck with the head tilt. If the head tilts 30 degrees forward, the neck does not need to tilt 30 degrees; it usually tilts less, perhaps 10 to 15 degrees forward from vertical. This creates a natural-looking support. Draw the neck lines first as light guides, then refine. The key is that the neck must look like it holds the head without strain. Avoid making the neck too thin or too thick relative to the head; a hypothetical neck width of 3 units for an 8-unit head is a reasonable starting point.
- Mark the base of the skull at the back of the head and the chin at the front.
- Draw the front neck line from under the chin down to the shoulder line, using a slight forward tilt (for example, 10 degrees from vertical).
- Draw the back neck line from the back of the skull down to the upper back, sloping backward.
- Set the shoulder line roughly horizontal and check that the neck length is about half the head length (for example, 4 units for an 8-unit head).
- Refine the neck width to about 3 units for an 8-unit head, adjusting as needed.
Aligning Features and Checking Proportions
Once the head angle and neck are drawn, check that the facial features follow the tilt. The eye line, nose base, and mouth line should all be perpendicular to the tilted midline. A common error is to draw the eyes horizontal to the page while the head is tilted, which makes the face look flat. Use a small set square or the corner of a card to check perpendicularity. If the midline is at 30 degrees from vertical, the feature lines should be at 30 degrees from horizontal in the opposite direction.
Check the neck alignment by drawing a line from the chin to the shoulder. This line should be roughly parallel to the front neck line. The back of the neck should connect smoothly to the back of the skull. Measure the distance from the top of the head to the chin (head length) and from the chin to the shoulder (neck length). For a hypothetical example, if head length is 8 units, neck length should be about 4 units. If your neck is much longer or shorter, adjust before adding details.
Finally, check the overall balance. The head should not look like it is floating or sinking into the shoulders. The neck should look like a solid support. You can test this by tracing the outline of the head and neck with your finger; the transition should feel smooth. Remember that letter styles and handwriting vary, so there is no single correct line quality. The rubric allows valid alternatives as long as the tilt and neck alignment are consistent.
- Check that eye line, nose base, and mouth line are perpendicular to the tilted midline.
- Draw a line from chin to shoulder and compare it to the front neck line; they should be roughly parallel.
- Measure head length and neck length; adjust neck to about half the head length if needed.
- Trace the head-neck outline to ensure a smooth transition without sharp bends.
Worked example
Draw a head tilted 30 degrees forward from vertical with a neck that supports it. Use a hypothetical head length of 8 units and neck length of 4 units. Describe the steps and the final check.
Worked answer
Draw a vertical guide. Draw the head midline at 30 degrees from vertical, marking top of head and chin 8 units apart. Place eye line at 4 units from top, nose base at about 5.3 units, mouth at 6 units along the midline. Draw feature lines perpendicular to the midline. Mark the base of the skull at the back and the chin at the front. Draw the front neck line from under the chin down 4 units to the shoulder line, tilted about 10 degrees forward from vertical. Draw the back neck line from the back of the skull down to the upper back, sloping backward. Set shoulder line horizontal. Check that feature lines are perpendicular to the midline and that neck length is half the head length. The final drawing shows a consistent downward gaze with a supporting neck.
Four practice exercises
Exercise 1
A head is tilted 45 degrees forward from vertical. The head length is 10 units. Where should the eye line be placed along the midline, and what is the neck length if it is half the head length?
Show answer and check
Eye line at 5 units from the top of the head along the midline. Neck length is 5 units.
Why: The eye line sits halfway between top of head and chin, so 10 divided by 2 equals 5 units. Neck length is half the head length, so 10 divided by 2 equals 5 units.
Check: Measure along the tilted midline from the top of the head; confirm the eye line is at the midpoint. Measure the neck from chin to shoulder and confirm it equals half the head length.
Exercise 2
A drawing shows a head tilted 30 degrees from vertical, but the eye line is drawn horizontal to the page. Describe the error and the fix.
Show answer and check
The error is that the eye line is not perpendicular to the tilted midline. The fix is to redraw the eye line perpendicular to the midline, which means it should be tilted 30 degrees from horizontal in the opposite direction.
Why: Feature lines must follow the head tilt. A horizontal eye line on a tilted head makes the face look flat and inconsistent. Perpendicularity keeps the features aligned with the angle.
Check: Use a set square or card corner to check that the angle between the eye line and the midline is 90 degrees.
Exercise 3
A neck is drawn 6 units long for a head that is 8 units long. The front neck line is vertical. Is this consistent with a head tilted 30 degrees forward? Explain and suggest a correction.
Show answer and check
No. The neck is too long (6 units instead of about 4 units) and the front neck line should tilt slightly forward, about 10 degrees from vertical, to support the tilted head. Correction: shorten the neck to about 4 units and tilt the front neck line forward slightly.
Why: Neck length should be about half the head length, so 8 divided by 2 equals 4 units. A vertical front neck line with a tilted head can look disconnected; a slight forward tilt improves support.
Check: Measure neck length against head length; confirm it is about half. Check the front neck line angle against vertical; it should be slightly forward, not perfectly vertical.
Exercise 4
You are drawing a person looking down with a 15-degree head tilt. The head length is 9 units. Place the nose base at two-thirds of the head length from the top. How many units from the top is the nose base, and what neck length would you use if following the half-head convention?
Show answer and check
Nose base is 6 units from the top along the midline. Neck length is 4.5 units.
Why: Two-thirds of 9 is 6 (9 times 2 divided by 3 equals 6). Half of 9 is 4.5 (9 divided by 2 equals 4.5).
Check: Measure along the tilted midline from the top of the head to the nose base; confirm it is 6 units. Measure neck from chin to shoulder; confirm it is 4.5 units.
Common mistakes
- Drawing facial features horizontal to the page while the head is tilted. Draw feature lines perpendicular to the tilted midline, using a set square or card corner to check.
- Making the neck too vertical or too tilted, so it looks disconnected from the head. Tilt the neck less than the head (for example, 10 to 15 degrees when the head is at 30 degrees) and connect the back neck line to the back of the skull.
- Using inconsistent units for head length and neck length. Choose one unit (for example, 1 unit = 1 cm on your paper) and measure both head and neck with it; keep neck about half the head length.
- Making the neck too thin or too thick relative to the head. Use a hypothetical neck width of about 3 units for an 8-unit head, then adjust after checking the overall balance.
Self-check rubric
- Head midline is straight and tilted at a consistent angle from vertical.
- Facial feature lines are perpendicular to the tilted midline, not horizontal to the page.
- Neck length is approximately half the head length, using consistent units.
- Front neck line is roughly parallel to the chin-to-shoulder line.
- Back neck line connects to the back of the skull, not the middle of the head.
- Neck width is proportionate to the head (for example, about 3 units for an 8-unit head).
- Overall head-neck transition looks smooth and supportive, with no sharp bends.
- Valid alternative line styles and handwriting are acceptable if the tilt and alignment are consistent.
Questions and answers
What angle should I use for a person looking down?
Any angle from about 15 to 45 degrees from vertical works. A moderate 30-degree tilt is a good starting point. The exact number is a hypothetical example; choose what looks right for your drawing.
How long should the neck be?
A common convention is about half the head length. If your head length is 8 units, make the neck about 4 units. Adjust if your figure looks too stiff or too loose.
Do I need to draw the whole body?
No. This guide focuses on head tilt and neck construction. You can stop at the shoulder line. Full-body poses are outside this scope.
How do I check my drawing without a ruler?
Use the head length as your unit. Mark it on a strip of paper and use that strip to compare neck length. For angles, use the corner of a card to check perpendicular feature lines.