Free original lessons
Colored Pencil Eye: Layered Iris and Skin Tone Blending
Learn to draw a realistic eye in colored pencil using ordered iris layers, blended skin tones, and a clear self-check rubric for original results.
Free lesson
Four exercises
Worked answers
Object Drawing Lessons
This lesson teaches a repeatable colored-pencil method for a realistic eye: establish a light base, build mid-tones in a consistent order, reserve highlights, and blend skin tones around the lids without muddying the iris. You will use a simple convention for judging placement and tone rather than copying one fixed drawing. All measurements are hypothetical examples; measure your own paper and pencils before setting values. The focus is layered iris color and skin-tone blending, not graphite shading or cartoon styles.
Practice materials: Printable downloads are not available for this lesson yet. Use the instructions and four exercises below.
Reference illustration
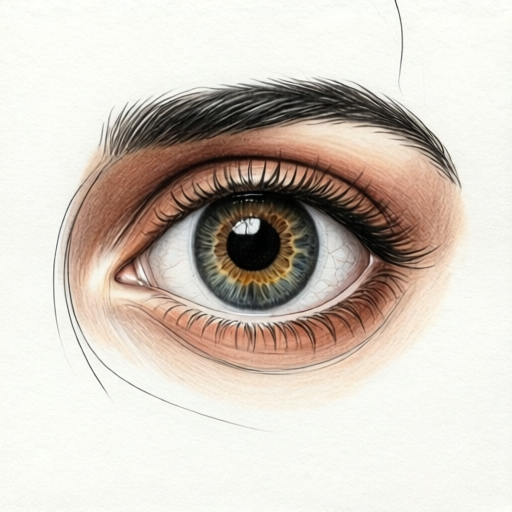
Use the stated measurements and conventions for each exercise.
Set up the eye map and layer order
Draw a horizontal baseline and a midline above it to mark the eye opening. Place the iris circle so its top touches the midline and its bottom rests near the baseline; the pupil sits at the iris center. This is a convention, not a universal rule, so adjust if your reference eye differs.
Decide a three-step layer order before coloring: base (lightest), mid (main color), highlight (paper left white or a pale pencil). Write the order on a scrap strip so you do not reverse it mid-drawing. Keep pencil pressure light in the base layer and increase only in the mid layer.
- Mark the baseline and midline lightly; measure the eye width and record it as a hypothetical example such as 40 mm.
- Draw the iris circle and pupil; check that the pupil is centered by measuring equal distances to the iris edge.
- Label your layer order strip: base, mid, highlight.
- Test three skin-tone pencils on a spare corner and note which pair blends smoothly.
Build the iris in ordered layers
Start with the base color over the whole iris except the pupil and reserved highlight. Use small circular strokes that follow the iris rim. Next add the mid color in thin radial strokes from pupil to rim, leaving gaps so the base still shows. Finally strengthen the rim with a darker mid tone and keep the highlight area untouched.
Blend by lightly overlapping strokes, not by smudging with a finger. If the iris looks flat, add one more mid-layer pass rather than pressing harder. Check value by stepping back: the pupil should read darkest, the rim mid-dark, and the highlight lightest.
- Fill the iris base with light circular strokes, avoiding pupil and highlight.
- Add mid-color radial strokes, leaving thin base gaps.
- Darken the iris rim with short curved strokes.
- Compare pupil, rim, and highlight values from a short distance.
Blend skin tones around the lids
Skin around the eye is not one flat color. Choose a light base skin pencil, a mid skin pencil, and a deeper accent for the crease and outer corner. Apply the light base first around the lids, then the mid tone in the crease and under the lower lid, then the accent only at the deepest crease line.
Blend adjacent skin pencils with light overlapping strokes. Keep the iris edge crisp by coloring skin right up to the rim without crossing it. If the skin looks patchy, add a thin base-layer pass over the patch rather than a heavy mid layer.
- Lay light base skin around the upper and lower lids.
- Add mid skin in the crease and under the lower lid.
- Place deep accent only in the crease line and outer corner.
- Blend with light overlapping strokes and re-check the iris edge.
Check and refine without overworking
Use a simple check: the iris should show at least three distinct values, the skin should show at least two, and the highlight should remain the lightest area. If any check fails, add one thin layer in the correct order instead of erasing aggressively.
Valid alternatives are allowed. A greener or browner iris is acceptable if the layer order and value checks hold. Skin tones may be warmer or cooler if the blend strip shows a smooth transition. The rubric rewards consistent layering and clean edges, not a single universal color.
- Check three iris values and two skin values.
- Confirm the highlight is the lightest area.
- Confirm the iris rim is crisp and not crossed by skin color.
- Add one corrective thin layer only where a check fails.
Worked example
A student draws an eye with a 40 mm width, a centered pupil, a light blue iris base, a mid blue radial layer, and a reserved white highlight. Skin uses a light peach base and a mid tan crease. Check the layer order and value count.
Worked answer
The order is correct: base, mid, highlight. The iris shows three values (pupil dark, rim mid, highlight light). Skin shows two values (light base, mid crease). The pupil is centered because equal distances to the iris edge were measured. One refinement: add a thin deep accent only at the crease line to strengthen skin depth without crossing the iris rim.
Four practice exercises
Exercise 1
An eye map has a 36 mm width. The iris circle is drawn with its top on the midline and bottom on the baseline. The pupil is 8 mm across and centered. State the layer order and one value check.
Show answer and check
Layer order: base, mid, highlight. Value check: pupil darkest, iris rim mid-dark, highlight lightest.
Why: The map fixes iris placement; the layer order prevents muddy color, and the value check confirms three distinct iris values.
Check: Measure pupil center to iris edge on both sides; equal distances confirm centering. Step back to compare three values.
Exercise 2
A student colors the iris base, then adds deep accent, then mid tone, and finally colors the highlight with dark pencil. Identify two mistakes and give fixes.
Show answer and check
Mistake one: accent before mid, causing muddiness; fix by following base, mid, accent order. Mistake two: coloring the highlight dark; fix by reserving it untouched or using a very pale pencil.
Why: The stated order reverses the planned layers and destroys the lightest area, so both value and order checks fail.
Check: List the actual order and compare to base, mid, highlight. Confirm the highlight is the lightest area from a short distance.
Exercise 3
Skin around an eye uses light peach base and mid tan crease, but the blend looks patchy and skin color crosses the iris rim. Give two corrective steps using the lesson method.
Show answer and check
Add a thin light-base pass over the patch, then a light mid pass. Stop skin strokes at the iris rim and blend only within skin.
Why: Thin layers correct patchiness without heavy pressure, and stopping at the rim keeps the eye edge crisp.
Check: Check that skin shows two smooth values and that no skin color crosses the iris rim.
Exercise 4
A drawing uses a green iris base, a mid green radial layer, and a reserved highlight. Skin uses light olive base and mid brown crease. The iris rim is crisp. Decide whether this is valid under the rubric and state one refinement.
Show answer and check
Valid: layer order and value checks pass, and alternative colors are allowed. Refinement: add a thin deep accent only at the crease line to deepen skin without crossing the rim.
Why: The rubric accepts valid alternatives if three iris values and two skin values are present and the rim is crisp.
Check: Count three iris values and two skin values; confirm the highlight is lightest and the rim is uncrossed.
Common mistakes
- Pressing hard in the base layer, which flattens the paper and blocks later layers. Use light circular strokes for the base and save pressure for the mid layer.
- Coloring the highlight with pencil, so it no longer reads as the lightest area. Reserve the highlight from the start and keep it untouched or use only a very pale pencil.
- Blending skin color across the iris rim, making the eye edge fuzzy. Stop skin strokes at the rim and blend only within the skin area.
- Adding dark accent before the mid tone is established, causing a muddy iris. Follow the base, mid, highlight order and add accent only after the mid layer is even.
Self-check rubric
- Layer order is stated and followed: base, mid, highlight.
- Iris shows at least three distinct values.
- Skin shows at least two blended values.
- Highlight remains the lightest area.
- Iris rim is crisp and not crossed by skin color.
- Valid alternative colors are accepted if value checks pass.
Questions and answers
Do I need a fixed color list?
No. Choose a light base, a mid, and a deep accent that blend smoothly on your paper. Test them on a spare corner first.
How do I know the iris has enough layers?
Step back and count distinct values. Three values (pupil, rim, highlight) are the minimum check for this lesson.
Can I change the eye shape?
Yes. The baseline and midline convention is a guide. Adjust the iris placement if your reference eye differs, then keep the layer order.
What if my skin blend looks patchy?
Add a thin light-base pass over the patch, then a light mid pass. Avoid heavy pressure, which makes patches worse.