Free original lessons
Charcoal Eye Drawing: Tonal Blending and Highlight Lift
Learn to render a charcoal eye with graded iris shading, lid tones, and lifted highlights using a defined value convention and checkable steps.
Free lesson
Four exercises
Worked answers
Object Drawing Lessons
This lesson teaches a charcoal drawing of an eye using three controlled tonal zones: the iris, the lids, and the lifted highlight. Work on charcoal paper with vine charcoal for broad tones, compressed charcoal for darks, and a kneaded eraser for lifting. Define your value convention before starting: treat the paper white as the lightest value, the charcoal black as the darkest, and judge every tone against that fixed scale. Measure your actual paper and tools, and label any numerical examples as hypothetical.
Practice materials: Printable downloads are not available for this lesson yet. Use the instructions and four exercises below.
Reference illustration
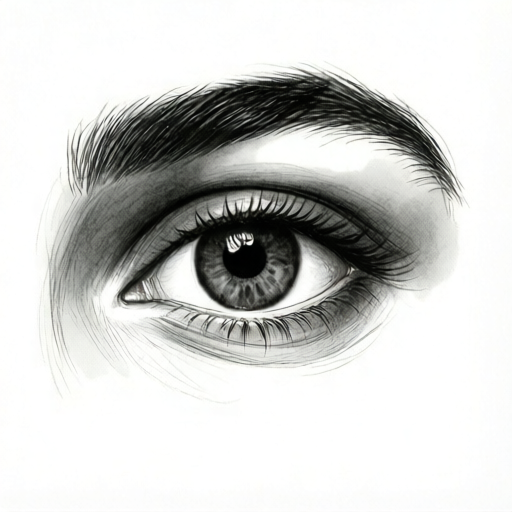
Use the stated measurements and conventions for each exercise.
Set the value convention and eye geometry
Before shading, draw a light outline of the eye shape: an upper lid curve, a lower lid curve, and an almond opening. Mark the iris as a circle that overlaps the upper and lower lids slightly. Define your value scale in five steps from paper white to charcoal black, and write the step numbers beside the drawing so every tone can be checked later.
Use a hypothetical example: if the iris diameter is 40 mm on your paper, the pupil might be 16 mm and the highlight about 6 mm. These numbers are examples only; measure your own drawing and keep units consistent.
- Measure the eye opening width and iris diameter on your paper; record both in millimetres.
- Draw the upper lid, lower lid, and iris circle lightly with vine charcoal.
- Mark five value steps on a scrap strip from white to black and label them 1 to 5.
- Check that the iris overlaps both lids by the same small amount.
Shade the iris in graded steps
Fill the iris with a mid tone first, then darken toward the outer rim and around the pupil. Keep the pupil as the darkest area unless your convention places the lifted highlight above it. Blend with a paper stump or soft brush in small circular strokes, and compare each ring against your value strip.
Leave the highlight area untouched or lightly toned so it can be lifted later. Do not erase the outline; instead, shade over it and refine the edge with a sharp charcoal stick.
- Apply value step 3 across the whole iris.
- Darken the outer rim to step 4 and the pupil to step 5.
- Blend each ring separately, cleaning the stump between tones.
- Check the iris against the value strip under the same lighting.
Shade the lids and lift the highlight
Shade the upper lid with a soft gradient from step 2 near the crease to step 4 at the lash line. Shade the lower lid more lightly, using step 1 to step 3. Then press a kneaded eraser onto the highlight area and lift charcoal in small dabs, checking that the lifted area reads as the lightest value on the eye.
If the highlight becomes too bright, tap a little charcoal back with a clean finger and re-lift. Keep the lifted shape simple: a small oval or crescent is enough.
- Shade the upper lid from step 2 to step 4.
- Shade the lower lid from step 1 to step 3.
- Dab the kneaded eraser on the highlight area until it reaches paper white.
- Compare the highlight with the value strip and adjust with light charcoal if needed.
Refine edges and check the whole eye
Soften the lid edges with a clean stump, but keep the iris rim crisp. Check that the darkest dark is the pupil or the lash line, and that the lightest light is the lifted highlight. Step back from the drawing and compare the three zones: iris, lids, and highlight.
Record any changes to your value convention so the drawing can be repeated consistently.
- Soften lid edges and keep the iris rim sharp.
- Confirm the darkest and lightest values match your convention.
- Step back and compare the three tonal zones.
- Note any adjustments for a second attempt.
Worked example
A student draws an eye with iris diameter 40 mm, pupil 16 mm, and highlight 6 mm. They shade the iris at step 3, the outer rim at step 4, and the pupil at step 5. The upper lid runs from step 2 to step 4, and the lower lid from step 1 to step 3. The highlight is lifted to paper white. Check the tonal order and state one improvement.
Worked answer
The tonal order is consistent: pupil step 5 is darkest, outer rim step 4 is next, iris step 3 is mid, upper lid step 4 at the lash line matches the rim, lower lid step 1 to step 3 is light, and the highlight is paper white. One improvement is to soften the upper lid crease with a clean stump so the step 2 to step 4 transition reads smoothly.
Four practice exercises
Exercise 1
On a 60 mm wide eye opening, the iris is 30 mm across and the pupil is 12 mm. Using a five-step scale, state the step numbers for the pupil, outer rim, iris middle, upper lid lash line, and lower lid. Then describe where the highlight goes.
Show answer and check
Pupil step 5, outer rim step 4, iris middle step 3, upper lid lash line step 4, lower lid step 1 to step 3. The highlight is a small oval inside the iris, lifted to paper white.
Why: The scale runs from paper white step 1 to charcoal black step 5. The pupil is darkest, the rim next, the iris middle is mid, and the lids are lighter except at the lash line. The highlight is the lightest area and sits inside the iris.
Check: Compare each stated step to a labelled value strip and confirm the pupil is step 5 and the highlight is paper white.
Exercise 2
A drawing has iris step 2, outer rim step 3, pupil step 4, upper lid step 4, lower lid step 2, and highlight step 1. Identify two tonal problems and give a fix for each.
Show answer and check
Problem one: the iris middle is too light relative to the rim and pupil; fix by darkening the iris middle to step 3. Problem two: the lower lid is too light and competes with the highlight; fix by darkening the lower lid to step 3 so the highlight remains clearly the lightest value.
Why: The highlight must be the lightest value, and the iris should show a clear progression from pupil to rim to middle. The lower lid should not compete with the highlight.
Check: List the steps in order from darkest to lightest and confirm the highlight is step 1 and the pupil is the darkest.
Exercise 3
Describe how to lift a highlight on an iris that is already shaded to step 3, using a kneaded eraser. Include one check to confirm the lift is correct.
Show answer and check
Press the kneaded eraser onto the highlight area in small dabs, cleaning the eraser between dabs, until the area reaches paper white. Check by comparing the lifted area to the value strip: it should match step 1 and be the lightest value on the eye.
Why: Dabbing lifts charcoal without smearing, and cleaning the eraser prevents transferring dark charcoal back onto the highlight. The value strip confirms the lift reached the lightest step.
Check: Compare the lifted area to step 1 on the value strip under the same light and confirm no darker charcoal remains in the highlight shape.
Exercise 4
An eye drawing uses a four-step scale: step 1 paper white, step 2 light, step 3 mid, step 4 black. The pupil is step 4, the iris middle is step 3, the outer rim is step 3, the upper lid is step 2 to step 3, and the highlight is step 1. State whether the tonal order is consistent and give one improvement.
Show answer and check
The order is broadly consistent because the pupil is darkest, the iris and rim are mid, the lid ranges from lighter to mid, and the highlight is lightest. One improvement is to darken the outer rim to step 4 so the iris shows a clearer progression from pupil to rim to middle.
Why: A four-step scale still requires the pupil to be darkest and the highlight lightest. The rim and iris middle sharing step 3 is allowed, but darkening the rim improves separation.
Check: Confirm the pupil is step 4, the highlight is step 1, and every other tone lies between them on the labelled scale.
Common mistakes
- Shading the iris as one flat tone. Build at least three rings: outer rim darker, middle mid tone, pupil darkest.
- Lifting the highlight before the iris is fully shaded. Finish iris and lid tones first, then lift the highlight last.
- Using the eraser to redraw the outline. Refine edges with charcoal and a clean stump; reserve the eraser for lifting tone.
- Judging tones under changing light. Keep one light source and compare every tone to the same value strip.
Self-check rubric
- Value convention is defined and labelled before shading.
- Iris shows at least three distinct tonal steps with the pupil darkest.
- Upper and lower lids show separate gradients that match the convention.
- Highlight is lifted to the lightest value and reads as a simple shape.
- Edges are controlled: iris rim crisp, lid edges softened.
- Measurements and units are recorded consistently.
- Valid alternative conventions are accepted if internally consistent and documented.
Questions and answers
Can I use a different value scale?
Yes. Define your own scale and label it; the rubric checks consistency, not a single universal scale.
What if my highlight is too large?
Lift less area next time; a small oval or crescent is enough. Tap charcoal back and re-lift to reduce it.
Do I need compressed charcoal?
Vine charcoal works for soft tones; compressed charcoal helps reach the darkest step. Use what you have and measure its actual darkness.
How do I check the iris rings?
Compare each ring to your labelled value strip under the same light and record the step number beside the drawing.