Free original lessons
Cross-Contour Drawing of a Yam: Wrapping Lines Around Irregular Form
Learn to draw a yam using cross-contour lines that wrap around bumps and dips, showing three-dimensional volume without shading or outline-only drawing.
Free lesson
Four exercises
Worked answers
Object Drawing Lessons
Cross-contour drawing uses lines that travel across a form, like stripes painted on a rounded object. Instead of tracing only the outer edge, you draw lines that curve over bulges and dip into hollows, revealing volume through spacing and direction. This study focuses on an irregular tuber: a yam with uneven lumps, a tapered end, and subtle bends. You will practice reading form, spacing lines according to surface change, and redrawing wrapped lines inside a blank frame. No shading or botanical detail is needed; the goal is accurate cross-contour description. All line conventions are defined below so you can check your work and accept valid alternatives.
Practice materials: Printable downloads are not available for this lesson yet. Use the instructions and four exercises below.
Reference illustration
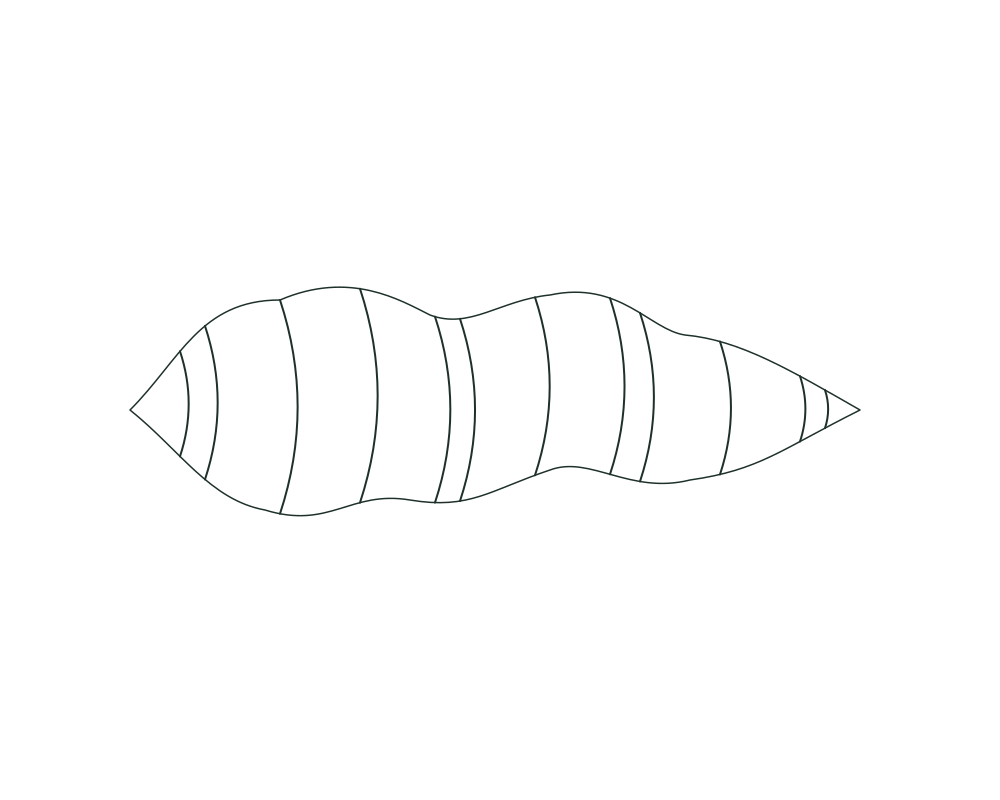
Use the stated measurements and conventions for each exercise.
Defining the cross-contour convention
A cross-contour line crosses the long axis of the yam at an angle, wrapping around the form as if the yam were banded. Lines are not outlines; they sit on the surface. Where the surface bulges toward you, lines spread farther apart; where it dips or turns away, lines bunch closer together. This spacing change is the main information you draw.
Use a simple convention: draw each wrap line as a smooth curve that changes direction at bumps and hollows. Lines may cross the outer silhouette only at the edges of the form; inside the form they stay on the surface. You may draw lines from left to right or right to left, but keep the wrap direction consistent within one study. Valid alternatives include slightly wavy lines, lines that split around a deep dip, and lines that compress into a narrow band at a constriction. Avoid straight parallel lines that ignore the tuber's shape.
- Place the yam on a plain surface and light it evenly so you can see its bumps without strong shadows.
- Draw a light outer boundary of the yam, marking the tapered tip and the widest bulge.
- Choose one wrap direction, such as top-left to bottom-right, and draw the first cross-contour line across the widest part.
- Add three to five more wrap lines, changing spacing: wider over bulges, tighter over dips and near the tapered end.
- Check that each line curves with the surface and that no line behaves like a flat stripe.
Reading bumps and dips through line spacing
A yam is irregular, so no two wrap lines look the same. Over a rounded bulge, the surface is broad and facing you, so wrap lines separate more. Over a hollow or a narrow neck, the surface turns away quickly, so lines crowd together. At a deep dip, a line may appear to hesitate or split into two short curves that rejoin after the dip.
Use spacing as your main tool. If a section looks flat, the lines are too evenly spaced. If a section looks confusing, the lines may be crossing without following the surface. Compare your drawing to the actual yam by rotating the yam slightly; the wrap lines should still make sense as bands around the form. Remember that x-height is baseline to midline for any handwritten labels, and letter styles vary; labels are optional and not part of the drawing score.
- Identify the widest bulge and the deepest dip on your yam.
- Draw one wrap line across the bulge with generous spacing on either side.
- Draw one wrap line through the dip with tighter spacing and a slight change in curvature.
- Add intermediate lines and adjust spacing gradually rather than abruptly.
- Step back and check whether the spacing pattern matches the surface changes you observed.
Redrawing wrapped lines in a blank frame
After a first pass, redraw the same yam inside a blank frame using only cross-contour lines. This second pass tests whether you understood the form or merely copied the first drawing. Keep the outer boundary light and let the wrap lines carry the volume. You may change line direction or spacing if your first pass missed a bump.
A useful check is to cover the outer boundary with your hand and look only at the wrap lines. If they still suggest a rounded, irregular tuber, the cross-contours are working. If they look like random curves, revise the spacing at the bulges and dips. Valid alternatives include using a slightly thicker line at a constriction or leaving a small gap where a line passes behind a bump; both are acceptable if they describe the surface.
- Draw a blank frame on a new sheet, leaving space around the yam boundary.
- Redraw the outer boundary lightly, then add wrap lines from the widest bulge outward.
- Adjust spacing at each bump and dip without shading or adding botanical detail.
- Compare the redrawn wrap lines to the actual yam and revise one or two lines if needed.
- Label nothing unless you choose to; if you label, use the defined x-height convention and accept varied letter styles.
Checking your cross-contour study
Use a simple rubric: wrap lines follow the surface, spacing changes with bulges and dips, the line direction is consistent, and the drawing reads as a three-dimensional tuber without shading. A valid alternative may use fewer lines if the spacing is clear, or more lines if they remain readable. The goal is not a single correct drawing but a checkable description of form.
Measure your actual equipment if you use any tools; do not assume printer tolerances or hardware standards. Any numerical values in this lesson, such as line counts or spacing examples, are hypothetical and chosen for practice. Keep units consistent if you measure your yam, for example using centimeters for length and width.
- Check that every wrap line curves with the surface rather than lying flat.
- Check that spacing is wider over bulges and tighter over dips.
- Check that the tapered end shows compressed spacing.
- Check that no shading or outline-only drawing replaces the cross-contours.
- Check that valid alternatives, such as split lines at a dip, still describe the form.
Worked example
A yam has a wide bulge on its left side, a narrow neck near the top, and a tapered tip at the bottom. Describe how to place four cross-contour lines from top to bottom, including spacing changes.
Worked answer
Draw the first line near the top with tight spacing because the neck turns away quickly. Draw the second line across the wide left bulge with wider spacing on the bulge and slightly tighter spacing where the surface curves back. Draw the third line below the bulge with moderate spacing, compressing it as the yam narrows. Draw the fourth line near the tapered tip with tight spacing. Keep each line curved and consistent in wrap direction; do not shade or outline heavily.
Four practice exercises
Exercise 1
A yam has a deep dip on its right side between two bulges. You draw three wrap lines across that area. Describe how the middle line should behave at the dip and how spacing should change.
Show answer and check
The middle line should curve into the dip, possibly splitting into two short curves that rejoin after the dip. Spacing should tighten at the dip and widen over the two bulges on either side.
Why: A deep dip turns the surface away quickly, so lines crowd and may split. Bulges face the viewer more broadly, so spacing widens.
Check: Cover the outer boundary and check whether the middle line still suggests a dip between two rounded bulges. If spacing is even, revise it.
Exercise 2
You draw a yam with five wrap lines, but the drawing looks flat. List two spacing changes you can make and one line-shape change to improve volume.
Show answer and check
Widen spacing over the largest bulge and tighten spacing near the tapered end. Change one straight line into a curve that follows a bump.
Why: Flatness often comes from even spacing and straight lines. Spacing changes and curved lines describe surface change.
Check: Compare the revised spacing to the actual yam at the bulge and tip. The bulge should show wider gaps and the tip tighter gaps.
Exercise 3
A student draws a heavy outline and only two cross-contour lines. Explain why this weakens the study and give one fix.
Show answer and check
The heavy outline makes the drawing read as a flat shape, and two lines may not describe enough bumps and dips. Fix by lightening the boundary and adding curved wrap lines with spacing that changes at each bump and dip.
Why: Cross-contour volume comes from wrap lines and spacing, not from a strong edge. More descriptive lines improve form reading.
Check: Look only at the wrap lines with the boundary covered. If they do not suggest the tuber's bumps, add or revise lines.
Exercise 4
You are redrawing a yam in a blank frame. The first pass had tight spacing over a wide bulge. What should you change in the second pass, and how will you check it?
Show answer and check
Widen the spacing over the wide bulge in the second pass. Check by comparing the gap widths at the bulge to the actual yam and by covering the boundary to see if the wrap lines still suggest a rounded bulge.
Why: A wide bulge faces the viewer more broadly, so wrap lines should separate more. The first pass compressed them incorrectly.
Check: Measure gap widths with a simple ruler if needed, using consistent units such as centimeters, and compare the bulge gaps to the dip gaps.
Common mistakes
- Drawing straight parallel lines across the yam as if it were a cylinder. Curve each line to follow the surface and change spacing at bumps and dips.
- Making the outer outline heavy and treating wrap lines as decoration. Keep the boundary light and let the cross-contour spacing carry the volume.
- Using even spacing everywhere so the yam looks flat. Widen spacing over bulges and tighten it over dips and near the tapered end.
- Adding shading or botanical detail instead of cross-contours. Remove shading and detail; use only wrap lines that describe surface form.
- Copying the first drawing without checking the actual yam. Rotate the yam and compare spacing at each bump before redrawing in the blank frame.
Self-check rubric
- Wrap lines follow the yam's surface rather than lying flat or parallel.
- Spacing is wider over bulges and tighter over dips and the tapered end.
- Line direction is consistent within the study.
- The drawing reads as a three-dimensional irregular tuber without shading.
- Valid alternatives, such as split lines at a deep dip, are accepted if they describe form.
- Outer boundary remains light and does not replace cross-contours.
Questions and answers
What is a cross-contour line in this study?
A line that wraps across the yam's surface at an angle, changing spacing and curvature to show bulges and dips. It is not an outline or a shading mark.
How many wrap lines should I draw?
There is no fixed number. Use enough lines to describe the main bumps and dips clearly. A hypothetical example is five to eight lines, but choose based on your yam and keep spacing readable.
Can I use wavy or split lines?
Yes. Valid alternatives include slightly wavy lines and lines that split around a deep dip, as long as they describe the surface and keep a consistent wrap direction.
Do I need to label the drawing?
No. Labels are optional. If you label, use the defined convention that x-height is baseline to midline, and accept varied letter styles.
How do I know my drawing is accurate?
Cover the outer boundary and look only at the wrap lines. If they still suggest an irregular rounded tuber with wider spacing at bulges and tighter spacing at dips, the cross-contours are working.