Free original lessons
Dragon Scale Armor Drawing: Overlapping Rows and Edge Shading
Learn to draw overlapping dragon-scale rows with consistent overlap and edge shading using a simple row-building method and clear checks.
Free lesson
Four exercises
Worked answers
Object Drawing Lessons
This lesson teaches a focused pattern study: overlapping dragon-scale rows with edge shading. You will build rows from a baseline, keep overlap consistent, and shade each scale's lower edge to suggest depth. The method uses a defined convention for scale shape and overlap so you can check your work and adapt it to different styles. No full dragon anatomy is required; the goal is a clean, repeatable armor pattern.
Practice materials: Printable downloads are not available for this lesson yet. Use the instructions and four exercises below.
Reference illustration
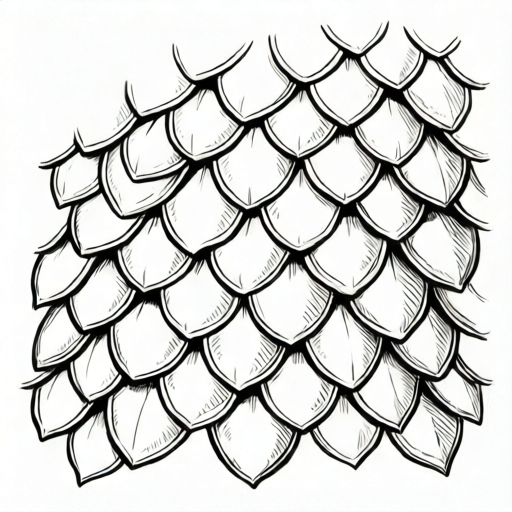
Use the stated measurements and conventions for each exercise.
Set the row convention
Choose a scale width and height in your own units, such as 2 cm wide and 1.5 cm tall. These numbers are hypothetical examples; measure your paper and tools to pick values that fit. Draw a horizontal baseline. Each scale is a rounded shield shape whose top sits on the row line and whose bottom hangs below it. The bottom edge is the visible edge that will receive shading.
Overlap is the key. Each new scale in a row should cover part of the previous scale's lower edge. A simple convention is to place scales so that each one overlaps its neighbor by about one third of the scale width. Mark this overlap lightly at first so you can adjust before shading.
- Draw a light horizontal baseline for row one.
- Mark scale centers along the baseline at equal spacing.
- Draw each scale as a rounded shield with its top on the baseline.
- Check that each scale overlaps the previous one by the same amount.
- Repeat the baseline for row two, offset sideways by half a scale width.
- Keep row two's tops slightly above row one's bottoms so rows overlap.
Build rows with consistent overlap
Work left to right. For row one, draw the first scale fully. For each next scale, start at the marked center and draw the shield so its left side tucks behind the previous scale. Do not erase the previous scale's lower edge; the overlap should hide part of it naturally. When the row is complete, the visible lower edges should form a repeating rhythm.
For row two, offset the centers by half a scale width. This staggered arrangement is what makes armor read as layered. Keep the same scale size and overlap. If a scale looks too wide or too narrow, note the difference and correct the next one rather than redrawing the whole row.
- Draw row one left to right with equal spacing.
- Draw row two offset by half a scale width.
- Compare overlap gaps between rows; adjust the next scale if needed.
- Add row three using the same offset pattern as row one.
- Step back and check that rows read as separate layers.
Add edge shading
Edge shading means darkening the lower visible edge of each scale and leaving the upper area lighter. Use a soft pencil or fine pen. Shade a narrow band along the bottom curve, then blend or hatch lightly upward. Keep the darkest part at the very edge and let it fade. This creates a simple depth cue without drawing full shadows.
Apply shading after the row outlines are stable. Shade only the visible lower edges, not the hidden parts under the next scale. If two scales overlap, the upper scale's lower edge should be shaded, while the lower scale's covered edge stays unshaded. Check that shading follows the same direction on every scale.
- Identify the visible lower edge of each scale.
- Shade a narrow band along that edge, darkest at the bottom.
- Fade the shading upward with light hatching.
- Skip shading on edges hidden by an overlapping scale.
- Review the row for consistent shading direction.
Check and refine the pattern
Use simple checks. Count scales per row and confirm the count is consistent or intentionally varied. Measure two overlap gaps with a ruler; they should be close. Look at the shading band width; it should be similar across scales. If a row drifts upward or downward, redraw the baseline lightly and shift the next row to match.
Valid alternatives are allowed. Scales may be rounder, pointier, or wider, and shading may be hatching or smooth blending. The rubric rewards consistent overlap, clear edge shading, and readable rows, not one exact shape.
- Count scales in each row.
- Measure two overlap gaps and compare.
- Check shading band width across five scales.
- Confirm rows are staggered and readable.
- Adjust only the next scale or row, not the whole page.
Worked example
Draw two rows of five scales each. Use, for example, a scale 2 cm wide and 1.5 cm tall (chosen example values, not a universal standard), overlap each scale within a row by 0.7 cm, offset row two sideways by 1 cm, and place row two so its tops sit 0.7 cm above row one's bottoms. Shade the visible lower edges.
Worked answer
Row one has five scales with centers 2 cm apart. Each scale overlaps the previous by 0.7 cm, leaving 1.3 cm of visible width per scale. Row two is offset 1 cm to the right and placed so its tops sit 0.7 cm above row one's bottoms, meaning row two's tops are 0.8 cm below row one's tops (1.5 cm scale height minus 0.7 cm). Row two's tops sit 0.7 cm above row one's bottoms, so row two covers the bottom 0.7 cm of row one vertically; this vertical overlap is independent of the 0.7 cm horizontal overlap used within rows. Shade a 0.3 cm band along each visible lower edge, darkest at the bottom. Check: five scales per row, two measured overlap gaps near 0.7 cm, row two offset 1 cm sideways with tops 0.7 cm above row one's bottoms, and shading bands near 0.3 cm.
Four practice exercises
Exercise 1
Draw one row of four scales. Use, for example, scales 3 cm wide and 2 cm tall (chosen example values) with 1 cm overlap. Shade the visible lower edges.
Show answer and check
Four scales with centers 3 cm apart; each overlaps the previous by 1 cm, leaving 2 cm visible width. Shade a narrow band along each visible lower edge.
Why: Centers spaced by scale width keep size consistent; 1 cm overlap is one third of 3 cm, a simple repeatable convention.
Check: Count four scales; measure two overlap gaps near 1 cm; confirm shading only on visible lower edges.
Exercise 2
Draw two rows of three scales. Use, for example, scales 2 cm wide and 1.5 cm tall (chosen example values), overlap 0.5 cm, offset row two by 1 cm, and place row two so its tops sit 0.5 cm above row one's bottoms. Shade visible edges.
Show answer and check
Row one: three scales, centers 2 cm apart, 0.5 cm overlap. Row two: same size, offset 1 cm right, placed so its tops sit 0.5 cm above row one's bottoms (that is, 1 cm below row one's tops). Shade visible lower edges only.
Why: Half-width offset staggers rows; 0.5 cm overlap is one quarter of 2 cm and easy to check.
Check: Count three scales per row; measure overlap gaps near 0.5 cm; confirm row two is offset and shading is on visible edges.
Exercise 3
Draw three rows of five scales. Use, for example, scales 1.5 cm wide and 1 cm tall (chosen example values), overlap 0.5 cm, offset row two by 0.75 cm, and align row three with row one. Shade visible edges.
Show answer and check
Three rows of five scales; centers 1.5 cm apart; 0.5 cm overlap leaves 1 cm visible width. Row two offset 0.75 cm; row three aligned with row one. Shade visible lower edges.
Why: Alternating offset creates a woven look; 0.5 cm overlap is one third of 1.5 cm.
Check: Count five scales per row; measure two overlap gaps near 0.5 cm; check alternating offsets and shading consistency.
Exercise 4
Draw two rows of four scales. Use, for example, scales 2.5 cm wide and 1.8 cm tall (chosen example values), overlap 0.8 cm, and offset row two by 1.25 cm. Use hatching for edge shading.
Show answer and check
Two rows of four scales; centers 2.5 cm apart; 0.8 cm overlap leaves 1.7 cm visible width. Row two offset 1.25 cm. Hatch a narrow band along visible lower edges, darkest at the bottom.
Why: Offset by half width staggers rows; 0.8 cm overlap is close to one third of 2.5 cm and checkable with a ruler.
Check: Count four scales per row; measure overlap gaps near 0.8 cm; confirm hatching is only on visible lower edges and fades upward.
Common mistakes
- Drawing scales without overlap so they look like separate tiles. Place each new scale so it covers about one third of the previous scale's lower edge.
- Shading the hidden part of a scale under the next one. Shade only the visible lower edge; leave covered edges unshaded.
- Changing scale size midway through a row. Mark centers first and keep the same width and height for the row.
- Making rows perfectly aligned instead of staggered. Offset each new row by half a scale width to create layering.
Self-check rubric
- Rows are clearly separated and staggered.
- Overlap is consistent within each row.
- Scale size is consistent within each row.
- Edge shading is present on visible lower edges only.
- Shading direction and band width are consistent.
- Pattern reads as layered armor, not separate tiles.
- Valid style variations are accepted if checks pass.
Questions and answers
Do I need to draw a full dragon?
No. This is a pattern study of overlapping rows and edge shading only.
What scale size should I use?
Pick any size that fits your paper. The numbers in this lesson are hypothetical examples; measure your own space.
Can I use hatching instead of smooth shading?
Yes. Any shading method is valid if the darkest part is at the visible lower edge and it fades upward.
How much overlap is correct?
There is no universal amount. Choose one overlap, such as one third of the scale width, and keep it consistent.