Free original lessons
Bazaar Drawing: Stall Rows, Awnings, and Crowd Depth
Plan a lively bazaar scene using repeated stall structures, varied awning shapes, and clear foreground-to-background crowd layering.
Free lesson
Four exercises
Worked answers
Object Drawing Lessons
A bazaar drawing works when repetition and depth agree. Stall rows give rhythm, awnings give shape variety, and crowd layers tell the eye where to look first. This lesson treats the scene as three depth zones: foreground figures, midground stalls, and background buildings. You will place a perspective guide, repeat stall structures with controlled variation, design awning silhouettes, and layer figures so the crowd reads as depth rather than clutter. All measurements are simple and checkable; any numbers are hypothetical examples you can adjust to your paper.
Practice materials: Printable downloads are not available for this lesson yet. Use the instructions and four exercises below.
Reference illustration
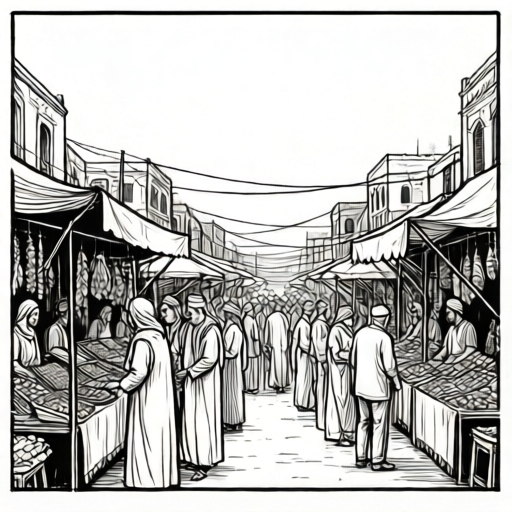
Use the stated measurements and conventions for each exercise.
Set the three depth zones
Divide your page into three horizontal bands before drawing any object. A hypothetical A4 page could use a foreground band from the bottom edge to about 40 percent of the page height, a midground band from 40 to 70 percent, and a background band from 70 percent to the top. These values are examples, not standards; measure your own paper and label the bands lightly.
The foreground holds the largest figures, cut off by the page edge to suggest the viewer stands inside the crowd. The midground holds stall rows and awnings at a readable size. The background holds simplified buildings and distant figures. Keeping the bands consistent prevents stalls from floating and figures from shrinking unpredictably.
- Measure your paper height and mark three band boundaries with a light pencil line.
- Label the bands foreground, midground, background in small writing at the margin.
- Decide the eye level: place it inside the midground band so stall counters sit near it.
- Check that no band is narrower than one fifth of the page height.
Build a stall-row perspective guide
A stall row is a line of repeated structures receding toward a vanishing point. Draw one vanishing point on the eye-level line, then draw two guide lines from the bottom corners of the midground band toward it. These lines are the stall-row guides. Place stall fronts along the guides so each successive stall is slightly smaller and slightly higher on the page.
Repetition needs variation to stay interesting. Keep the stall counter height similar, but vary the goods, the awning shape, and the number of visible supports. A simple arithmetic check keeps the recession believable: if the first stall front is 6 cm wide, a hypothetical second stall could be 5 cm, a third 4 cm, and a fourth 3 cm. These are example values; measure your own spacing and keep the decrease consistent.
- Mark one vanishing point on the eye-level line inside the midground band.
- Draw two light guide lines from the lower midground corners to the vanishing point.
- Place four stall fronts along the guides, decreasing width by a consistent amount.
- Check each stall front sits on its guide line and its counter aligns with the eye level.
Design awning shapes as silhouettes
Awnings carry much of the bazaar's character. Treat each awning as a silhouette first: a scalloped edge, a flat slope, a peaked triangle, or a striped rectangle. Draw the silhouette in one continuous outline, then add stripes or seams inside it. Vary two awnings at most in shape and keep the rest related so the row reads as a family of forms.
Use a simple convention for stripes: draw them as evenly spaced lines following the awning slope, and let the spacing narrow slightly as the awning recedes. If a hypothetical awning is 8 cm wide with stripes every 1 cm, a receding awning 4 cm wide could use stripes every 0.5 cm. These numbers are examples; measure your own awning and keep the ratio consistent.
- Draw each awning silhouette as one closed outline before adding interior detail.
- Choose two shape variations and repeat the others to build rhythm.
- Add stripes or seams following the awning slope, narrowing spacing with recession.
- Check that every awning overlaps its stall front and casts a short shadow line beneath.
Layer the crowd from front to back
Crowd depth comes from overlap, size change, and detail reduction. Foreground figures are largest, drawn with clear head, shoulders, and hands, and often cut by the page edge. Midground figures are smaller and may be partly hidden by stalls. Background figures are smallest and drawn as simple upright shapes without facial detail.
Use a consistent figure-height check. If a hypothetical foreground figure is 12 cm tall, a midground figure at half the distance could be 8 cm, and a background figure 4 cm. These are example values; measure your own figures and keep the decrease proportional to the depth band. Overlap figures so each foreground figure hides part of a midground figure, and each midground figure hides part of a background figure.
- Draw three foreground figures first, cut by the bottom edge, with clear silhouettes.
- Add five to seven midground figures between stalls, partly hidden by counters and awnings.
- Add background figures as small upright shapes near the buildings.
- Check that every depth band contains figures and that overlaps increase toward the foreground.
Worked example
On a hypothetical A4 page, plan a bazaar scene with three depth bands, four stall fronts on a perspective guide, three awning shape variations, and crowd layers. Describe the placement and give a simple arithmetic check.
Worked answer
Mark bands at 40 percent and 70 percent of page height. Place the eye level at 50 percent and one vanishing point on it. Draw two guide lines from the lower midground corners to the vanishing point. Place four stall fronts along the guides with widths 8 cm, 6 cm, 4 cm, and 2 cm, each counter aligned to eye level. Draw awnings as silhouettes: two scalloped, one peaked, one flat, with stripes narrowing from 1.5 cm to 0.75 cm spacing. Draw three foreground figures 14 cm tall cut by the bottom edge, six midground figures 9 cm tall partly hidden by stalls, and five background figures 4.5 cm tall near simplified buildings. Check: 14 divided by 4.5 is about 3.1, so background figures are roughly one third the foreground height; stall widths decrease by 2 cm each step; every stall base sits on a guide line.
Four practice exercises
Exercise 1
A hypothetical page is 20 cm tall. Mark foreground and midground boundaries at 40 percent and 70 percent of page height. Calculate the band heights in centimeters and state which band holds the eye level if it is placed at 55 percent.
Show answer and check
Foreground band: 0 to 8 cm (8 cm tall). Midground band: 8 to 14 cm (6 cm tall). Background band: 14 to 20 cm (6 cm tall). The eye level at 55 percent is 11 cm from the bottom, inside the midground band.
Why: Multiply page height by each percentage: 20 times 0.40 equals 8 cm, and 20 times 0.70 equals 14 cm. Subtract boundaries to get band heights. 20 times 0.55 equals 11 cm, which lies between 8 cm and 14 cm.
Check: Add the three band heights: 8 plus 6 plus 6 equals 20 cm, matching page height. Confirm 11 cm is greater than 8 cm and less than 14 cm.
Exercise 2
Four stall fronts along a guide have hypothetical widths 7 cm, 5.5 cm, 4 cm, and 2.5 cm. State the consistent decrease and check whether the recession is arithmetic. Then state the width of a fifth stall if the pattern continues.
Show answer and check
The decrease is 1.5 cm per step. The recession is arithmetic. A fifth stall would be 1 cm wide.
Why: Subtract consecutive widths: 7 minus 5.5 equals 1.5, 5.5 minus 4 equals 1.5, and 4 minus 2.5 equals 1.5. A constant difference means arithmetic recession. Subtract 1.5 from 2.5 to get 1 cm.
Check: Add 1.5 cm four times to the first width: 7 minus four times 1.5 equals 7 minus 6 equals 1 cm, matching the fifth width.
Exercise 3
A hypothetical foreground figure is 15 cm tall. Midground figures are two thirds that height and background figures are one third. Calculate both heights and state a simple overlap rule for the three layers.
Show answer and check
Midground figures are 10 cm tall and background figures are 5 cm tall. Overlap rule: each foreground figure hides part of a midground figure, and each midground figure hides part of a background figure.
Why: 15 times two thirds equals 10 cm. 15 times one third equals 5 cm. The overlap rule follows the depth order: nearer layers hide farther layers.
Check: Divide 15 by 5 to confirm background figures are one third: 15 divided by 5 equals 3. Confirm 10 cm is greater than 5 cm and less than 15 cm.
Exercise 4
An 8 cm wide awning uses stripes every 1 cm. A receding awning is 4 cm wide. Calculate the stripe spacing that keeps the same ratio, and state one awning shape variation you could use without breaking the family of forms.
Show answer and check
The receding awning uses stripes every 0.5 cm. A valid variation is changing a scalloped edge to a peaked edge while keeping the same slope and stripe direction.
Why: The ratio is 1 cm spacing to 8 cm width, or one eighth. For a 4 cm awning, one eighth of 4 cm is 0.5 cm. Changing the silhouette edge while keeping slope and stripe direction preserves the family of forms.
Check: Multiply 0.5 cm by 8 to get 4 cm, confirming the same one-eighth ratio. Check that the varied awning still overlaps its stall front and follows the same slope.
Common mistakes
- Stall fronts drift off the perspective guides, making the row look wobbly. Redraw each stall front so its base sits on a guide line and its counter aligns with the eye level.
- All awnings use the same shape, so the row looks like a copied pattern. Vary two awning silhouettes and keep the rest related; check that each silhouette is a single closed outline.
- Foreground figures are the same size as background figures, flattening the crowd. Measure figure heights and keep a consistent decrease from foreground to background band.
- Figures and stalls overlap randomly, creating visual clutter. Plan overlaps so foreground figures hide midground figures and midground figures hide background figures.
Self-check rubric
- Three depth bands are marked and labeled, with no band narrower than one fifth of page height.
- A vanishing point sits on the eye-level line and two stall-row guides reach it.
- Four to six stall fronts sit on the guides with consistently decreasing widths.
- Awnings use at least two shape variations and stripes follow the awning slope.
- Foreground, midground, and background figures are present with a consistent height decrease.
- Overlaps increase toward the foreground and each depth band contains figures.
- Valid alternatives are accepted: any eye level inside the midground band, any consistent width decrease, and any two awning shape variations that form a related family.
Questions and answers
How many stalls should the row contain?
Four to six stall fronts are enough to show repetition without crowding the midground band. Measure your band width and keep each stall front at least one fifth of that width.
Can I use a different eye level?
Yes. Place the eye level anywhere inside the midground band, but keep the vanishing point on that line and align stall counters to it.
How do I check crowd depth without measuring every figure?
Compare the tallest foreground figure with the tallest background figure. The background figure should be roughly one third to one half the foreground height, depending on your chosen example values.
What if my awning stripes look uneven?
Draw stripes following the awning slope and keep spacing proportional to awning width. A receding awning half the width should use stripes at half the spacing.