Free original lessons
Black and White Bird Drawing: Feather Groups, Value Contrast, and Tonal Shading
Learn to draw a black-and-white bird using feather grouping, value contrast zones, and tonal shading steps with a clear convention and rubric.
Free lesson
Four exercises
Worked answers
Object Drawing Lessons
This lesson teaches a repeatable method for rendering a bird in black and white. You will group feathers into simple shapes, assign light and dark value zones, and build tonal shading with pencil pressure and stroke direction. The convention is explicit: value is measured from 0 (paper white) to 5 (densest black), and x-height refers to the distance from baseline to midline of lowercase letters when labeling zones. Letter styles vary, so labels may be printed or handwritten as long as they are legible. All numerical values are hypothetical examples for practice, not manufacturing standards. Measure your own paper and pencil to confirm behavior before relying on any number.
Practice materials: Printable downloads are not available for this lesson yet. Use the instructions and four exercises below.
Reference illustration
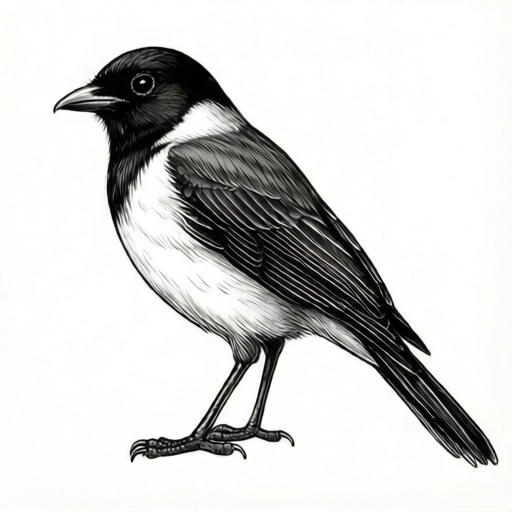
Use the stated measurements and conventions for each exercise.
Feather grouping: from complex plumage to simple shapes
Start by reducing the bird to three feather groups: wing coverts, flight feathers, and body contour feathers. Each group is drawn as a single outlined shape first, not as individual feathers. This prevents visual noise and keeps value contrast readable.
Use a labeled feather map: draw the bird outline, then place three labeled boxes on the wing, tail, and breast. Label each box with a group name and a target value from 0 to 5. Keep labels at least one x-height tall so they remain legible after shading.
- Draw the bird silhouette lightly with a 2H pencil; keep line weight uniform.
- Outline three feather groups as closed shapes: wing coverts, flight feathers, body contour.
- Label each group with a target value (for example, wing coverts 2, flight feathers 4, breast 1).
- Check that no group outline crosses another without a clear boundary; adjust before shading.
Value contrast zones: planning light and dark
Assign each feather group a value zone before shading. A simple plan uses three zones: light (0–1), mid (2–3), and dark (4–5). Contrast is the difference between adjacent zones; aim for at least two value steps between neighboring groups so the bird reads clearly in black and white.
Test contrast by squinting at the drawing. If two adjacent groups merge, increase the value difference by one step. Record your zone plan in a small table beside the drawing so you can check consistency.
- Write a three-row table: group name, target value, adjacent group.
- For each pair of adjacent groups, subtract the values; if the difference is less than 2, adjust one target.
- Mark the darkest zone with a small cross and the lightest with a small circle.
- Verify the plan against the feather map labels before adding shading.
Tonal shading: building value with pencil pressure and stroke direction
Build tone in layers. First layer: light even strokes in one direction across the whole group. Second layer: cross-hatch at about 45 degrees to darken. Third layer: increase pressure only in the darkest zone. Keep stroke direction consistent within a group to suggest feather flow.
Measure your pencil's actual value range on scrap paper: make five patches with increasing pressure and label them 0–5. Use these patches as your reference. If your pencil cannot reach value 5, use a darker pencil or more layers; do not invent a standard.
- Create a five-patch value scale on scrap paper using your actual pencil; label 0–5.
- Shade the light zone first with one layer of light strokes.
- Add a second cross-hatch layer to mid zones; check against the value scale.
- Add pressure or a third layer only to dark zones; stop when the patch matches your target value.
- Erase guide labels carefully after shading, or keep them outside the drawing box.
Checking the finished study
Compare the finished drawing to your zone plan. Each group should match its target value within one step. Adjacent groups should differ by at least two steps. Feather group outlines should remain visible as boundaries, not as heavy outlines.
Use the rubric to score value accuracy, contrast, feather grouping clarity, and label legibility. Valid alternatives include different stroke directions or slightly different group shapes, provided the value plan and contrast checks pass.
- Place the value scale beside the drawing and compare each group.
- Squint to confirm adjacent groups remain distinct.
- Check that labels are at least one x-height tall and readable.
- Record any group that misses its target by more than one step and adjust.
Worked example
A bird study has three groups: breast target value 1, wing coverts target value 3, flight feathers target value 5. Check adjacent contrast and state whether the plan passes.
Worked answer
Breast to wing coverts difference is 2; wing coverts to flight feathers difference is 2. Both meet the minimum two-step contrast, so the plan passes.
Four practice exercises
Exercise 1
A bird has body contour value 2 and wing coverts value 4. What is the contrast difference, and does it pass the two-step minimum?
Show answer and check
Difference is 2; it passes.
Why: Subtract the smaller value from the larger: 4 minus 2 equals 2. The minimum is 2, so the pair passes.
Check: Recompute 4 minus 2 and confirm the result is at least 2.
Exercise 2
Three groups have values 1, 3, and 4 in order. Which adjacent pair fails the two-step contrast check?
Show answer and check
The pair 3 and 4 fails.
Why: Differences are 3 minus 1 equals 2 (pass) and 4 minus 3 equals 1 (fail).
Check: List both differences and compare each to 2.
Exercise 3
You plan values 0, 2, 4 for three groups. After shading, the middle group measures 3. Which group misses its target, and by how many steps?
Show answer and check
The middle group misses by 1 step.
Why: Target was 2; measured 3; difference is 1 step.
Check: Subtract target from measured: 3 minus 2 equals 1.
Exercise 4
A label is 0.4 cm tall and the x-height of your lettering is 0.5 cm. Does the label meet the one-x-height rule?
Show answer and check
No; it is 0.1 cm short.
Why: Compare 0.4 cm to 0.5 cm; 0.4 is less than 0.5, so it fails.
Check: Measure the label and the x-height with the same ruler and subtract: 0.5 minus 0.4 equals 0.1 cm.
Common mistakes
- Drawing individual feathers before grouping. Outline three group shapes first; add feather detail only after value zones are assigned.
- Using adjacent values that are too close. Ensure neighboring groups differ by at least two value steps; adjust the plan before shading.
- Applying heavy pressure in the first layer. Start with light even strokes, then build with cross-hatch layers and pressure only in dark zones.
- Making labels too small to read after shading. Keep labels at least one x-height tall and place them outside the shaded area when possible.
Self-check rubric
- Value accuracy: each group matches its target value within one step.
- Contrast: adjacent groups differ by at least two value steps.
- Feather grouping: three groups are clearly outlined and labeled.
- Label legibility: labels are at least one x-height tall and readable.
- Valid alternatives: different stroke directions or group shapes are accepted if checks pass.
Questions and answers
What does x-height mean here?
X-height is the distance from the baseline to the midline of lowercase letters. Use it to size labels so they stay legible; letter styles vary, so any legible style is acceptable.
Do I need a specific pencil grade?
No. Measure your own pencil by making a five-patch value scale on scrap paper. Use the patches as your reference; numerical values are hypothetical examples.
Can I change the feather group shapes?
Yes. Valid alternatives include different group outlines as long as the value plan, contrast check, and rubric are satisfied.
How do I know the contrast is enough?
Squint at the drawing. If adjacent groups merge, increase the value difference by one step and recheck.