Free original lessons
Realistic Rooster Drawing: Body and Feather Construction
Build a realistic rooster study using body-outline guides, feather-group labels and shading steps, with a practice area for comb and tail feathers.
Free lesson
Four exercises
Worked answers
Object Drawing Lessons
This lesson teaches a realistic rooster drawing through body construction and feather grouping. You will establish a stable body outline, place the comb, beak, eye and tail, then layer feather groups with simple shading. The convention is explicit: a personal small-unit is measured from baseline to midline of lowercase letters, and letter styles vary, so use the convention as a guide rather than a single universal answer. All measurements are hypothetical examples; measure your own paper and tools before drawing.
Practice materials: Printable downloads are not available for this lesson yet. Use the instructions and four exercises below.
Reference illustration
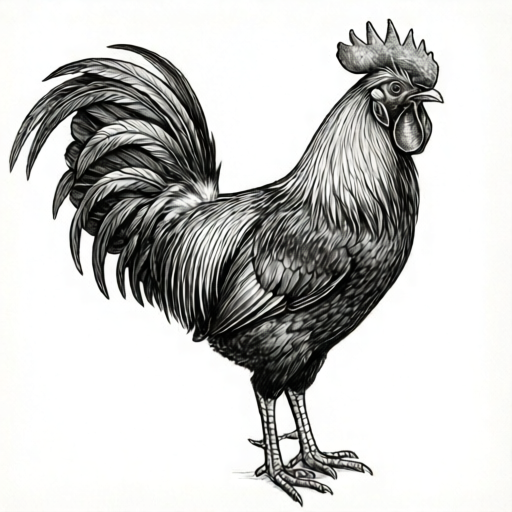
Use the stated measurements and conventions for each exercise.
Establish the body outline
Begin with a light oval for the body, tilted so the breast sits lower than the tail root. Add a smaller circle for the head above and slightly forward of the body. Connect them with a neck curve that widens toward the shoulders.
Use a baseline and midline convention to judge proportions: mark a baseline for the feet and a midline through the body oval. The head should sit above the front of the body oval, with its bottom edge overlapping or touching the front top edge of the body oval, connected by a neck curve. Measure the head diameter as the small unit for this placement, and keep that unit consistent while adjusting the guides.
- Draw a tilted oval about 10 cm long and 7 cm high as a hypothetical body guide.
- Place a head circle about 3 cm across above the front of the oval.
- Connect head and body with two neck curves, wider at the base.
- Mark a baseline for the feet and a midline through the body.
Place comb, beak, eye and tail
The comb sits on top of the head circle, rising in three or four rounded points. The beak projects forward from the lower front of the head, roughly triangular. The eye sits above the beak line and slightly back from the beak base.
The tail root attaches at the back of the body oval. Draw three or four long curved guide lines fanning upward and back. These are guides only; feather detail comes later.
- Draw the comb as a series of rounded bumps along the head top.
- Add a triangular beak at the front of the head.
- Place the eye above the beak line.
- Draw tail guide lines fanning from the back of the body.
Layer feather groups
Feathers are drawn in groups, not individually. Start with the neck hackles as short overlapping curves flowing down from the head. Then add the breast feathers as rounded scallops, the wing as a folded shape with three layered rows, and the tail as long curved feathers with a central shaft line.
Shade each group with light strokes in the direction of feather growth. Keep the light source consistent, for example from the upper left, so shadows fall on the lower right of each group.
- Draw neck hackles as short overlapping curves.
- Add breast feathers as rounded scallops.
- Build the wing with three layered rows of feather shapes.
- Draw tail feathers with shaft lines and shade in the growth direction.
Refine and check proportions
Compare the head size to the body: a realistic rooster head is small relative to the body. Check that the legs attach under the body midline and that the feet sit on the baseline. Adjust any guide that looks too large or misplaced before adding final shading.
Use a personal small-unit convention to check small details such as the eye and comb points: measure from the baseline to the midline of a lowercase letter in your own handwriting to set a consistent small unit. Letter styles vary, so choose a unit that suits your drawing and keep it consistent.
- Compare head width to body width; the head should be clearly smaller.
- Check leg attachment under the body midline.
- Confirm feet rest on the baseline.
- Adjust guides before final shading.
Worked example
A student draws a body oval 12 cm long and 8 cm high, a head circle 4 cm across, and a tail root at the lower back. Identify two proportion problems and state a fix for each.
Worked answer
The head is at the upper limit: 4 cm is one third of the 12 cm body, so keep it at or below one third, or reduce it to about 3 cm for a clearly smaller head. The tail root is too low; move it to the upper back of the body oval.
Why: A realistic rooster head is small relative to the body, so a head near one third of body length looks heavy. The tail attaches at the upper back, so a lower placement breaks the body construction.
Check: Measure head width against body length with a ruler and confirm the tail root sits above the body midline.
Four practice exercises
Exercise 1
Draw a body oval 10 cm long and 6 cm high. Place a head circle 3 cm across above the front. Mark a baseline 4 cm below the body and a midline through the body. State the head-to-body length ratio.
Show answer and check
Head-to-body length ratio is 3:10, or 0.3.
Why: Divide head width by body length: 3 divided by 10 equals 0.3. A ratio near 0.3 is acceptable for a study.
Check: Measure both lengths with a ruler and divide; confirm the result is between 0.25 and 0.33.
Exercise 2
A tail root is placed 2 cm below the body midline on a body oval 8 cm high. The upper back is 3 cm above the midline. Describe the correction and the new vertical distance from midline to tail root.
Show answer and check
Move the tail root to the upper back, 3 cm above the midline.
Why: The tail attaches at the upper back, so a root below the midline is misplaced. The corrected distance is 3 cm above the midline.
Check: Measure from the midline to the new tail root and confirm it is above the midline by the stated distance.
Exercise 3
You draw four feather groups: neck hackles, breast, wing and tail. You shade with strokes from upper left to lower right. State one check that confirms shading is consistent and one check that confirms feather groups are distinct.
Show answer and check
Consistency check: all shaded groups show darker strokes on the lower right. Group check: each group has its own outline and growth direction.
Why: A single light source from upper left produces shadows on the lower right. Distinct groups have separate outlines and stroke directions.
Check: Squint at the drawing to see the shadow side, then trace each group outline to confirm separation.
Exercise 4
Using a personal small-unit of 0.5 cm from your own handwriting, place an eye 1 unit above the beak line and draw a comb with four stacked points, each 1 unit high. State the eye height above the beak line and the total comb height.
Show answer and check
Eye is 0.5 cm above the beak line; total comb height is 2 cm.
Why: One unit is 0.5 cm, so the eye sits 0.5 cm above the beak line. Four stacked points at 1 unit each total 4 units, which is 2 cm.
Check: Measure the eye distance and comb height with a ruler and confirm they match 0.5 cm and 2 cm.
Common mistakes
- Drawing feathers as isolated single shapes instead of groups. Block in feather groups first, then add individual feather edges within each group.
- Making the head too large relative to the body. Measure the head against the body oval and reduce it if it exceeds about one third of the body length; keep the head at or below one third for a realistic look.
- Shading in conflicting directions. Choose one light source and stroke in the direction of feather growth consistently.
- Attaching the tail too low on the body. Place the tail root at the upper back of the body oval, not at the base.
Self-check rubric
- Body outline is stable and tilted with breast lower than tail root.
- Head is clearly smaller than the body and sits above the front of the body.
- Comb, beak and eye are placed on the head with consistent small units.
- Tail root attaches at the upper back and tail guides fan upward and back.
- Feathers are drawn in at least four groups with shading following growth direction.
- Legs attach under the body midline and feet rest on the baseline.
- Valid alternatives are accepted if proportions and attachment points remain consistent.
Questions and answers
How many feather groups should I draw?
Four main groups are enough for a study: neck hackles, breast, wing and tail. Add detail only after the groups are placed.
What does x-height mean here?
A personal small-unit is the distance from the baseline to the midline of lowercase letters in your own handwriting. Use it as a small consistent unit for details like the eye; letter styles vary, so the unit is personal.
Can I use different proportions?
Yes. The rubric allows valid alternatives as long as the head is smaller than the body, the legs sit under the midline and the tail attaches at the upper back.
How do I check my shading?
Squint at the drawing: the lightest area should face your chosen light source and the darkest should be opposite. Strokes should follow feather growth.