Free original lessons
Colorful Bird Drawing: Block Plumage Zones and Blend Edges
Plan plumage color zones on a generic bird, then blend adjacent hues cleanly. Includes a worked example, four practice tasks, and a free planned worksheet.
Free lesson
Four exercises
Worked answers
Object Drawing Lessons
This lesson teaches a repeatable method for drawing a colorful bird by first blocking plumage into distinct color zones, then blending only where zones meet. You will define a simple convention for zone boundaries, choose a limited palette, and use a checkable blending strip to judge transitions. The approach works for any stylized bird and keeps color decisions separate from shape decisions, which reduces muddiness and overworking. All measurements are simple and unit-consistent; any numerical values are hypothetical examples you can replace after measuring your own paper and tools.
Practice materials: Printable downloads are not available for this lesson yet. Use the instructions and four exercises below.
Reference illustration
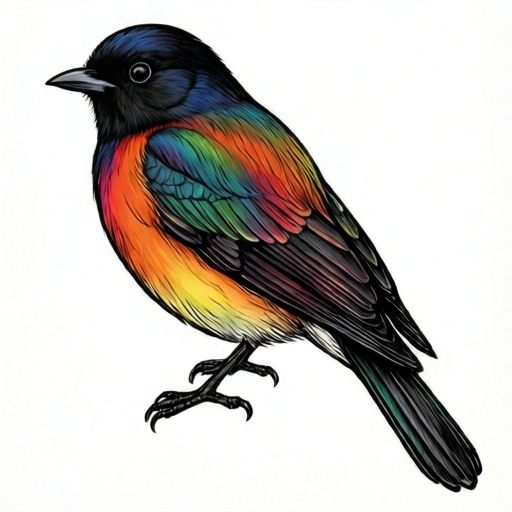
Use the stated measurements and conventions for each exercise.
Define zones before adding color
Draw a generic bird outline and divide the body into four labeled plumage zones: head, breast, wing, and tail. Use a light pencil line for each boundary so it can be adjusted. The goal is not species accuracy but clear color blocking.
Assign one base hue per zone from a limited palette of four to six colors. Write the hue name beside each zone label. Adjacent zones may share a hue or use neighboring hues; distant zones can contrast more strongly.
- Draw the bird outline on plain paper; mark head, breast, wing, and tail with light boundary lines.
- Label each zone and write its planned base hue beside the label.
- Check that no zone is left unlabeled and that the palette has no more than six hues.
- Lightly outline each zone boundary again so it remains visible under color.
Block each zone with flat color
Fill each zone with its base hue using even, overlapping strokes. Keep color inside the boundary line; slight overshoot is acceptable if corrected before blending. Work one zone at a time and let each zone dry or settle before moving to an adjacent zone.
Use a simple convention: a zone boundary is the pencil line you drew, and a blend band is the strip within one finger-width of that line on both sides. This convention is explicit so another person can reproduce your result.
- Fill the head zone first, then breast, wing, and tail in any order you prefer.
- Keep strokes parallel within each zone to reduce patchiness.
- Leave the blend band untreated until both adjacent zones are blocked.
- Inspect for gaps and fill them with the same base hue before blending.
Blend only across shared boundaries
Blend where two zones meet by working a small amount of each hue into the blend band. Move the tool in short strokes across the boundary, alternating hues. Stop when the transition looks gradual at arm's length; overblending dulls both colors.
Test blends on a separate strip first. Draw two adjacent squares of the chosen hues, then blend the shared edge using the same convention. Compare the strip to the bird and adjust pressure or stroke count.
- Make a blending strip with two adjacent color squares for each pair of neighboring zones.
- Blend the shared edge in short alternating strokes until the transition is gradual.
- Apply the same stroke count and pressure to the matching boundary on the bird.
- Check at arm's length; if the transition is too abrupt, add one more short pass.
Check contrast and finish
Step back and check that each zone still reads as its own color and that blended edges do not erase the zone structure. Strengthen a zone by adding its base hue rather than a darker unrelated color. Keep the tail and wing distinct if they share a hue by varying stroke direction or value slightly.
Record your palette and blend-band width on the page so the drawing can be repeated. This record is part of the method, not decoration.
- View the drawing at arm's length and confirm four readable zones.
- Re-block any zone that lost its identity during blending.
- Write the palette and blend-band width beside the drawing.
- Erase remaining pencil boundary lines only after the color is settled.
Worked example
A generic bird has four zones: head, breast, wing, tail. Planned hues: head yellow, breast orange, wing blue, tail green. Blend band is one finger-width. Describe the blocking and blending order and a check.
Worked answer
Block head yellow, breast orange, wing blue, and tail green, leaving each one-finger-width blend band untreated. Blend the head-breast boundary with short alternating yellow and orange strokes; blend the breast-wing boundary with orange and blue; blend the wing-tail boundary with blue and green. Do not blend head to wing or breast to tail because they do not share a boundary. Check at arm's length that four zones remain readable and that each blended edge is gradual. Record the palette and band width beside the drawing.
Four practice exercises
Exercise 1
A bird has head red, breast yellow, wing blue, tail green. The blend band is one finger-width. List every shared boundary that should be blended and every boundary that should stay crisp.
Show answer and check
Blend head-breast (red-yellow), breast-wing (yellow-blue), and wing-tail (blue-green). Keep head-wing, head-tail, and breast-tail crisp because those zones do not share a boundary.
Why: Blending is applied only where two zones meet along a shared edge; non-adjacent zones have no shared boundary to blend.
Check: Count the blended boundaries: three. Confirm no non-adjacent pair is listed as blended.
Exercise 2
You plan five hues but two adjacent zones use the same hue. Describe one adjustment that keeps the zones readable without adding a new hue.
Show answer and check
Vary stroke direction or value slightly between the two zones, for example horizontal strokes in one zone and vertical strokes in the other, or a slightly lighter value in one zone. Keep the shared hue and the same blend-band convention.
Why: Zone readability depends on a visible difference; stroke direction or value provides that difference without expanding the palette.
Check: At arm's length, confirm the two zones are distinguishable and the palette count is still five.
Exercise 3
A blending strip shows two adjacent squares, blue and green, blended across a one-finger-width band with six alternating passes. The bird boundary looks more abrupt after four passes. State the next action and the check.
Show answer and check
Add two more short alternating passes to match the strip's six passes, then check at arm's length. If the transition is still abrupt, add one pass at a time and recheck.
Why: The strip sets a reproducible stroke count; matching it reduces inconsistency between test and final drawing.
Check: Compare the bird boundary to the strip at arm's length and confirm the pass count matches or is within one pass.
Exercise 4
After blocking, the wing zone looks patchy and the tail zone lost its identity during blending. Give one fix for each problem using only the planned palette.
Show answer and check
For the patchy wing, re-block gaps with the wing's base hue using parallel strokes. For the tail, re-block its base hue in the center of the zone and reduce blending at its boundary to the planned band width.
Why: Patchiness comes from gaps in flat color, and lost identity comes from overblending; both are corrected by restoring the base hue and limiting the blend band.
Check: Confirm the wing has no visible gaps and the tail reads as its own hue at arm's length; verify the blend band is no wider than one finger-width.
Common mistakes
- Blending every edge, including distant zone boundaries. Blend only where zones share a boundary; leave distant boundaries crisp.
- Using too many hues so zones become muddy. Limit the palette to four to six hues and label each zone before coloring.
- Overblending until both hues look the same. Use the blending strip to set a stroke count, then stop at that count.
- Coloring before zone boundaries are labeled. Label all four zones and their base hues first, then block color.
Self-check rubric
- Four zones are labeled and each has a recorded base hue.
- Palette is limited to four to six hues.
- Blend bands are applied only at shared boundaries.
- Blended edges are gradual at arm's length without erasing zone identity.
- Palette and blend-band width are recorded on the page.
- Valid alternatives are accepted: different hue choices, different zone shapes, and different stroke directions, provided the zone structure and blend convention are followed.
Questions and answers
Do I need a specific bird species?
No. The method uses a generic bird with head, breast, wing, and tail zones; species identification is outside this lesson.
How wide is the blend band?
Use one finger-width on both sides of the boundary as a hypothetical convention; measure your own finger and record the width.
Can adjacent zones share a hue?
Yes. If they share a hue, vary stroke direction or value slightly so the zones remain readable.
What if my blend looks abrupt?
Add one short alternating pass across the boundary, then check at arm's length before adding more.