Free original lessons
Coyote Drawing: Proportions for Head, Legs, and Tail
Learn to construct a coyote from basic shapes, checking head, leg, and tail proportions with simple landmark measurements and a clear drawing convention.
Free lesson
Four exercises
Worked answers
Object Drawing Lessons
This lesson teaches a repeatable way to draw a coyote by building body masses first, then placing the head, legs, and tail against proportion landmarks. The goal is believable structure, not fur detail or cartoon stylization. Use a light pencil for construction lines and a darker pencil for final contours. All measurements below are relative units you choose; keep one unit consistent across the drawing. A useful convention: treat the shoulder height as one vertical unit, then compare other parts to it. Because letter styles and hand pressure vary, judge proportions by landmark positions rather than by exact line weight.
Practice materials: Printable downloads are not available for this lesson yet. Use the instructions and four exercises below.
Reference illustration
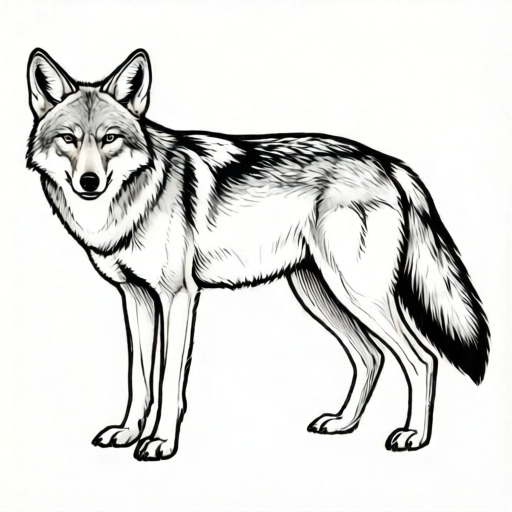
Use the stated measurements and conventions for each exercise.
Build the body masses first
Start with two overlapping ovals: a chest oval and a hip oval. The chest oval is slightly larger and sits higher. Connect them with a gentle back line and a slightly curved belly line. This gives a coyote's lean, low-slung profile without committing to detail.
Place a landmark line for shoulder height and another for hip height. In a standing side view, the shoulder and hip landmarks should be close to level, with the hip only slightly lower. Keep the body length roughly one and a half times the shoulder height as a starting proportion.
- Draw a chest oval about one unit tall and one and a quarter units long.
- Draw a hip oval about three-quarters of a unit tall, overlapping the chest oval slightly.
- Connect the top of the ovals with a shallow back curve.
- Connect the bottom with a belly line that rises slightly toward the hips.
- Mark shoulder height and hip height as horizontal guide lines.
Place the head and neck
The coyote head is narrow and wedge-shaped, not round. Attach a short neck from the front of the chest oval. The head length, from the back of the skull to the nose tip, is about one-third of the shoulder height. The muzzle is roughly half the head length.
Set the eye line slightly above the midpoint of the head. Ears are tall and triangular; each ear height is about half the head length. Keep the ears upright and close together at the base.
- Draw a short neck line from the chest oval to the head position.
- Sketch a wedge for the skull and a narrower wedge for the muzzle.
- Mark the eye line above the head midpoint.
- Add two triangular ears, each about half the head length tall.
- Check that the nose tip sits forward of the chest oval.
Set leg length and spacing
Legs carry much of the coyote's proportion. From the shoulder landmark to the ground, the front leg is about one unit, matching shoulder height. The hind leg is slightly longer in appearance because of the angled hock, but the hip-to-ground distance should stay close to one unit.
Draw the front legs as narrow columns with a slight elbow bend. Draw the hind legs with a clear hock angle. Keep the paws small and compact. Space the front and hind leg pairs so the body does not look stretched or compressed.
- Drop a vertical guide from the shoulder to the ground.
- Draw the front leg as a narrow column with a slight elbow bend.
- Drop a guide from the hip and draw the hind leg with an angled hock.
- Add small paws at ground level.
- Compare leg length to shoulder height; they should be close.
Add the tail and check proportions
The coyote tail is bushy but should not dominate the drawing. Tail length is roughly two-thirds of shoulder height. Attach it at the hip and let it hang with a slight curve. Keep the tail width moderate near the base and fuller toward the tip.
Finish by checking three landmarks: head length against shoulder height, leg length against shoulder height, and tail length against shoulder height. Adjust construction lines before adding final contours.
- Attach the tail at the hip landmark.
- Draw a slight curve downward, about two-thirds of shoulder height long.
- Widen the tail gradually toward the tip.
- Recheck head, leg, and tail lengths against the shoulder-height unit.
- Erase unnecessary guides and darken the final outline.
Worked example
A side-view coyote is drawn with shoulder height 4 cm. The head measures 1.4 cm, the front leg measures 3.8 cm, and the tail measures 2.6 cm. Check the three proportions.
Worked answer
Head target is about one-third of 4 cm, or 1.33 cm; 1.4 cm is close. Leg target is about 4 cm; 3.8 cm is close. Tail target is about two-thirds of 4 cm, or 2.67 cm; 2.6 cm is close. All three are within a small adjustment range.
Four practice exercises
Exercise 1
A side-view coyote has shoulder height 6 cm. The head is drawn 2.4 cm long. Is the head proportion close to the lesson target?
Show answer and check
No, it is too long. The target is about one-third of 6 cm, or 2 cm.
Why: Head length should be near one-third of shoulder height. 2.4 cm is noticeably above 2 cm.
Check: Divide shoulder height by 3 and compare with the head length.
Exercise 2
A coyote drawing has shoulder height 5 cm and front leg length 4.6 cm. Is the leg proportion acceptable?
Show answer and check
Yes, it is close. The target is about 5 cm, and 4.6 cm is a small adjustment away.
Why: Front leg length from shoulder to ground should be close to shoulder height.
Check: Compare the shoulder-to-ground measurement with the shoulder-height unit.
Exercise 3
A tail is drawn 4.5 cm long on a coyote with shoulder height 6 cm. What is the target tail length, and is the drawn tail close?
Show answer and check
Target is about 4 cm. The drawn tail is 0.5 cm too long, so it needs a small adjustment.
Why: Tail length should be near two-thirds of shoulder height. Two-thirds of 6 cm is 4 cm.
Check: Multiply shoulder height by 2 and divide by 3, then compare.
Exercise 4
A head is 3 cm long. The ears are each drawn 1.8 cm tall. Using the lesson rule, what ear height is expected, and is this close?
Show answer and check
Expected ear height is about 1.5 cm. 1.8 cm is slightly tall but close enough for a small adjustment.
Why: Ear height should be about half the head length. Half of 3 cm is 1.5 cm.
Check: Divide head length by 2 and compare with ear height.
Common mistakes
- Making the head too round and large. Use a wedge shape and keep head length near one-third of shoulder height.
- Drawing legs too short, making the coyote look stocky. Compare shoulder-to-ground distance with shoulder height; they should be close.
- Making the tail longer than the body suggests. Keep tail length near two-thirds of shoulder height and attach it at the hip.
- Placing the ears too far apart or too small. Set ears close at the base and about half the head length tall.
Self-check rubric
- Body masses are built from two overlapping ovals with a clear back and belly line.
- Head is wedge-shaped and close to one-third of shoulder height.
- Front and hind legs are close to shoulder height from ground to shoulder or hip.
- Tail is attached at the hip and close to two-thirds of shoulder height.
- Ears are triangular, close at the base, and about half the head length tall.
- Construction lines are light and final contours are clear.
- Valid alternative proportions are accepted if landmark relationships remain consistent.
Questions and answers
Do I need to use exact numbers?
No. The numbers are relative proportions. Choose one unit and keep it consistent, then compare landmarks.
Can I draw a coyote facing forward?
Yes, but this lesson uses a side view because head, leg, and tail proportions are easier to check.
How do I know if my proportions are close?
Check head length, leg length, and tail length against shoulder height using the same unit.
Should I add fur detail?
Not in this lesson. Focus on construction and proportion first; fur rendering is excluded.