Free original lessons
Fox Drawing Base: Head, Tail, and Body Construction
Learn to build a standing fox base using simple shapes: head wedge, curved tail, and boxed body outline. Practice with four self-contained exercises.
Free lesson
Four exercises
Worked answers
Object Drawing Lessons
A fox base is the structural sketch you make before adding detail. This lesson teaches a repeatable construction: a wedge-shaped head with ear triangles, a tail built from a curved centerline, and a body outline assembled from simple boxes. You will use a defined convention for proportions and a rubric that accepts valid stylistic variation. All measurements are hypothetical examples; measure your own paper and tools. The goal is a clear, balanced base you can refine later, not a finished rendering.
Practice materials: Printable downloads are not available for this lesson yet. Use the instructions and four exercises below.
Reference illustration
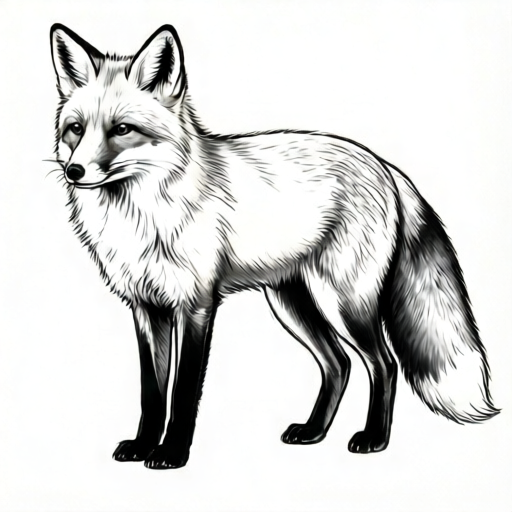
Use the stated measurements and conventions for each exercise.
Head Shape Construction
Begin the head as a downward-pointing wedge. Draw a horizontal line for the top of the skull, then two lines angling down to a narrow muzzle point. The wedge should be wider at the ears and narrower at the nose. Place two triangular ears on the top line, angled slightly outward. The ear triangles should be roughly one-third the height of the head wedge. Mark a vertical centerline through the wedge to keep the muzzle and forehead aligned.
Use a head-height convention: the baseline is the bottom of the head wedge, and the midline is halfway up the wedge. Head shapes vary, so treat these as guide marks, not fixed rules. Check symmetry by folding the paper or measuring from the centerline. If the wedge looks too wide, narrow the muzzle point; if too narrow, widen the top line. Keep the ear triangles attached to the top line, not floating above it.
- Draw a horizontal top line about 4 cm long (hypothetical example).
- From each end, draw lines angling down to a single muzzle point about 3 cm below the top line.
- Add two ear triangles on the top line, each about 1.5 cm tall.
- Draw a vertical centerline from the top line to the muzzle point.
- Check that both sides of the wedge mirror each other within 2 mm.
Tail Curve Guide
The tail is built from a curved centerline, not a single outline. Draw a smooth curve that starts at the rear of the body and sweeps outward and slightly upward. The curve should have one gentle bend, not a sharp angle. Mark three points along the curve: start, midpoint, and tip. The midpoint should be the widest part of the tail. From the centerline, add parallel outlines on both sides, keeping the width consistent at the midpoint and tapering toward the tip.
A common error is making the tail too straight or too thick at the tip. Use the three points to check the curve: the start should connect to the body outline, the midpoint should be the farthest from the body, and the tip should taper to a rounded point. The tail length can vary, but for a standing pose, keep the tip roughly level with the midpoint of the body. Measure the curve with a flexible ruler or a piece of string to confirm smoothness.
- Mark the tail start at the rear of the body outline.
- Draw a curved centerline with one gentle bend, about 6 cm long (hypothetical example).
- Mark the midpoint at the widest part of the curve.
- Add parallel outlines on both sides, tapering toward the tip.
- Check that the tip is rounded and the width at the midpoint is about 2 cm (hypothetical example).
Body Outline Boxes
Build the body from two boxes: a chest box and a hip box. The chest box is slightly larger and sits at the front; the hip box is smaller and sits at the rear. Connect the boxes with a curved line for the back and a straighter line for the belly. The boxes should overlap slightly so the body outline flows without gaps. The legs are simple vertical lines dropping from the bottom corners of each box. Keep the leg lines parallel to the body centerline.
Check the balance by measuring the distance from the chest box to the hip box. The gap should be about half the width of the chest box. If the body looks too long, shorten the gap; if too short, lengthen it. The back curve should be gentle, not a deep arch. The belly line should be nearly straight. Use the box corners as anchor points for the legs, and make sure the front legs align with the chest box and the rear legs with the hip box.
- Draw a chest box about 5 cm wide and 4 cm tall (hypothetical example).
- Draw a hip box about 4 cm wide and 3 cm tall, overlapping the chest box by 1 cm.
- Connect the top corners with a gentle back curve.
- Connect the bottom corners with a nearly straight belly line.
- Add four leg lines from the bottom corners, each about 4 cm long.
Standing Pose Practice Strip
A practice strip is a row of small boxes where you sketch the fox base repeatedly. Divide a strip of paper into four equal sections. In each section, draw the head wedge, tail curve, and body boxes at a smaller scale. The goal is consistency, not detail. Use the same proportions in each section, but vary the tail curve slightly to see how the base adapts. This builds muscle memory for the construction sequence.
Check each sketch against the rubric: head wedge symmetrical, tail curve smooth, body boxes connected, legs aligned. If a sketch fails a check, redraw only that part in the next section. Keep the strip free of fur texture or facial detail; this is a base sketch only. Measure the sections to ensure they are equal, and label each with a number for reference.
- Divide a strip of paper into four equal sections, each about 6 cm wide (hypothetical example).
- In section one, draw the full base at small scale.
- In section two, redraw the base, adjusting the tail curve slightly.
- In section three, redraw the base, checking head symmetry.
- In section four, redraw the base, checking body box alignment.
Worked example
Draw a fox base with a head wedge 4 cm wide at the top and 3 cm tall, a tail curve 6 cm long with a midpoint width of 2 cm, and body boxes 5 cm and 4 cm wide. Check the head symmetry and tail smoothness.
Worked answer
The head wedge is drawn with a 4 cm top line and a muzzle point 3 cm below. The ear triangles are 1.5 cm tall. The tail centerline curves gently from the rear of the body, with the midpoint 2 cm wide and the tip tapered. The chest box is 5 cm wide and the hip box 4 cm wide, overlapping by 1 cm. The back curve connects the top corners, and the belly line connects the bottom corners. Leg lines drop from the bottom corners. Symmetry check: both sides of the head wedge are within 2 mm. Tail check: the curve has one gentle bend and the tip is rounded.
Four practice exercises
Exercise 1
Draw a head wedge with a top line 5 cm long and a muzzle point 4 cm below. Add two ear triangles 2 cm tall. Check symmetry.
Show answer and check
A wedge with a 5 cm top line, a muzzle point 4 cm below, and two 2 cm ear triangles on the top line. Both sides mirror within 2 mm.
Why: The top line sets the width, the muzzle point sets the height, and the ear triangles sit on the top line. Symmetry is checked by measuring from the centerline.
Check: Fold the paper along the centerline or measure the distance from the centerline to each side at three points.
Exercise 2
Draw a tail centerline 7 cm long with one gentle bend. Mark the midpoint at 3 cm from the start. Add parallel outlines tapering to a rounded tip.
Show answer and check
A curved centerline 7 cm long with a midpoint at 3 cm, parallel outlines that are widest at the midpoint and taper to a rounded tip.
Why: The centerline defines the curve, the midpoint marks the widest part, and the outlines taper toward the tip.
Check: Use a string to confirm the curve is smooth and measure the width at the midpoint and tip.
Exercise 3
Draw a chest box 6 cm wide and 5 cm tall, and a hip box 5 cm wide and 4 cm tall, overlapping by 1 cm. Connect the top corners with a back curve and the bottom corners with a belly line.
Show answer and check
Two overlapping boxes with a gentle back curve and a nearly straight belly line connecting the corners.
Why: The boxes provide the body structure, and the connecting lines create a continuous outline.
Check: Measure the overlap and check that the back curve is gentle and the belly line is straight.
Exercise 4
Combine the head, tail, and body into a standing fox base. Use a head wedge 4 cm wide and 3 cm tall, a tail curve 6 cm long, and body boxes 5 cm and 4 cm wide. Check all rubric points.
Show answer and check
A complete base with a symmetrical head wedge, a smooth tail curve, overlapping body boxes, and aligned leg lines.
Why: The construction sequence builds the base from simple shapes, and the rubric checks each part.
Check: Measure head symmetry, tail smoothness, box overlap, and leg alignment against the rubric.
Common mistakes
- Making the head wedge too wide at the muzzle. Narrow the muzzle point and keep the top line wider. Check that the wedge tapers evenly on both sides.
- Drawing the tail as a straight line or with a sharp angle. Use a curved centerline with one gentle bend. Mark the midpoint and taper the outlines smoothly.
- Leaving gaps between the chest box and hip box. Overlap the boxes slightly and connect the corners with continuous lines for the back and belly.
- Placing the legs outside the body boxes. Anchor each leg line to a bottom corner of the chest or hip box, keeping the lines parallel to the centerline.
Self-check rubric
- Head wedge is symmetrical within 2 mm on both sides.
- Ear triangles are attached to the top line and angled outward.
- Tail centerline has one gentle bend and tapers to a rounded tip.
- Chest and hip boxes overlap and connect with continuous back and belly lines.
- Leg lines are anchored to box corners and parallel to the centerline.
- Base sketch contains no fur texture or facial detail.
Questions and answers
Do I need to use exact measurements?
No. The numbers given are hypothetical examples. Measure your own paper and adjust the proportions to fit your sketch.
Can I change the tail curve?
Yes. The rubric accepts any smooth curve with one gentle bend. Vary the curve as long as the tail connects to the body and tapers at the tip.
What is the head-height convention?
It is a guide where the baseline is the bottom of the head wedge and the midline is halfway up. Head shapes vary, so use it as a reference, not a strict rule.
How do I check my base sketch?
Use the rubric: head symmetry, tail smoothness, body box connection, and leg alignment. Measure key distances with a ruler or string.